HP LaserJet 5si HP LaserJet 5Si user guide - Page 115
Cleaning the Printer
 |
View all HP LaserJet 5si manuals
Add to My Manuals
Save this manual to your list of manuals |
Page 115 highlights
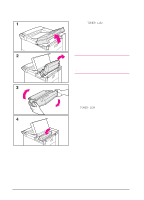
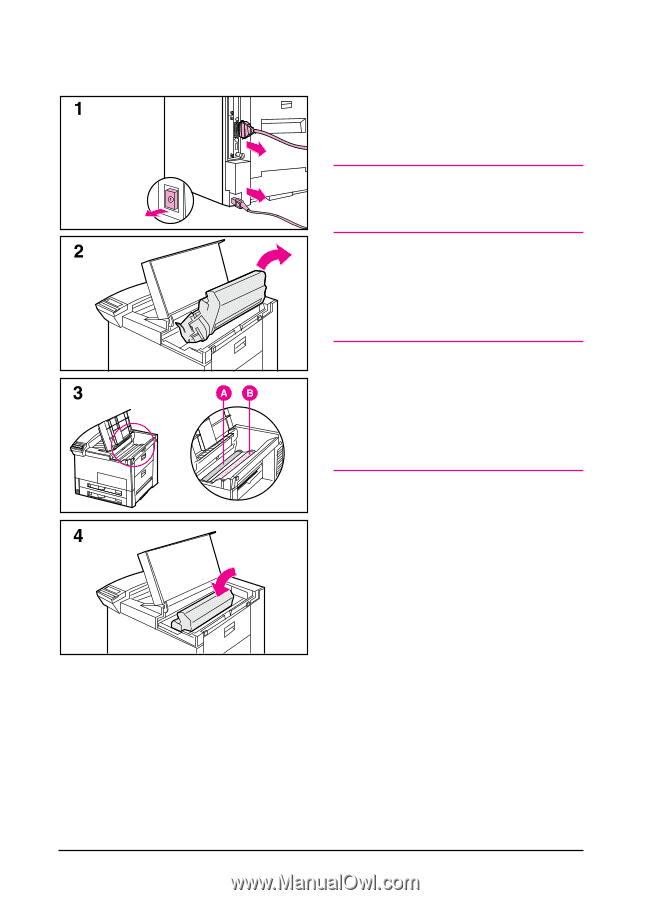
Cleaning the Printer 1 Before you begin these steps, turn the printer OFF and unplug all cords. 2 Open the top cover of the printer and remove the toner cartridge. WARNING Avoid touching the adjacent fusing area in the left door. It may be HOT. 3 With a dry lint-free cloth, wipe any residue from the paper path area, the registration roller (B), and the toner cartridge cavity. CAUTION Do not touch the transfer roller (A). Skin oils on the roller can reduce print quality. If toner gets on your clothes, wipe it off with a dry cloth and wash your clothes in cold water. Hot water sets toner into fabric. 4 Replace the toner cartridge, close the printer, reconnect all cables, and switch the printer ON. 7-2 Maintenance and Troubleshooting EN
-
 1
1 -
2
-
3
-
4
-
5
-
6
-
7
-
8
-
9
-
10
-
11
-
12
-
13
-
14
-
15
-
16
-
17
-
18
-
19
-
20
-
21
-
22
-
23
-
24
-
25
-
26
-
27
-
28
-
29
-
30
-
31
-
32
-
33
-
34
-
35
-
36
-
37
-
38
-
39
-
40
-
41
-
42
-
43
-
44
-
45
-
46
-
47
-
48
-
49
-
50
-
51
-
52
-
53
-
54
-
55
-
56
-
57
-
58
-
59
-
60
-
61
-
62
-
63
-
64
-
65
-
66
-
67
-
68
-
69
-
70
-
71
-
72
-
73
-
74
-
75
-
76
-
77
-
78
-
79
-
80
-
81
-
82
-
83
-
84
-
85
-
86
-
87
-
88
-
89
-
90
-
91
-
92
-
93
-
94
-
95
-
96
-
97
-
98
-
99
-
100
-
101
-
102
-
103
-
104
-
105
-
106
-
107
-
108
-
109
-
 110
110 -
 111
111 -
 112
112 -
 113
113 -
 114
114 -
 115
115 -
 116
116 -
 117
117 -
 118
118 -
 119
119 -
 120
120 -
121
-
122
-
123
-
124
-
125
-
126
-
127
-
128
-
129
-
130
-
131
-
132
-
133
-
134
-
135
-
136
-
137
-
138
-
139
-
140
-
141
-
142
-
143
-
144
-
145
-
146
-
147
-
148
-
149
-
150
-
151
-
152
-
153
-
154
-
155
-
156
-
157
-
158
-
159
-
160
-
161
-
162
-
163
-
164
-
165
-
166
-
167
-
168
-
169
-
170
-
171
-
172
-
173
-
174
-
175
-
176
-
177
-
178
-
179
-
180
-
181
-
182
-
183
-
184
-
185
-
186
-
187
-
188
-
189
-
190
-
191
-
192
-
193
-
194
-
195
-
196
-
197
-
198
-
199
-
200
-
201
-
202
-
203
 |
 |
Cleaning the Printer
1
Before you begin these steps
, turn the
printer OFF and unplug all cords.
2
Open the top cover of the printer and
remove the toner cartridge.
WARNING
Avoid touching the adjacent fusing
area in the left door. It may be HOT.
3
With a
dry
lint-free cloth, wipe any
residue from the paper path area, the
registration roller (B), and the toner
cartridge cavity.
CAUTION
Do not touch the transfer roller (A). Skin
oils on the roller can reduce print quality.
If toner gets on your clothes, wipe it off
with a dry cloth and wash your clothes in
cold
water. Hot water sets toner into
fabric.
4
Replace the toner cartridge, close the
printer, reconnect all cables, and switch
the printer ON.
7-2
Maintenance and Troubleshooting
EN