HP LaserJet 5si HP LaserJet 5Si user guide - Page 142
Clearing the Front Door Duplex Area
 |
View all HP LaserJet 5si manuals
Add to My Manuals
Save this manual to your list of manuals |
Page 142 highlights
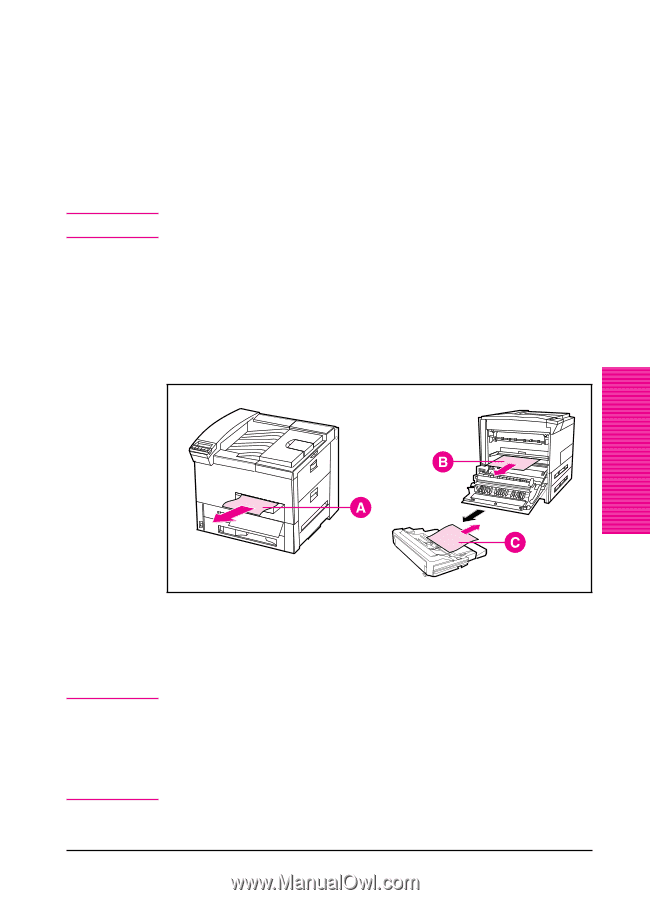
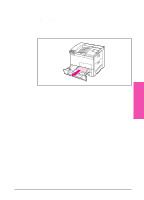
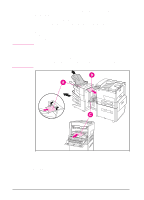
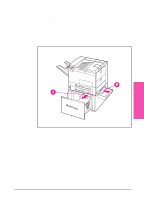
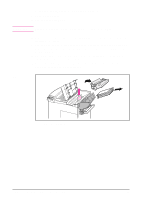
Clearing the Front Door (Duplex Area) 1 Open the front door. 2 Check for paper jammed in this area. 3 Remove any paper by pulling it in the direction shown by the arrow (A) in Figure 7-6. Be careful not to tear the page. 4 If you cannot remove all the paper from the front door, open the left door and carefully pull out any jammed paper (B). If a mailbox accessory is installed, push it away from the printer to access the left door. W A R N I N G Avoid touching the adjacent fusing area. It may be HOT. Figure 7-6 5 If a Duplex Unit is installed, remove the Duplex Unit (C) by pressing the colored tab on the lower right side of the unit and pulling the entire unit out of its slot. 6 Remove any paper remaining in the Duplex Unit (C). 7 Reinstall the Duplex Unit by sliding it back into the slot until it clicks into place and close all open doors. 8 Push the mailbox accessory back into place, if one is installed. Maintenance & 7 Troubleshooting Front Door (Duplex Area) A. Front door jam B. Left door jam C. Duplex Unit removed Note After removing a sheet of paper, you may need to check other areas to ensure that all paper has been removed. Whenever a sheet of jammed paper becomes badly shredded, it is a good idea to carefully piece all parts together to be sure you haven't overlooked some small part. All portions of a jammed piece of paper must be removed, or you may run into repeated jams. EN Maintenance and Troubleshooting 7-29
-
 1
1 -
2
-
3
-
4
-
5
-
6
-
7
-
8
-
9
-
10
-
11
-
12
-
13
-
14
-
15
-
16
-
17
-
18
-
19
-
20
-
21
-
22
-
23
-
24
-
25
-
26
-
27
-
28
-
29
-
30
-
31
-
32
-
33
-
34
-
35
-
36
-
37
-
38
-
39
-
40
-
41
-
42
-
43
-
44
-
45
-
46
-
47
-
48
-
49
-
50
-
51
-
52
-
53
-
54
-
55
-
56
-
57
-
58
-
59
-
60
-
61
-
62
-
63
-
64
-
65
-
66
-
67
-
68
-
69
-
70
-
71
-
72
-
73
-
74
-
75
-
76
-
77
-
78
-
79
-
80
-
81
-
82
-
83
-
84
-
85
-
86
-
87
-
88
-
89
-
90
-
91
-
92
-
93
-
94
-
95
-
96
-
97
-
98
-
99
-
100
-
101
-
102
-
103
-
104
-
105
-
106
-
107
-
108
-
109
-
110
-
111
-
112
-
113
-
114
-
115
-
116
-
117
-
118
-
119
-
120
-
121
-
122
-
123
-
124
-
125
-
126
-
127
-
128
-
129
-
130
-
131
-
132
-
133
-
134
-
135
-
136
-
 137
137 -
 138
138 -
 139
139 -
 140
140 -
 141
141 -
 142
142 -
 143
143 -
 144
144 -
 145
145 -
 146
146 -
 147
147 -
148
-
149
-
150
-
151
-
152
-
153
-
154
-
155
-
156
-
157
-
158
-
159
-
160
-
161
-
162
-
163
-
164
-
165
-
166
-
167
-
168
-
169
-
170
-
171
-
172
-
173
-
174
-
175
-
176
-
177
-
178
-
179
-
180
-
181
-
182
-
183
-
184
-
185
-
186
-
187
-
188
-
189
-
190
-
191
-
192
-
193
-
194
-
195
-
196
-
197
-
198
-
199
-
200
-
201
-
202
-
203
 |
 |