HP LaserJet 5si HP LaserJet 5Si user guide - Page 48
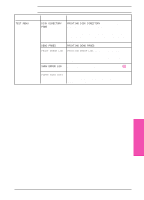
Changing Paper Type from the Control Panel
 |
View all HP LaserJet 5si manuals
Add to My Manuals
Save this manual to your list of manuals |
Page 48 highlights
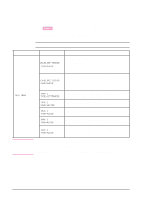
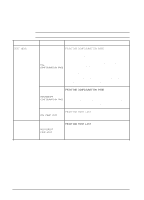
Changing Paper Type from the Control Panel 1 Press [Menus] repeatedly until TRAY MENU appears. 2 Press [Items] repeatedly to scroll through the trays and their types. 3 Press [+] repeatedly to scroll through the paper type or size options. 4 Press [Select *] to save your choice. Selecting media by type rather than source is similar to locking out the tray(s), which is a feature of previous HP LaserJet printers. If letterhead is loaded in Tray 1, and print on plain paper is selected in the driver, the printer will not pull the letterhead paper from Tray 1. However, the printer will pull from either of the other trays if plain paper is loaded, and has been set on the printer control panel. Table 4-6 Job Control Menu The Job Control Menu is used to cancel a current job or to eject data that has been sent to the printer. The CANCEL JOB option will cancel the job from the control panel. The FORMFEED option is useful when the data light is on, but nothing is printing out. This situation occurs when the application has not told the printer that it has finished sending data. This commonly occurs when printing from DOS. Table 4-6 presents the messages that appear after selecting each menu item. Job Control Menu Menu JOB CONTROL MENU Item CANCEL JOB PRESS SELECT TO FORMFEED Explanation Press [Select *]. STOPPING CHECK LAST PAGE appears until the last page currently being printed is placed in the output bin. PRESS SELECT TO CANCEL JOB is displayed. If you press [Select *] again, CANCELING JOB appears until the entire print job is removed or deleted. To ignore job cancellation, press [On Line]. FORMFEEDING is displayed. The online indicator flashes until the page is delivered to the output bin. Printer Control 4 Panel EN Printer Control Panel 4-9
-
 1
1 -
2
-
3
-
4
-
5
-
6
-
7
-
8
-
9
-
10
-
11
-
12
-
13
-
14
-
15
-
16
-
17
-
18
-
19
-
20
-
21
-
22
-
23
-
24
-
25
-
26
-
27
-
28
-
29
-
30
-
31
-
32
-
33
-
34
-
35
-
36
-
37
-
38
-
39
-
40
-
41
-
42
-
 43
43 -
 44
44 -
 45
45 -
 46
46 -
 47
47 -
 48
48 -
 49
49 -
 50
50 -
 51
51 -
 52
52 -
 53
53 -
54
-
55
-
56
-
57
-
58
-
59
-
60
-
61
-
62
-
63
-
64
-
65
-
66
-
67
-
68
-
69
-
70
-
71
-
72
-
73
-
74
-
75
-
76
-
77
-
78
-
79
-
80
-
81
-
82
-
83
-
84
-
85
-
86
-
87
-
88
-
89
-
90
-
91
-
92
-
93
-
94
-
95
-
96
-
97
-
98
-
99
-
100
-
101
-
102
-
103
-
104
-
105
-
106
-
107
-
108
-
109
-
110
-
111
-
112
-
113
-
114
-
115
-
116
-
117
-
118
-
119
-
120
-
121
-
122
-
123
-
124
-
125
-
126
-
127
-
128
-
129
-
130
-
131
-
132
-
133
-
134
-
135
-
136
-
137
-
138
-
139
-
140
-
141
-
142
-
143
-
144
-
145
-
146
-
147
-
148
-
149
-
150
-
151
-
152
-
153
-
154
-
155
-
156
-
157
-
158
-
159
-
160
-
161
-
162
-
163
-
164
-
165
-
166
-
167
-
168
-
169
-
170
-
171
-
172
-
173
-
174
-
175
-
176
-
177
-
178
-
179
-
180
-
181
-
182
-
183
-
184
-
185
-
186
-
187
-
188
-
189
-
190
-
191
-
192
-
193
-
194
-
195
-
196
-
197
-
198
-
199
-
200
-
201
-
202
-
203
 |
 |
