HP LaserJet 5si HP LaserJet 5Si user guide - Page 79
into the printer. - tray 3 not lifting
 |
View all HP LaserJet 5si manuals
Add to My Manuals
Save this manual to your list of manuals |
Page 79 highlights
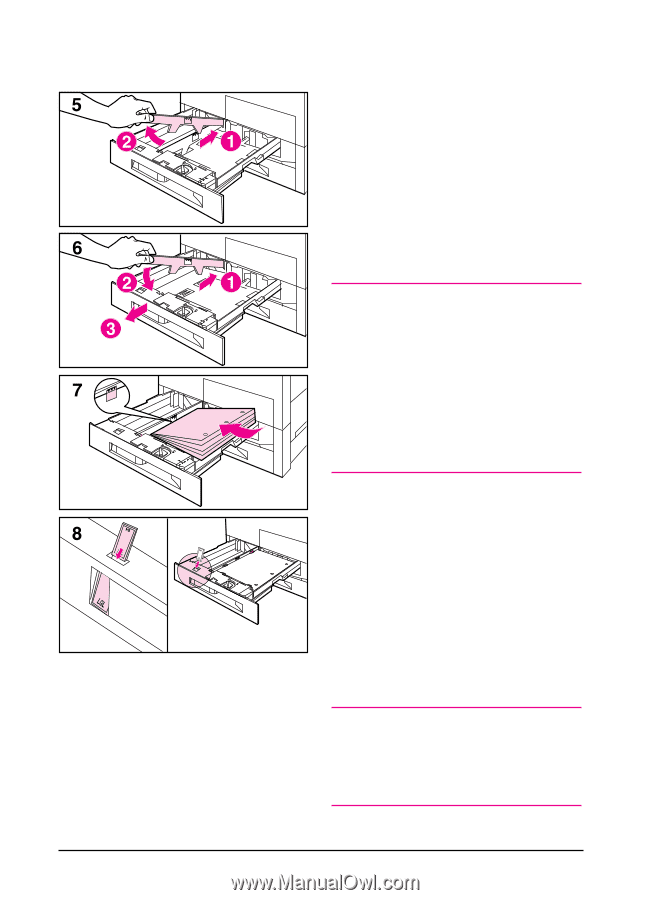
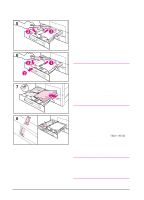
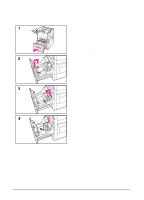
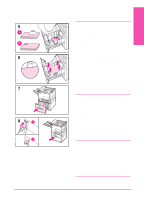
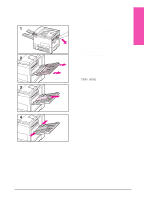
5-12 Print Tasks 5 Adjust the left paper guide by pushing in (1), then lifting up and out (2). 6 Position the guide over the appropriate lines marked in the tray. Press the guide into the rear slot (1) and then lower down (2) into the front slot (3). Be sure the guide is not skewed. 7 Place paper into the tray without stacking it above the paperfill mark. Fewer than 100 sheets of paper may not lay flat (from rear to front). Note For single-sided printing place paper into the tray with side-to-be-printed down. Letterhead should orient to the rear of the tray. Load 3-hole paper with holes on your right. For two-sided printing place paper with the front side (odd-numbered) up. Letterhead should be oriented to the rear of the tray. Load 3-hole paper with holes on your left. 8 Ensure that the paper size tab is set correctly. Then slide the tray back into the printer. 9 If you wish to select your paper by type rather than tray (source) in your software, set the correct paper type for Trays 2 and 3 in the TRAY MENU on the printer control panel. Adjust the paper stop guide on the Top Output Bin for the paper sizes larger than Letter or A4 (see Figure 5-4). Note If paper curls or skews excessively during printing, open the tray and turn the stack of paper over. To avoid a paper jam, never open the tray while it is in use. EN
-
 1
1 -
2
-
3
-
4
-
5
-
6
-
7
-
8
-
9
-
10
-
11
-
12
-
13
-
14
-
15
-
16
-
17
-
18
-
19
-
20
-
21
-
22
-
23
-
24
-
25
-
26
-
27
-
28
-
29
-
30
-
31
-
32
-
33
-
34
-
35
-
36
-
37
-
38
-
39
-
40
-
41
-
42
-
43
-
44
-
45
-
46
-
47
-
48
-
49
-
50
-
51
-
52
-
53
-
54
-
55
-
56
-
57
-
58
-
59
-
60
-
61
-
62
-
63
-
64
-
65
-
66
-
67
-
68
-
69
-
70
-
71
-
72
-
73
-
 74
74 -
 75
75 -
 76
76 -
 77
77 -
 78
78 -
 79
79 -
 80
80 -
 81
81 -
 82
82 -
 83
83 -
 84
84 -
85
-
86
-
87
-
88
-
89
-
90
-
91
-
92
-
93
-
94
-
95
-
96
-
97
-
98
-
99
-
100
-
101
-
102
-
103
-
104
-
105
-
106
-
107
-
108
-
109
-
110
-
111
-
112
-
113
-
114
-
115
-
116
-
117
-
118
-
119
-
120
-
121
-
122
-
123
-
124
-
125
-
126
-
127
-
128
-
129
-
130
-
131
-
132
-
133
-
134
-
135
-
136
-
137
-
138
-
139
-
140
-
141
-
142
-
143
-
144
-
145
-
146
-
147
-
148
-
149
-
150
-
151
-
152
-
153
-
154
-
155
-
156
-
157
-
158
-
159
-
160
-
161
-
162
-
163
-
164
-
165
-
166
-
167
-
168
-
169
-
170
-
171
-
172
-
173
-
174
-
175
-
176
-
177
-
178
-
179
-
180
-
181
-
182
-
183
-
184
-
185
-
186
-
187
-
188
-
189
-
190
-
191
-
192
-
193
-
194
-
195
-
196
-
197
-
198
-
199
-
200
-
201
-
202
-
203
 |
 |