HP LaserJet 5si HP LaserJet 5Si user guide - Page 147
Clearing the Optional Envelope Feeder
 |
View all HP LaserJet 5si manuals
Add to My Manuals
Save this manual to your list of manuals |
Page 147 highlights
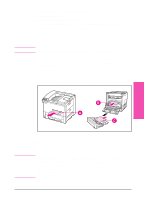
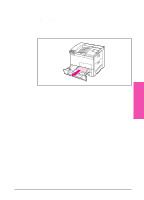
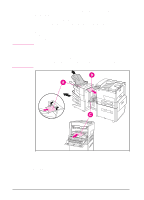
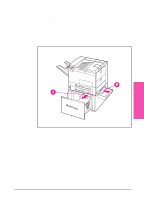
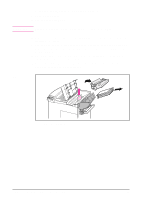
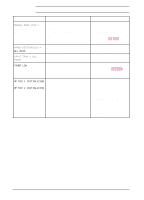
Clearing the Optional Envelope Feeder 1 Open the top cover. 2 Remove toner cartridge. W A R N I N G Avoid touching the adjacent fusing area. It may be HOT. 3 Remove envelopes in this area by pulling them in the direction shown by the arrow in Figure 7-11. 4 Remove any and all pieces of torn paper. Carefully check to be sure you have removed all scraps. Lift both green user tabs to clear any jams that may be hidden. 5 You may need to remove the optional Envelope Feeder to release any jammed envelopes or scraps of paper. 6 After removing all pieces of the envelope or paper, replace the optional Envelope Feeder and toner cartridge. Figure 7-11 Optional Envelope Feeder 7-34 Maintenance and Troubleshooting EN
-
 1
1 -
2
-
3
-
4
-
5
-
6
-
7
-
8
-
9
-
10
-
11
-
12
-
13
-
14
-
15
-
16
-
17
-
18
-
19
-
20
-
21
-
22
-
23
-
24
-
25
-
26
-
27
-
28
-
29
-
30
-
31
-
32
-
33
-
34
-
35
-
36
-
37
-
38
-
39
-
40
-
41
-
42
-
43
-
44
-
45
-
46
-
47
-
48
-
49
-
50
-
51
-
52
-
53
-
54
-
55
-
56
-
57
-
58
-
59
-
60
-
61
-
62
-
63
-
64
-
65
-
66
-
67
-
68
-
69
-
70
-
71
-
72
-
73
-
74
-
75
-
76
-
77
-
78
-
79
-
80
-
81
-
82
-
83
-
84
-
85
-
86
-
87
-
88
-
89
-
90
-
91
-
92
-
93
-
94
-
95
-
96
-
97
-
98
-
99
-
100
-
101
-
102
-
103
-
104
-
105
-
106
-
107
-
108
-
109
-
110
-
111
-
112
-
113
-
114
-
115
-
116
-
117
-
118
-
119
-
120
-
121
-
122
-
123
-
124
-
125
-
126
-
127
-
128
-
129
-
130
-
131
-
132
-
133
-
134
-
135
-
136
-
137
-
138
-
139
-
140
-
141
-
 142
142 -
 143
143 -
 144
144 -
 145
145 -
 146
146 -
 147
147 -
 148
148 -
 149
149 -
 150
150 -
 151
151 -
 152
152 -
153
-
154
-
155
-
156
-
157
-
158
-
159
-
160
-
161
-
162
-
163
-
164
-
165
-
166
-
167
-
168
-
169
-
170
-
171
-
172
-
173
-
174
-
175
-
176
-
177
-
178
-
179
-
180
-
181
-
182
-
183
-
184
-
185
-
186
-
187
-
188
-
189
-
190
-
191
-
192
-
193
-
194
-
195
-
196
-
197
-
198
-
199
-
200
-
201
-
202
-
203
 |
 |

Clearing the Optional Envelope Feeder
1
Open the top cover.
2
Remove toner cartridge.
WARNING
Avoid touching the adjacent fusing area. It may be HOT.
3
Remove envelopes in this area by pulling them in the direction shown by
the arrow in Figure 7-11.
4
Remove any and all pieces of torn paper. Carefully check to be sure you
have removed all scraps. Lift both green user tabs to clear any jams that
may be hidden.
5
You may need to remove the optional Envelope Feeder to release any
jammed envelopes or scraps of paper.
6
After removing all pieces of the envelope or paper, replace the optional
Envelope Feeder and toner cartridge.
Optional Envelope Feeder
Figure 7-11
7-34
Maintenance and Troubleshooting
EN