HP LaserJet 5si HP LaserJet 5Si user guide - Page 120
Clearing Staple Jams
 |
View all HP LaserJet 5si manuals
Add to My Manuals
Save this manual to your list of manuals |
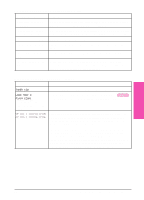
Page 120 highlights
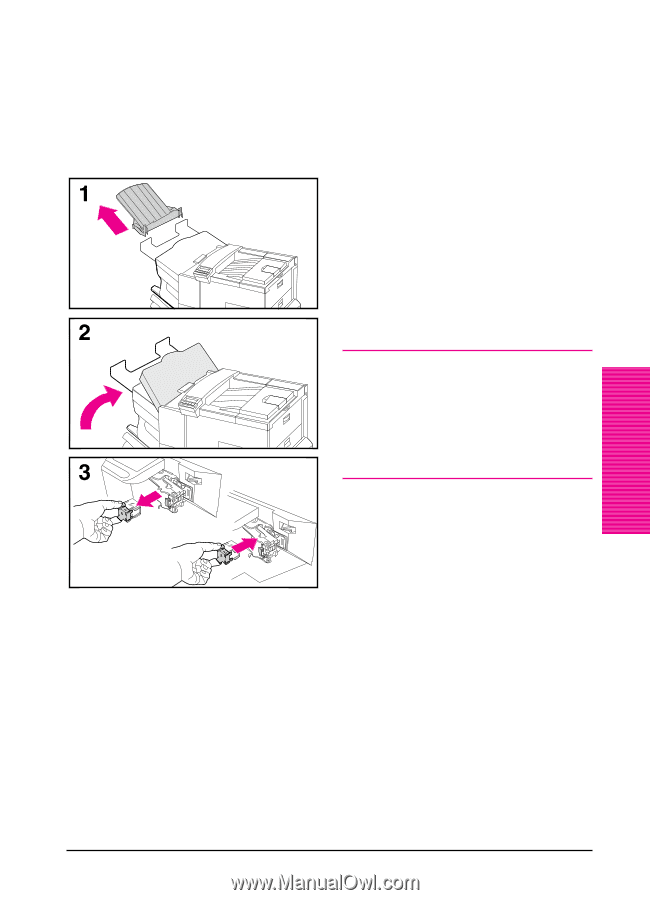
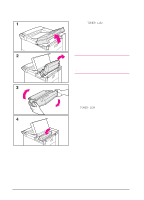
Clearing Staple Jams 1 Turn off the printer and remove the Left Output Bin. 2 Open the stapler unit cover. 3 Press the colored tab with your thumb and pull the colored circular tab with your forefinger to open the stapler. 4 Remove loose or damaged staples from the stapler head. 5 Push the circular tab to snap it back into place. 6 Close the stapler unit cover and replace the Left Output Bin. 7 Clear all paper paths that may have jammed as a result of the jammed staples. Note After clearing a stapler jam, up to 12 documents may not be stapled when printing resumes because the stapler must reload. Once the unit begins stapling again, either manually staple the unstapled documents or resend the job. Maintenance & 7 Troubleshooting EN Maintenance and Troubleshooting 7-7
-
 1
1 -
2
-
3
-
4
-
5
-
6
-
7
-
8
-
9
-
10
-
11
-
12
-
13
-
14
-
15
-
16
-
17
-
18
-
19
-
20
-
21
-
22
-
23
-
24
-
25
-
26
-
27
-
28
-
29
-
30
-
31
-
32
-
33
-
34
-
35
-
36
-
37
-
38
-
39
-
40
-
41
-
42
-
43
-
44
-
45
-
46
-
47
-
48
-
49
-
50
-
51
-
52
-
53
-
54
-
55
-
56
-
57
-
58
-
59
-
60
-
61
-
62
-
63
-
64
-
65
-
66
-
67
-
68
-
69
-
70
-
71
-
72
-
73
-
74
-
75
-
76
-
77
-
78
-
79
-
80
-
81
-
82
-
83
-
84
-
85
-
86
-
87
-
88
-
89
-
90
-
91
-
92
-
93
-
94
-
95
-
96
-
97
-
98
-
99
-
100
-
101
-
102
-
103
-
104
-
105
-
106
-
107
-
108
-
109
-
110
-
111
-
112
-
113
-
114
-
 115
115 -
 116
116 -
 117
117 -
 118
118 -
 119
119 -
 120
120 -
 121
121 -
 122
122 -
 123
123 -
 124
124 -
 125
125 -
126
-
127
-
128
-
129
-
130
-
131
-
132
-
133
-
134
-
135
-
136
-
137
-
138
-
139
-
140
-
141
-
142
-
143
-
144
-
145
-
146
-
147
-
148
-
149
-
150
-
151
-
152
-
153
-
154
-
155
-
156
-
157
-
158
-
159
-
160
-
161
-
162
-
163
-
164
-
165
-
166
-
167
-
168
-
169
-
170
-
171
-
172
-
173
-
174
-
175
-
176
-
177
-
178
-
179
-
180
-
181
-
182
-
183
-
184
-
185
-
186
-
187
-
188
-
189
-
190
-
191
-
192
-
193
-
194
-
195
-
196
-
197
-
198
-
199
-
200
-
201
-
202
-
203
 |
 |