Samsung SGH-T759 User Manual (user Manual) (ver.f4) (English) - Page 85
Contacts, Accounts, Settings, Accounts and sync, Applications, General sync settings
 |
View all Samsung SGH-T759 manuals
Add to My Manuals
Save this manual to your list of manuals |
Page 85 highlights
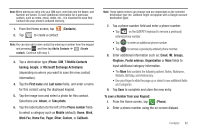
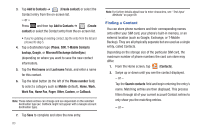
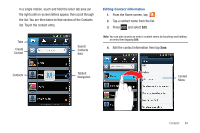
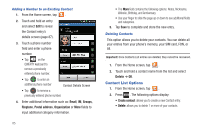
Section 6: Contacts This section explains how to use and manage your Contacts List. You can save phone numbers to your phone's memory. Accounts From the Accounts menu you decide if you want applications to synchronize, send, and receive data at any given time, or if you want the applications to synchronize automatically. After determining how you want the accounts to synchronize, indicate which account to synchronize with your Contacts list. 1. Sign in to your Google account. 2. Press ➔ and then tap Accounts and sync. - or - (Settings) ➔ From the Home screen, tap (Applications) ➔ (Settings) ➔ Accounts and sync. 3. From the General sync settings section, touch one of the following options: • Background data: allows your phone to use data in the background. • Auto-sync: automatically synchronizes your data with the phone. 4. From the Manage accounts area, tap account you want to synchronize. - or - next to the Tap Add account to create a new account. 5. Tap an account type to add. 6. Follow the on-screen instructions. The selected account type synchronizes with your Contacts list. Contacts 80
-
 1
1 -
2
-
3
-
4
-
5
-
6
-
7
-
8
-
9
-
10
-
11
-
12
-
13
-
14
-
15
-
16
-
17
-
18
-
19
-
20
-
21
-
22
-
23
-
24
-
25
-
26
-
27
-
28
-
29
-
30
-
31
-
32
-
33
-
34
-
35
-
36
-
37
-
38
-
39
-
40
-
41
-
42
-
43
-
44
-
45
-
46
-
47
-
48
-
49
-
50
-
51
-
52
-
53
-
54
-
55
-
56
-
57
-
58
-
59
-
60
-
61
-
62
-
63
-
64
-
65
-
66
-
67
-
68
-
69
-
70
-
71
-
72
-
73
-
74
-
75
-
76
-
77
-
78
-
79
-
 80
80 -
 81
81 -
 82
82 -
 83
83 -
 84
84 -
 85
85 -
 86
86 -
 87
87 -
 88
88 -
 89
89 -
 90
90 -
91
-
92
-
93
-
94
-
95
-
96
-
97
-
98
-
99
-
100
-
101
-
102
-
103
-
104
-
105
-
106
-
107
-
108
-
109
-
110
-
111
-
112
-
113
-
114
-
115
-
116
-
117
-
118
-
119
-
120
-
121
-
122
-
123
-
124
-
125
-
126
-
127
-
128
-
129
-
130
-
131
-
132
-
133
-
134
-
135
-
136
-
137
-
138
-
139
-
140
-
141
-
142
-
143
-
144
-
145
-
146
-
147
-
148
-
149
-
150
-
151
-
152
-
153
-
154
-
155
-
156
-
157
-
158
-
159
-
160
-
161
-
162
-
163
-
164
-
165
-
166
-
167
-
168
-
169
-
170
-
171
-
172
-
173
-
174
-
175
-
176
-
177
-
178
-
179
-
180
-
181
-
182
-
183
-
184
-
185
-
186
-
187
-
188
-
189
-
190
-
191
-
192
-
193
-
194
-
195
-
196
-
197
-
198
-
199
-
200
-
201
-
202
-
203
-
204
-
205
-
206
-
207
-
208
-
209
-
210
-
211
-
212
-
213
-
214
-
215
-
216
-
217
-
218
-
219
-
220
-
221
-
222
-
223
-
224
-
225
-
226
-
227
-
228
-
229
-
230
-
231
-
232
-
233
-
234
-
235
-
236
-
237
-
238
-
239
-
240
-
241
-
242
-
243
-
244
-
245
-
246
-
247
-
248
-
249
-
250
-
251
-
252
-
253
-
254
-
255
-
256
-
257
-
258
-
259
 |
 |