Samsung SGH-T759 User Manual (user Manual) (ver.f4) (English) - Page 95
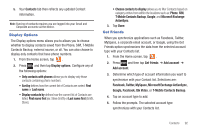
Copying Contact Information
 |
View all Samsung SGH-T759 manuals
Add to My Manuals
Save this manual to your list of manuals |
Page 95 highlights
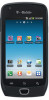
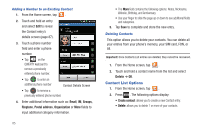
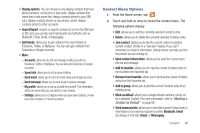
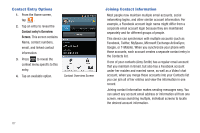
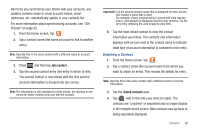
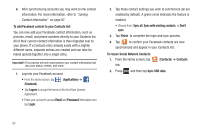
3. Tap Select all to place a check mark alongside all currently displayed Contact entries. 4. Tap Send and select a delivery method: • Bluetooth to transmit this contact to another bluetooth-compatible device. • Email to attach the contact card to a new outgoing email (Exchange or Internet). • Gmail to attach the contact card to a new outgoing Internet-based email. • Messaging to attach the contact card to a new outgoing text message. Sending a namecard using Bluetooth You must create a Contact prior to sending a namecard to a recipient. For more information, refer to "Creating a Contact" on page 81. 1. From the Home screen, tap . 2. Touch and hold the entry to reveal the on-screen context menu. 3. Tap Send namecard via ➔ Bluetooth. Important!: You must activate Bluetooth to use this feature. 4. Tap the Bluetooth device in which to send this name card. Bluetooth forwards the namecard to the recipient. Copying Contact Information Copying Contact Information to the SIM Card The default storage location for saving phone numbers to your Contacts list is your phone's built-in memory. This procedure allows you to copy numbers saved to the phone's memory, onto the SIM card. 1. From the Home screen, tap . 2. From the Contacts List, press and then tap Import/Export ➔ Export to SIM card. 3. Tap Select all to choose all current phone contact entries. - or - Select a specific entry by touching an entry. A check mark indicates a selection. 4. Tap Export. The name and phone number for the selected contact is then copied to the SIM. Contacts 90
-
 1
1 -
2
-
3
-
4
-
5
-
6
-
7
-
8
-
9
-
10
-
11
-
12
-
13
-
14
-
15
-
16
-
17
-
18
-
19
-
20
-
21
-
22
-
23
-
24
-
25
-
26
-
27
-
28
-
29
-
30
-
31
-
32
-
33
-
34
-
35
-
36
-
37
-
38
-
39
-
40
-
41
-
42
-
43
-
44
-
45
-
46
-
47
-
48
-
49
-
50
-
51
-
52
-
53
-
54
-
55
-
56
-
57
-
58
-
59
-
60
-
61
-
62
-
63
-
64
-
65
-
66
-
67
-
68
-
69
-
70
-
71
-
72
-
73
-
74
-
75
-
76
-
77
-
78
-
79
-
80
-
81
-
82
-
83
-
84
-
85
-
86
-
87
-
88
-
89
-
 90
90 -
 91
91 -
 92
92 -
 93
93 -
 94
94 -
 95
95 -
 96
96 -
 97
97 -
 98
98 -
 99
99 -
 100
100 -
101
-
102
-
103
-
104
-
105
-
106
-
107
-
108
-
109
-
110
-
111
-
112
-
113
-
114
-
115
-
116
-
117
-
118
-
119
-
120
-
121
-
122
-
123
-
124
-
125
-
126
-
127
-
128
-
129
-
130
-
131
-
132
-
133
-
134
-
135
-
136
-
137
-
138
-
139
-
140
-
141
-
142
-
143
-
144
-
145
-
146
-
147
-
148
-
149
-
150
-
151
-
152
-
153
-
154
-
155
-
156
-
157
-
158
-
159
-
160
-
161
-
162
-
163
-
164
-
165
-
166
-
167
-
168
-
169
-
170
-
171
-
172
-
173
-
174
-
175
-
176
-
177
-
178
-
179
-
180
-
181
-
182
-
183
-
184
-
185
-
186
-
187
-
188
-
189
-
190
-
191
-
192
-
193
-
194
-
195
-
196
-
197
-
198
-
199
-
200
-
201
-
202
-
203
-
204
-
205
-
206
-
207
-
208
-
209
-
210
-
211
-
212
-
213
-
214
-
215
-
216
-
217
-
218
-
219
-
220
-
221
-
222
-
223
-
224
-
225
-
226
-
227
-
228
-
229
-
230
-
231
-
232
-
233
-
234
-
235
-
236
-
237
-
238
-
239
-
240
-
241
-
242
-
243
-
244
-
245
-
246
-
247
-
248
-
249
-
250
-
251
-
252
-
253
-
254
-
255
-
256
-
257
-
258
-
259
 |
 |
