Cisco RV042 User Guide - Page 76
Configuration of Scenario 2, Configuration of the One-to-One NAT Rules
 |
UPC - 745883560530
View all Cisco RV042 manuals
Add to My Manuals
Save this manual to your list of manuals |
Page 76 highlights
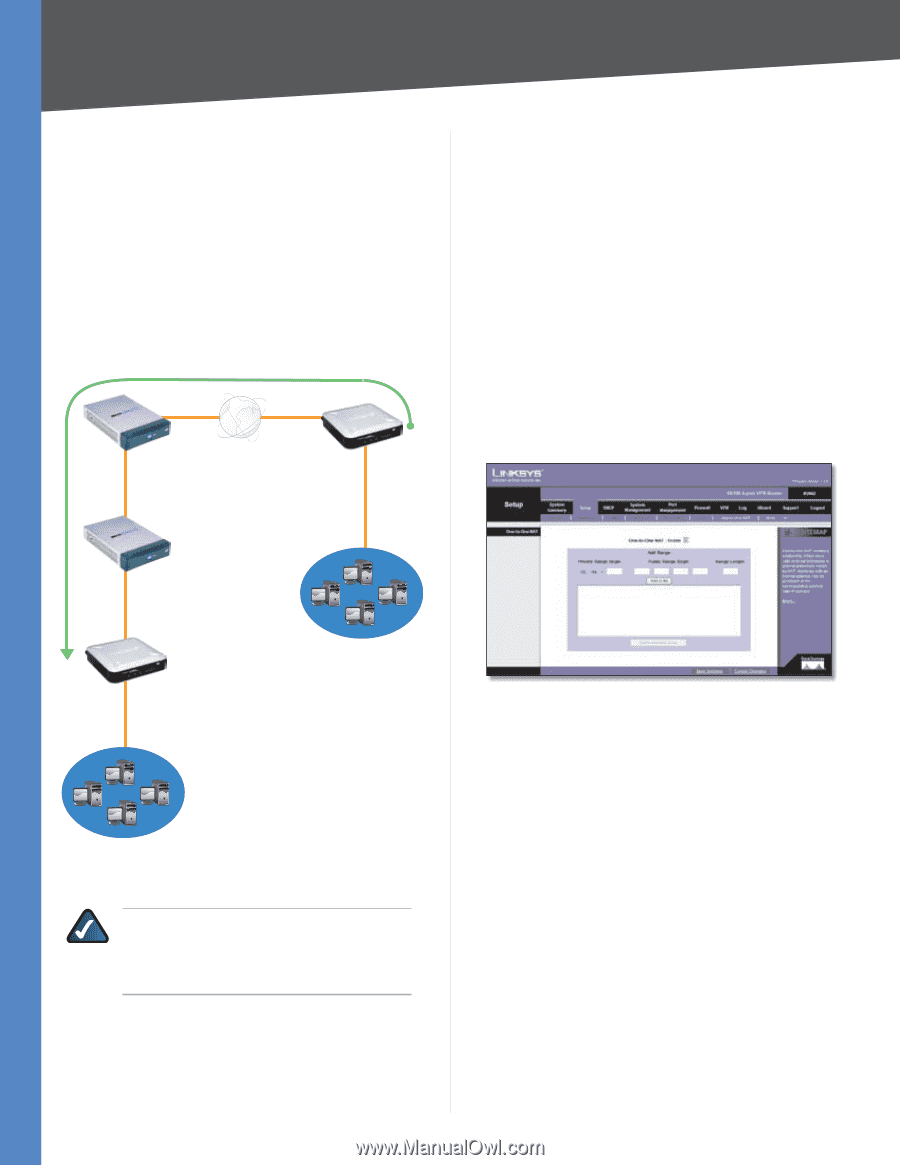
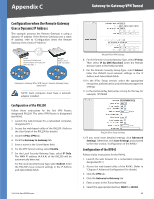
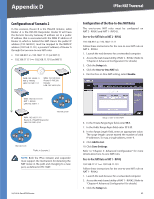
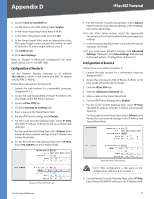
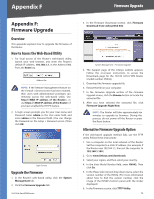
Appendix D IPSec NAT Traversal Configuration of Scenario 2 In this scenario, Router B is the RVL200 Initiator, while Router A is the RVL200 Responder. Router B will have the Remote Security Gateway IP address set to a public IP address that is associated with the WAN IP address of Router A, which is behind the NAT. Hence the public IP address (192.168.99.1) must be mapped to the WAN IP address (192.168.11.101, a private IP address) of Router A through the two one-to-one NAT rules: •• 192.168.99.1 => 192.168.111.11 (on NAT 2) •• 192.168.111.11 => 192.168.11.101 (on NAT 1) WAN: 192.168.99.11 NAT 2 - RV042 LAN: 192.168.111.1 WAN: 192.168.99.22 Router B - RVL200 Initiator LAN: 192.168.2.0/24 Configuration of the One-to-One NAT Rules The one-to-one NAT rules must be configured on NAT 2 - RV042 and NAT 1 - RVO42. One-to-One NAT Rule on NAT 2 - RV042 192.168.99.1 => 192.168.111.11 Follow these instructions for the one-to-one NAT rule on NAT 2 - RV042. 1. Launch the web browser for a networked computer. 2. Access the web-based utility of NAT 2 - RV042. (Refer to "Chapter 4: Advanced Configuration" for details.) 3. Click the Setup tab. 4. Click the One-to-One NAT tab. 5. For the One-to-One NAT setting, select Enable. WAN: 192.168.111.101 NAT 1 - RV042 LAN: 192.168.11.1 WAN: 192.168.11.101 Router A - RVL200 Responder LAN: 192.168.1.0/24 192.168.2.100 192.168.1.101 Traffic in Scenario 2 NOTE: Both the IPSec initiator and responder must support the mechanism for detecting the NAT router in the path and changing to a new port, as defined in RFC 3947. 10/100 4-Port VPN Router Setup > One-to-One NAT 6. In the Private Range Begin field, enter 99.1. 7. In the Public Range Begin field, enter 111.11. 8. In the Range Length field, enter an appropriate value. The range length cannot exceed the number of valid IP addresses. To map a single address, enter 1. 9. Click Add to List. 10. Click Save Settings. Refer to "Chapter 4: Advanced Configuration" for more details about one-to-one NAT rules. One-to-One NAT Rule on NAT 1 - RV042 192.168.111.11 => 192.168.11.101 Follow these instructions for the one-to-one NAT rule on NAT 1 - RV042. 1. Launch the web browser for a networked computer. 2. Access the web-based utility of NAT 1 - RV042. (Refer to "Chapter 4: Advanced Configuration" for details.) 3. Click the Setup tab. 69
-
 1
1 -
2
-
3
-
4
-
5
-
6
-
7
-
8
-
9
-
10
-
11
-
12
-
13
-
14
-
15
-
16
-
17
-
18
-
19
-
20
-
21
-
22
-
23
-
24
-
25
-
26
-
27
-
28
-
29
-
30
-
31
-
32
-
33
-
34
-
35
-
36
-
37
-
38
-
39
-
40
-
41
-
42
-
43
-
44
-
45
-
46
-
47
-
48
-
49
-
50
-
51
-
52
-
53
-
54
-
55
-
56
-
57
-
58
-
59
-
60
-
61
-
62
-
63
-
64
-
65
-
66
-
67
-
68
-
69
-
70
-
 71
71 -
 72
72 -
 73
73 -
 74
74 -
 75
75 -
 76
76 -
 77
77 -
 78
78 -
 79
79 -
 80
80 -
 81
81 -
82
-
83
-
84
-
85
-
86
-
87
-
88
-
89
-
90
-
91
-
92
-
93
-
94
-
95
-
96
-
97
-
98
-
99
-
100
-
101
-
102
-
103
 |
 |