Samsung SCH-R760 User Manual Ver.fb14_f6 (English(north America)) - Page 110
Customizing the Calendar, Sending Events via Bluetooth, First day of week
 |
View all Samsung SCH-R760 manuals
Add to My Manuals
Save this manual to your list of manuals |
Page 110 highlights
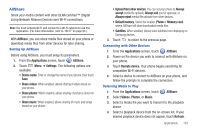
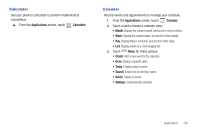
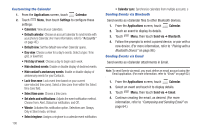
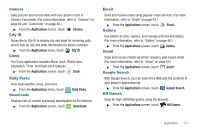
Customizing the Calendar 1. From the Applications screen, touch Calendar. 2. Touch Menu, then touch Settings to configure these settings: • Calendars: View all your calendars. • Default calendar: Choose an account calendar to synchronize with your phone's Calendar. (For more information, refer to "Accounts" on page 45.) • Default view: Set the default view when Calendar opens. • Day view: Choose a view for a day's events. Select a type: Time grid, or Event list. • First day of week: Choose a day to begin each week. • Hide declined events: Enable or disable display of declined events. • Hide contact's anniversary events: Enable or disable display of anniversary events for your Contacts. • Lock time zone: Lock event time based on your current user-selected time zone). Select a time zone from within the Select time zone field. • Select time zone: Choose a time zone. • Set alerts and notifications: Adjusts the event notification method. Choose from: Alert, Status bar notification, and Off. • Vibrate: Activates this notification option. Selections are: Always, Only in Silent mode, or Never. • Select ringtone: Assigns a ringtone to a calendar event notification. 106 • Calendar sync: Synchronize calendars from multiple accounts. s Sending Events via Bluetooth Send events as vCalendar files to other Bluetooth devices. 1. From the Applications screen, touch Calendar. 2. Touch an event to display its details. 3. Touch Menu, then touch Send via ➔ Bluetooth. 4. Follow the prompts to select a paired device, or pair with a new device. (For more information, refer to "Pairing with a Bluetooth Device" on page 98.) Sending Events via Email Send events as vCalendar attachments in Email. Note: To send Events via email, you must define an email account using the Email application. (For more information, refer to "Email" on page 62.) 1. From the Applications screen, touch Calendar. 2. Select an event and touch it to display details. 3. Touch Menu, then touch Send via ➔ Email. 4. Continue creating the email, as desired. (For more information, refer to "Composing and Sending Email" on page 64.)
-
 1
1 -
2
-
3
-
4
-
5
-
6
-
7
-
8
-
9
-
10
-
11
-
12
-
13
-
14
-
15
-
16
-
17
-
18
-
19
-
20
-
21
-
22
-
23
-
24
-
25
-
26
-
27
-
28
-
29
-
30
-
31
-
32
-
33
-
34
-
35
-
36
-
37
-
38
-
39
-
40
-
41
-
42
-
43
-
44
-
45
-
46
-
47
-
48
-
49
-
50
-
51
-
52
-
53
-
54
-
55
-
56
-
57
-
58
-
59
-
60
-
61
-
62
-
63
-
64
-
65
-
66
-
67
-
68
-
69
-
70
-
71
-
72
-
73
-
74
-
75
-
76
-
77
-
78
-
79
-
80
-
81
-
82
-
83
-
84
-
85
-
86
-
87
-
88
-
89
-
90
-
91
-
92
-
93
-
94
-
95
-
96
-
97
-
98
-
99
-
100
-
101
-
102
-
103
-
104
-
 105
105 -
 106
106 -
 107
107 -
 108
108 -
 109
109 -
 110
110 -
 111
111 -
 112
112 -
 113
113 -
 114
114 -
 115
115 -
116
-
117
-
118
-
119
-
120
-
121
-
122
-
123
-
124
-
125
-
126
-
127
-
128
-
129
-
130
-
131
-
132
-
133
-
134
-
135
-
136
-
137
-
138
-
139
-
140
-
141
-
142
-
143
-
144
-
145
-
146
-
147
-
148
-
149
-
150
-
151
-
152
-
153
-
154
-
155
-
156
-
157
-
158
-
159
-
160
-
161
-
162
-
163
-
164
-
165
-
166
-
167
-
168
-
169
-
170
-
171
-
172
-
173
-
174
-
175
-
176
-
177
-
178
-
179
-
180
-
181
-
182
-
183
-
184
-
185
-
186
-
187
-
188
-
189
-
190
-
191
-
192
-
193
-
194
-
195
-
196
-
197
-
198
-
199
-
200
-
201
-
202
-
203
-
204
-
205
-
206
-
207
 |
 |