Samsung SCH-R760 User Manual Ver.fb14_f6 (English(north America)) - Page 67
Setting up additional Email accounts, Account ID button
 |
View all Samsung SCH-R760 manuals
Add to My Manuals
Save this manual to your list of manuals |
Page 67 highlights
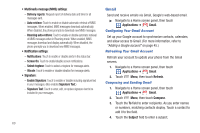
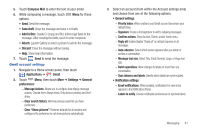
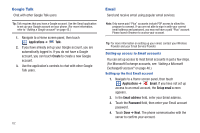
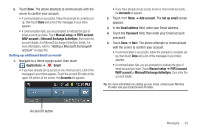
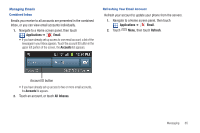
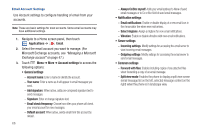
5. Touch Done. The phone attempts to communicate with the server to confirm your account. • If communication is successful, follow the prompts to complete setup, then touch Done and a list of the messages in your Inbox appears. • If communication fails, you are prompted to indicate the type of email account you have. Touch Manual setup ➔ POP3 account, IMAP account or Microsoft Exchange ActiveSync, then enter the account details. (For Microsoft Exchange ActiveSync details, For more information, refer to "Adding a Microsoft Exchange® account" on page 46.) Setting up additional Email accounts 1. Navigate to a Home screen panel, then touch Applications ➔ Email. • If you have already set up access to one email account, a list of the messages in your Inbox appears. Touch the account ID button in the upper left portion of the screen, the Accounts list appears. • If you have already set up access to two or more email accounts, the Accounts list appears. 2. Touch Menu ➔ Add account. The Set up email screen appears. 3. In the Email address field, enter your Email address. 4. Touch the Password field, then enter your Email account password. 5. Touch Done ➔ Next. The phone attempts to communicate with the server to confirm your account. • If communication is successful, follow the prompts to complete setup, then touch Done and a list of the messages in your Inbox appears. • If communication fails, you are prompted to indicate the type of email account you have. Touch Manual setup ➔ POP3 account, IMAP account or Microsoft Exchange ActiveSync, then enter the account details. Tip: For more information on setting up your email, contact your Wireless Provider and your Email Service Provider. Account ID button Messaging 63
-
 1
1 -
2
-
3
-
4
-
5
-
6
-
7
-
8
-
9
-
10
-
11
-
12
-
13
-
14
-
15
-
16
-
17
-
18
-
19
-
20
-
21
-
22
-
23
-
24
-
25
-
26
-
27
-
28
-
29
-
30
-
31
-
32
-
33
-
34
-
35
-
36
-
37
-
38
-
39
-
40
-
41
-
42
-
43
-
44
-
45
-
46
-
47
-
48
-
49
-
50
-
51
-
52
-
53
-
54
-
55
-
56
-
57
-
58
-
59
-
60
-
61
-
 62
62 -
 63
63 -
 64
64 -
 65
65 -
 66
66 -
 67
67 -
 68
68 -
 69
69 -
 70
70 -
 71
71 -
 72
72 -
73
-
74
-
75
-
76
-
77
-
78
-
79
-
80
-
81
-
82
-
83
-
84
-
85
-
86
-
87
-
88
-
89
-
90
-
91
-
92
-
93
-
94
-
95
-
96
-
97
-
98
-
99
-
100
-
101
-
102
-
103
-
104
-
105
-
106
-
107
-
108
-
109
-
110
-
111
-
112
-
113
-
114
-
115
-
116
-
117
-
118
-
119
-
120
-
121
-
122
-
123
-
124
-
125
-
126
-
127
-
128
-
129
-
130
-
131
-
132
-
133
-
134
-
135
-
136
-
137
-
138
-
139
-
140
-
141
-
142
-
143
-
144
-
145
-
146
-
147
-
148
-
149
-
150
-
151
-
152
-
153
-
154
-
155
-
156
-
157
-
158
-
159
-
160
-
161
-
162
-
163
-
164
-
165
-
166
-
167
-
168
-
169
-
170
-
171
-
172
-
173
-
174
-
175
-
176
-
177
-
178
-
179
-
180
-
181
-
182
-
183
-
184
-
185
-
186
-
187
-
188
-
189
-
190
-
191
-
192
-
193
-
194
-
195
-
196
-
197
-
198
-
199
-
200
-
201
-
202
-
203
-
204
-
205
-
206
-
207
 |
 |