Samsung SCH-R760 User Manual Ver.fb14_f6 (English(north America)) - Page 66
Google Talk, Email, Setting up access to Email accounts
 |
View all Samsung SCH-R760 manuals
Add to My Manuals
Save this manual to your list of manuals |
Page 66 highlights
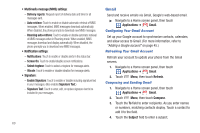
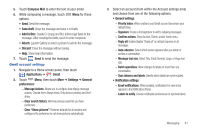
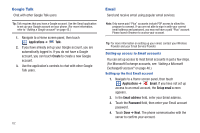
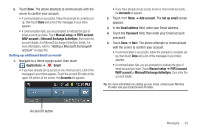
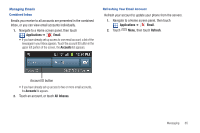
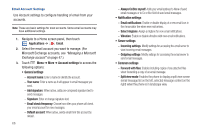
Google Talk Chat with other Google Talk users. Tip: Talk requires that you have a Google account. Use the Gmail application to set up your Google account on your phone. (For more information, refer to "Adding a Google account" on page 45.) 1. Navigate to a Home screen panel, then touch Applications ➔ Talk. 2. If you have already set up your Google account, you are automatically logged in. If you do not have a Google account, you can touch Create to create a new Google account. 3. Use the application's controls to chat with other Google Talk users. 62 Email Send and receive email using popular email services. Note: Only some paid "Plus" accounts include POP access to allow this program to connect. If you are not able to sign in with your correct email address and password, you may not have a paid "Plus" account. Please launch Browser to access your account. Tip: For more information on setting up your email, contact your Wireless Provider and your Email Service Provider. Setting up access to Email accounts You can set up access to most Email accounts in just a few steps. (For Microsoft Exchange accounts, see "Adding a Microsoft Exchange® account" on page 46.) Setting up the first Email account 1. Navigate to a Home screen panel, then touch Applications ➔ Email. If you have not set up access to an email account, the Set up email screen appears. 2. In the Email address field, enter your Email address. 3. Touch the Password field, then enter your Email account password. 4. Touch Done ➔ Next. The phone communicates with the server to confirm your account.
-
 1
1 -
2
-
3
-
4
-
5
-
6
-
7
-
8
-
9
-
10
-
11
-
12
-
13
-
14
-
15
-
16
-
17
-
18
-
19
-
20
-
21
-
22
-
23
-
24
-
25
-
26
-
27
-
28
-
29
-
30
-
31
-
32
-
33
-
34
-
35
-
36
-
37
-
38
-
39
-
40
-
41
-
42
-
43
-
44
-
45
-
46
-
47
-
48
-
49
-
50
-
51
-
52
-
53
-
54
-
55
-
56
-
57
-
58
-
59
-
60
-
 61
61 -
 62
62 -
 63
63 -
 64
64 -
 65
65 -
 66
66 -
 67
67 -
 68
68 -
 69
69 -
 70
70 -
 71
71 -
72
-
73
-
74
-
75
-
76
-
77
-
78
-
79
-
80
-
81
-
82
-
83
-
84
-
85
-
86
-
87
-
88
-
89
-
90
-
91
-
92
-
93
-
94
-
95
-
96
-
97
-
98
-
99
-
100
-
101
-
102
-
103
-
104
-
105
-
106
-
107
-
108
-
109
-
110
-
111
-
112
-
113
-
114
-
115
-
116
-
117
-
118
-
119
-
120
-
121
-
122
-
123
-
124
-
125
-
126
-
127
-
128
-
129
-
130
-
131
-
132
-
133
-
134
-
135
-
136
-
137
-
138
-
139
-
140
-
141
-
142
-
143
-
144
-
145
-
146
-
147
-
148
-
149
-
150
-
151
-
152
-
153
-
154
-
155
-
156
-
157
-
158
-
159
-
160
-
161
-
162
-
163
-
164
-
165
-
166
-
167
-
168
-
169
-
170
-
171
-
172
-
173
-
174
-
175
-
176
-
177
-
178
-
179
-
180
-
181
-
182
-
183
-
184
-
185
-
186
-
187
-
188
-
189
-
190
-
191
-
192
-
193
-
194
-
195
-
196
-
197
-
198
-
199
-
200
-
201
-
202
-
203
-
204
-
205
-
206
-
207
 |
 |