Yamaha 02R96 Owner's Manual - Page 134
Using Talkback, Talkback Setup
 |
View all Yamaha 02R96 manuals
Add to My Manuals
Save this manual to your list of manuals |
Page 134 highlights
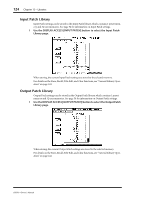
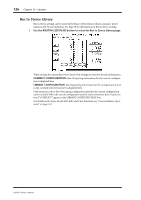
Using Talkback 121 Using Talkback The Talkback function distributes the Talkback mic signal to the Studio Monitor Outs and any Slot or Omni Outputs specified on the Talkback Setup page. The TALKBACK LEVEL control sets the level of the built-in talkback micro- 0 10 TALKBACK LEVEL phone. The [TALKBACK] button has two modes of operation: If it's pressed once (i.e., TALKBACK for less than 300 ms), the Talkback function is turned on and remains on when the button is released. This is Latched mode (this mode can be disabled on the Talkback Setup page). If it's pressed and held for longer, the Talkback function is turned on, but turns off when the button is released. This is Unlatched mode. The [TALKBACK] button indicator flashes while the Talkback function is active. Talkback Setup 1 Use the MONITOR [DISPLAY] button to locate the Talkback Setup page. 2 Use the cursor buttons to select the parameters, and use the Parameter wheel, INC/DEC buttons, and [ENTER] button to set them. OUTPUT ASSIGN: These buttons are used to assign the Talkback mic signal to Slot and Omni Outputs. TALKBACK DIMMER LEVEL: When the Talkback function is active, this determines the amount of attenuation applied to sound sources assigned to the Studio Monitors and selected for Talkback. USE AD IN x AS TALKBACK: This allows you to select an AD Input as the Talkback signal source. Use the check box to turn this option on and off, and use the number parameter to specify the number of the AD Input. The signal from the specified AD Input is mixed with the Talkback mic signal. Turn down the TALKBACK LEVEL if you do not want to use the Talkback mic. NEVER LATCH TALKBACK: This options allows you to disable latching for the Talkback function. 02R96-Owner's Manual
-
 1
1 -
2
-
3
-
4
-
5
-
6
-
7
-
8
-
9
-
10
-
11
-
12
-
13
-
14
-
15
-
16
-
17
-
18
-
19
-
20
-
21
-
22
-
23
-
24
-
25
-
26
-
27
-
28
-
29
-
30
-
31
-
32
-
33
-
34
-
35
-
36
-
37
-
38
-
39
-
40
-
41
-
42
-
43
-
44
-
45
-
46
-
47
-
48
-
49
-
50
-
51
-
52
-
53
-
54
-
55
-
56
-
57
-
58
-
59
-
60
-
61
-
62
-
63
-
64
-
65
-
66
-
67
-
68
-
69
-
70
-
71
-
72
-
73
-
74
-
75
-
76
-
77
-
78
-
79
-
80
-
81
-
82
-
83
-
84
-
85
-
86
-
87
-
88
-
89
-
90
-
91
-
92
-
93
-
94
-
95
-
96
-
97
-
98
-
99
-
100
-
101
-
102
-
103
-
104
-
105
-
106
-
107
-
108
-
109
-
110
-
111
-
112
-
113
-
114
-
115
-
116
-
117
-
118
-
119
-
120
-
121
-
122
-
123
-
124
-
125
-
126
-
127
-
128
-
 129
129 -
 130
130 -
 131
131 -
 132
132 -
 133
133 -
 134
134 -
 135
135 -
 136
136 -
 137
137 -
 138
138 -
 139
139 -
140
-
141
-
142
-
143
-
144
-
145
-
146
-
147
-
148
-
149
-
150
-
151
-
152
-
153
-
154
-
155
-
156
-
157
-
158
-
159
-
160
-
161
-
162
-
163
-
164
-
165
-
166
-
167
-
168
-
169
-
170
-
171
-
172
-
173
-
174
-
175
-
176
-
177
-
178
-
179
-
180
-
181
-
182
-
183
-
184
-
185
-
186
-
187
-
188
-
189
-
190
-
191
-
192
-
193
-
194
-
195
-
196
-
197
-
198
-
199
-
200
-
201
-
202
-
203
-
204
-
205
-
206
-
207
-
208
-
209
-
210
-
211
-
212
-
213
-
214
-
215
-
216
-
217
-
218
-
219
-
220
-
221
-
222
-
223
-
224
-
225
-
226
-
227
-
228
-
229
-
230
-
231
-
232
-
233
-
234
-
235
-
236
-
237
-
238
-
239
-
240
-
241
-
242
-
243
-
244
-
245
-
246
-
247
-
248
-
249
-
250
-
251
-
252
-
253
-
254
-
255
-
256
-
257
-
258
-
259
-
260
-
261
-
262
-
263
-
264
-
265
-
266
-
267
-
268
-
269
-
270
-
271
-
272
-
273
-
274
-
275
-
276
-
277
-
278
-
279
-
280
-
281
-
282
-
283
-
284
-
285
-
286
-
287
-
288
-
289
-
290
-
291
-
292
-
293
-
294
-
295
-
296
-
297
-
298
-
299
-
300
-
301
-
302
-
303
-
304
-
305
-
306
-
307
-
308
-
309
-
310
-
311
-
312
-
313
-
314
-
315
 |
 |