Yamaha 02R96 Owner's Manual - Page 21
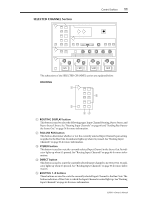
DUTILITY button EREMOTE button FMIDI button GMETER button HVIEW button IPAIR button JGROUP button KINPUT PATCH button LOUTPUT PATCH button
 |
View all Yamaha 02R96 manuals
Add to My Manuals
Save this manual to your list of manuals |
Page 21 highlights
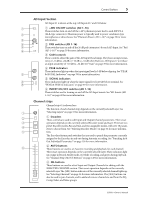
8 Chapter 2-Control Surface & Rear Panel D UTILITY button This button is used to select the following pages: Oscillator, Channel Status Monitor, and Battery Check. E REMOTE button This button is used to select the Remote page. See "About the Remote Layer" on page 189 for more information. F MIDI button This button is used to select the following pages: MIDI Setup, Program Change Assign Table, Control Change Assign Table, and Bulk Dump. See "MIDI" on page 163 for more information. G METER button This button is used to select the following pages: Input Channel Meter, Master Meter, Effect 1-4, Stereo Meter, and Metering Position. See "Metering" on page 87 for more information. H VIEW button This button is used to select the following pages: Parameter View, Fader View, and Channel Library. See "Viewing Channel Parameter Settings" on page 108, "Viewing Channel Fader Settings" on page 109, and "Channel Library" on page 123 for more information. I PAIR button This button is used to select the Input and Output Pair pages. See "Pairing Channels" on page 104 for more information. J GROUP button This button is used to select the following pages: Input Channel Fader Group, Input Channel Mute Group, Output Fader Group, Output Mute Group, Input Equalizer Link, Output Equalizer Link, Input Comp Link, and the Output Comp Link. K INPUT PATCH button This button is used to select the following pages: Input Channel Patch, Input Channel Insert In Patch, Effects 1-4 Input Patch, Input Channel Name, and Input Patch Library. See "Input Patching" on page 52 for more information. L OUTPUT PATCH button This button is used to select the following pages: Slot Output Patch, Omni Out Patch, Output Insert In Patch, Input Channel Direct Out Destination, 2TR Out Digital, Output Channel Name, and Output Patch Library. See "Output Patching" on page 54 for more information. 02R96-Owner's Manual
-
 1
1 -
2
-
3
-
4
-
5
-
6
-
7
-
8
-
9
-
10
-
11
-
12
-
13
-
14
-
15
-
 16
16 -
 17
17 -
 18
18 -
 19
19 -
 20
20 -
 21
21 -
 22
22 -
 23
23 -
 24
24 -
 25
25 -
 26
26 -
27
-
28
-
29
-
30
-
31
-
32
-
33
-
34
-
35
-
36
-
37
-
38
-
39
-
40
-
41
-
42
-
43
-
44
-
45
-
46
-
47
-
48
-
49
-
50
-
51
-
52
-
53
-
54
-
55
-
56
-
57
-
58
-
59
-
60
-
61
-
62
-
63
-
64
-
65
-
66
-
67
-
68
-
69
-
70
-
71
-
72
-
73
-
74
-
75
-
76
-
77
-
78
-
79
-
80
-
81
-
82
-
83
-
84
-
85
-
86
-
87
-
88
-
89
-
90
-
91
-
92
-
93
-
94
-
95
-
96
-
97
-
98
-
99
-
100
-
101
-
102
-
103
-
104
-
105
-
106
-
107
-
108
-
109
-
110
-
111
-
112
-
113
-
114
-
115
-
116
-
117
-
118
-
119
-
120
-
121
-
122
-
123
-
124
-
125
-
126
-
127
-
128
-
129
-
130
-
131
-
132
-
133
-
134
-
135
-
136
-
137
-
138
-
139
-
140
-
141
-
142
-
143
-
144
-
145
-
146
-
147
-
148
-
149
-
150
-
151
-
152
-
153
-
154
-
155
-
156
-
157
-
158
-
159
-
160
-
161
-
162
-
163
-
164
-
165
-
166
-
167
-
168
-
169
-
170
-
171
-
172
-
173
-
174
-
175
-
176
-
177
-
178
-
179
-
180
-
181
-
182
-
183
-
184
-
185
-
186
-
187
-
188
-
189
-
190
-
191
-
192
-
193
-
194
-
195
-
196
-
197
-
198
-
199
-
200
-
201
-
202
-
203
-
204
-
205
-
206
-
207
-
208
-
209
-
210
-
211
-
212
-
213
-
214
-
215
-
216
-
217
-
218
-
219
-
220
-
221
-
222
-
223
-
224
-
225
-
226
-
227
-
228
-
229
-
230
-
231
-
232
-
233
-
234
-
235
-
236
-
237
-
238
-
239
-
240
-
241
-
242
-
243
-
244
-
245
-
246
-
247
-
248
-
249
-
250
-
251
-
252
-
253
-
254
-
255
-
256
-
257
-
258
-
259
-
260
-
261
-
262
-
263
-
264
-
265
-
266
-
267
-
268
-
269
-
270
-
271
-
272
-
273
-
274
-
275
-
276
-
277
-
278
-
279
-
280
-
281
-
282
-
283
-
284
-
285
-
286
-
287
-
288
-
289
-
290
-
291
-
292
-
293
-
294
-
295
-
296
-
297
-
298
-
299
-
300
-
301
-
302
-
303
-
304
-
305
-
306
-
307
-
308
-
309
-
310
-
311
-
312
-
313
-
314
-
315
 |
 |
