Yamaha 02R96 Owner's Manual - Page 42
Operating Basics, Connecting the Power Cord, Turning On & Off the 02R96, About the Display
 |
View all Yamaha 02R96 manuals
Add to My Manuals
Save this manual to your list of manuals |
Page 42 highlights
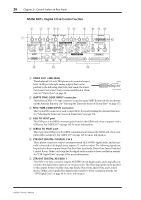
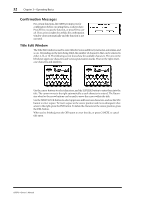
3 Operating Basics Operating Basics 29 Connecting the Power Cord Warning: Turn off all equipment connected to the 02R96 before making any power connections. Connect the socket-end of the supplied power cord to the AC IN on the rear panel of the 02R96. Connect the plug-end to a suitable AC wall outlet, one that conforms to the power supply requirements stated on the 02R96's rear panel. Turning On & Off the 02R96 To prevent loud clicks and thumps in your speakers, turn on your audio equipment in the following order (reverse this order when turning off)-sound sources, multitrack and master recorders, 02R96, monitoring power amplifiers. 1 To turn on the 02R96, press the [POWER] switch. The startup page appears for a while, and then the last selected display page appears. 2 To turn off the 02R96, press the [POWER] switch again. About the Display All 02R96 mix parameters can be edited on the various display pages. EDIT indicator Sampling rate MIDI indicator Current Scene Selected DISPLAY Selected channel Page title Page # Channel name Page area Page tab scroll arrow Page tabs Current Scene: The number and title of the currently selected Scene memory are displayed here. See "Storing & Recalling Scenes with the SCENE MEMORY Buttons" on page 140 for more information. If the selected Scene is write-protected, a padlock icon appears. See "Using the Scene Memory Page" on page 141 for more information. MIDI indicator: This indicator appears when the 02R96 is receiving MIDI data via the MIDI IN port, USB TO HOST port, or SERIAL TO HOST port. 02R96-Owner's Manual
-
 1
1 -
2
-
3
-
4
-
5
-
6
-
7
-
8
-
9
-
10
-
11
-
12
-
13
-
14
-
15
-
16
-
17
-
18
-
19
-
20
-
21
-
22
-
23
-
24
-
25
-
26
-
27
-
28
-
29
-
30
-
31
-
32
-
33
-
34
-
35
-
36
-
 37
37 -
 38
38 -
 39
39 -
 40
40 -
 41
41 -
 42
42 -
 43
43 -
 44
44 -
 45
45 -
 46
46 -
 47
47 -
48
-
49
-
50
-
51
-
52
-
53
-
54
-
55
-
56
-
57
-
58
-
59
-
60
-
61
-
62
-
63
-
64
-
65
-
66
-
67
-
68
-
69
-
70
-
71
-
72
-
73
-
74
-
75
-
76
-
77
-
78
-
79
-
80
-
81
-
82
-
83
-
84
-
85
-
86
-
87
-
88
-
89
-
90
-
91
-
92
-
93
-
94
-
95
-
96
-
97
-
98
-
99
-
100
-
101
-
102
-
103
-
104
-
105
-
106
-
107
-
108
-
109
-
110
-
111
-
112
-
113
-
114
-
115
-
116
-
117
-
118
-
119
-
120
-
121
-
122
-
123
-
124
-
125
-
126
-
127
-
128
-
129
-
130
-
131
-
132
-
133
-
134
-
135
-
136
-
137
-
138
-
139
-
140
-
141
-
142
-
143
-
144
-
145
-
146
-
147
-
148
-
149
-
150
-
151
-
152
-
153
-
154
-
155
-
156
-
157
-
158
-
159
-
160
-
161
-
162
-
163
-
164
-
165
-
166
-
167
-
168
-
169
-
170
-
171
-
172
-
173
-
174
-
175
-
176
-
177
-
178
-
179
-
180
-
181
-
182
-
183
-
184
-
185
-
186
-
187
-
188
-
189
-
190
-
191
-
192
-
193
-
194
-
195
-
196
-
197
-
198
-
199
-
200
-
201
-
202
-
203
-
204
-
205
-
206
-
207
-
208
-
209
-
210
-
211
-
212
-
213
-
214
-
215
-
216
-
217
-
218
-
219
-
220
-
221
-
222
-
223
-
224
-
225
-
226
-
227
-
228
-
229
-
230
-
231
-
232
-
233
-
234
-
235
-
236
-
237
-
238
-
239
-
240
-
241
-
242
-
243
-
244
-
245
-
246
-
247
-
248
-
249
-
250
-
251
-
252
-
253
-
254
-
255
-
256
-
257
-
258
-
259
-
260
-
261
-
262
-
263
-
264
-
265
-
266
-
267
-
268
-
269
-
270
-
271
-
272
-
273
-
274
-
275
-
276
-
277
-
278
-
279
-
280
-
281
-
282
-
283
-
284
-
285
-
286
-
287
-
288
-
289
-
290
-
291
-
292
-
293
-
294
-
295
-
296
-
297
-
298
-
299
-
300
-
301
-
302
-
303
-
304
-
305
-
306
-
307
-
308
-
309
-
310
-
311
-
312
-
313
-
314
-
315
 |
 |