Cisco AIR-LAP1252AG-A-K9 Software Configuration Guide - Page 129
Apply, not set, No Encryption, Step 5, Table 4-1
 |
UPC - 882658140716
View all Cisco AIR-LAP1252AG-A-K9 manuals
Add to My Manuals
Save this manual to your list of manuals |
Page 129 highlights
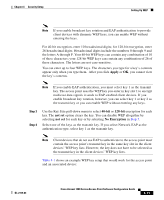
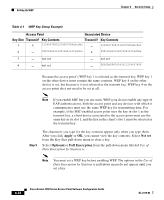
Chapter 4 Security Setup Setting Up WEP Note If you enable broadcast key rotation and EAP authentication to provide client devices with dynamic WEP keys, you can enable WEP without entering the keys. For 40-bit encryption, enter 10 hexadecimal digits; for 128-bit encryption, enter 26 hexadecimal digits. Hexadecimal digits include the numbers 0 through 9 and the letters A through F. Your 40-bit WEP keys can contain any combination of 10 of these characters; your 128-bit WEP keys can contain any combination of 26 of these characters. The letters are not case-sensitive. You can enter up to four WEP keys. The characters you type for a key's contents appear only when you type them. After you click Apply or OK, you cannot view the key's contents. Note If you enable EAP authentication, you must select key 1 as the transmit key. The access point uses the WEP key you enter in key slot 1 to encrypt multicast data signals it sends to EAP-enabled client devices. If you enable broadcast key rotation, however, you can select key 1 or key 2 as the transmit key or you can enable WEP without entering any keys. Step 3 Step 4 Use the Key Size pull-down menu to select 40-bit or 128-bit encryption for each key. The not set option clears the key. You can disable WEP altogether by selecting not set for each key or by selecting No Encryption in Step 5. Select one of the keys as the transmit key. If you select Network-EAP as the authentication type, select key 1 as the transmit key. Note Client devices that do not use EAP to authenticate to the access point must contain the access point's transmit key in the same key slot in the client devices' WEP key lists. However, the key does not have to be selected as the transmit key in the client devices' WEP key lists. Table 4-1 shows an example WEP key setup that would work for the access point and an associated device: OL-2159-03 Cisco Aironet 1200 Series Access Point Software Configuration Guide 4-11
-
 1
1 -
2
-
3
-
4
-
5
-
6
-
7
-
8
-
9
-
10
-
11
-
12
-
13
-
14
-
15
-
16
-
17
-
18
-
19
-
20
-
21
-
22
-
23
-
24
-
25
-
26
-
27
-
28
-
29
-
30
-
31
-
32
-
33
-
34
-
35
-
36
-
37
-
38
-
39
-
40
-
41
-
42
-
43
-
44
-
45
-
46
-
47
-
48
-
49
-
50
-
51
-
52
-
53
-
54
-
55
-
56
-
57
-
58
-
59
-
60
-
61
-
62
-
63
-
64
-
65
-
66
-
67
-
68
-
69
-
70
-
71
-
72
-
73
-
74
-
75
-
76
-
77
-
78
-
79
-
80
-
81
-
82
-
83
-
84
-
85
-
86
-
87
-
88
-
89
-
90
-
91
-
92
-
93
-
94
-
95
-
96
-
97
-
98
-
99
-
100
-
101
-
102
-
103
-
104
-
105
-
106
-
107
-
108
-
109
-
110
-
111
-
112
-
113
-
114
-
115
-
116
-
117
-
118
-
119
-
120
-
121
-
122
-
123
-
 124
124 -
 125
125 -
 126
126 -
 127
127 -
 128
128 -
 129
129 -
 130
130 -
 131
131 -
 132
132 -
 133
133 -
 134
134 -
135
-
136
-
137
-
138
-
139
-
140
-
141
-
142
-
143
-
144
-
145
-
146
-
147
-
148
-
149
-
150
-
151
-
152
-
153
-
154
-
155
-
156
-
157
-
158
-
159
-
160
-
161
-
162
-
163
-
164
-
165
-
166
-
167
-
168
-
169
-
170
-
171
-
172
-
173
-
174
-
175
-
176
-
177
-
178
-
179
-
180
-
181
-
182
-
183
-
184
-
185
-
186
-
187
-
188
-
189
-
190
-
191
-
192
-
193
-
194
-
195
-
196
-
197
-
198
-
199
-
200
-
201
-
202
-
203
-
204
-
205
-
206
-
207
-
208
-
209
-
210
-
211
-
212
-
213
-
214
-
215
-
216
-
217
-
218
-
219
-
220
-
221
-
222
-
223
-
224
-
225
-
226
-
227
-
228
-
229
-
230
-
231
-
232
-
233
-
234
-
235
-
236
-
237
-
238
-
239
-
240
-
241
-
242
-
243
-
244
-
245
-
246
-
247
-
248
-
249
-
250
-
251
-
252
-
253
-
254
-
255
-
256
-
257
-
258
-
259
-
260
-
261
-
262
-
263
-
264
-
265
-
266
-
267
-
268
-
269
-
270
-
271
-
272
-
273
-
274
-
275
-
276
-
277
-
278
-
279
-
280
-
281
-
282
-
283
-
284
 |
 |
