Cisco AIR-LAP1252AG-A-K9 Software Configuration Guide - Page 208
Settings on the Database Query Reset
 |
UPC - 882658140716
View all Cisco AIR-LAP1252AG-A-K9 manuals
Add to My Manuals
Save this manual to your list of manuals |
Page 208 highlights
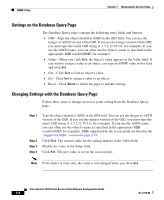
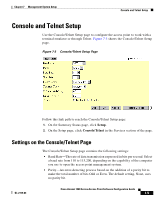
SNMP Setup Chapter 7 Management System Setup Settings on the Database Query Page The Database Query page contains the following entry fields and buttons: • OID-Type the object identifier (OID) in the OID field. You can use the integer or ASCII version of the OID. If you use the integer version of the OID, you must type the entire OID string (1.3.7.2.13.78.5.6, for example). If you use the ASCII name, you can often use the object's name as specified in the appropriate MIB (enableSNMP, for example). • Value-When you click Get, the object's value appears in the Value field. If you want to assign a value to an object, you type an SNMP value in this field and click Set. • Get-Click Get to find an object's value. • Set-Click Set to assign a value to an object. • Reset-Click Reset to return the page to default settings. Changing Settings with the Database Query Page Follow these steps to change an access point setting from the Database Query page: Step 1 Step 2 Step 3 Step 4 Type the object identifier (OID) in the OID field. You can use the integer or ASCII version of the OID. If you use the integer version of the OID, you must type the entire OID string (1.3.7.2.13.78.5.6, for example). If you use the ASCII name, you can often use the object's name as specified in the appropriate MIB (enableSNMP, for example). MIBs supported by the access point are listed in the "Supported MIBs" section on page 2-10. Click Get. The current value for the setting appears in the Value field. Modify the value in the Value field. Click Set. The new value is set on the access point. Note If the object is read-only, the value is not changed when you click Set. Cisco Aironet 1200 Series Access Point Software Configuration Guide 7-4 OL-2159-03
-
 1
1 -
2
-
3
-
4
-
5
-
6
-
7
-
8
-
9
-
10
-
11
-
12
-
13
-
14
-
15
-
16
-
17
-
18
-
19
-
20
-
21
-
22
-
23
-
24
-
25
-
26
-
27
-
28
-
29
-
30
-
31
-
32
-
33
-
34
-
35
-
36
-
37
-
38
-
39
-
40
-
41
-
42
-
43
-
44
-
45
-
46
-
47
-
48
-
49
-
50
-
51
-
52
-
53
-
54
-
55
-
56
-
57
-
58
-
59
-
60
-
61
-
62
-
63
-
64
-
65
-
66
-
67
-
68
-
69
-
70
-
71
-
72
-
73
-
74
-
75
-
76
-
77
-
78
-
79
-
80
-
81
-
82
-
83
-
84
-
85
-
86
-
87
-
88
-
89
-
90
-
91
-
92
-
93
-
94
-
95
-
96
-
97
-
98
-
99
-
100
-
101
-
102
-
103
-
104
-
105
-
106
-
107
-
108
-
109
-
110
-
111
-
112
-
113
-
114
-
115
-
116
-
117
-
118
-
119
-
120
-
121
-
122
-
123
-
124
-
125
-
126
-
127
-
128
-
129
-
130
-
131
-
132
-
133
-
134
-
135
-
136
-
137
-
138
-
139
-
140
-
141
-
142
-
143
-
144
-
145
-
146
-
147
-
148
-
149
-
150
-
151
-
152
-
153
-
154
-
155
-
156
-
157
-
158
-
159
-
160
-
161
-
162
-
163
-
164
-
165
-
166
-
167
-
168
-
169
-
170
-
171
-
172
-
173
-
174
-
175
-
176
-
177
-
178
-
179
-
180
-
181
-
182
-
183
-
184
-
185
-
186
-
187
-
188
-
189
-
190
-
191
-
192
-
193
-
194
-
195
-
196
-
197
-
198
-
199
-
200
-
201
-
202
-
 203
203 -
 204
204 -
 205
205 -
 206
206 -
 207
207 -
 208
208 -
 209
209 -
 210
210 -
 211
211 -
 212
212 -
 213
213 -
214
-
215
-
216
-
217
-
218
-
219
-
220
-
221
-
222
-
223
-
224
-
225
-
226
-
227
-
228
-
229
-
230
-
231
-
232
-
233
-
234
-
235
-
236
-
237
-
238
-
239
-
240
-
241
-
242
-
243
-
244
-
245
-
246
-
247
-
248
-
249
-
250
-
251
-
252
-
253
-
254
-
255
-
256
-
257
-
258
-
259
-
260
-
261
-
262
-
263
-
264
-
265
-
266
-
267
-
268
-
269
-
270
-
271
-
272
-
273
-
274
-
275
-
276
-
277
-
278
-
279
-
280
-
281
-
282
-
283
-
284
 |
 |
