Cisco AIR-LAP1252AG-A-K9 Software Configuration Guide - Page 51
The EtherType, Step 7
 |
UPC - 882658140716
View all Cisco AIR-LAP1252AG-A-K9 manuals
Add to My Manuals
Save this manual to your list of manuals |
Page 51 highlights
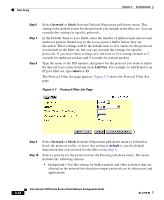
Chapter 3 Configuration Filter Setup Step 11 • default-This setting is the same as best effort, which applies to normal LAN traffic. • excellentEffort-Use this setting for a network's most important users. • controlledLoad-Use this setting for important business applications that are subject to some form of admission control. • interactiveVideo-Use this setting for traffic with less than 100 ms delay. • interactiveVoice-Use this setting for traffic with less than 10 ms delay. • networkControl-Use this setting for traffic that must get through to maintain and support the network infrastructure. Enter milliseconds in the Time-to-Live entry fields. If you leave these settings at 0, the protocol adopts the default time-to-live values you entered in Step 7. Note The time-to-live values you enter should be compatible with the priority you select for the protocol. For example, if you select interactiveVoice as the priority and enter high time-to-live values, voice packets will stay in the access point buffer longer than necessary, causing delivery of stale, useless packets. Step 12 Step 13 Step 14 Select Alert? yes to send an alert to the event log when a user transmits or receives the protocol through the access point. Click OK. The Filter Set page appears with the protocol listed at the bottom of the page. To edit the protocol entry, type the protocol name in the Special Cases entry field or click the select button beside the entry and click Edit. To delete the protocol, type the protocol name in the Special Cases entry field or click the select button beside the entry and click Remove. To add another protocol to the filter set, repeat Step 8 through Step 13. When you have included all the protocols you need in the filter set, click OK. The EtherType Filters, IP Protocol Filters, or IP Port Filters page appears, and the filter sets you defined appear in the filter set list at the bottom of the page. OL-2159-03 Cisco Aironet 1200 Series Access Point Software Configuration Guide 3-13
-
 1
1 -
2
-
3
-
4
-
5
-
6
-
7
-
8
-
9
-
10
-
11
-
12
-
13
-
14
-
15
-
16
-
17
-
18
-
19
-
20
-
21
-
22
-
23
-
24
-
25
-
26
-
27
-
28
-
29
-
30
-
31
-
32
-
33
-
34
-
35
-
36
-
37
-
38
-
39
-
40
-
41
-
42
-
43
-
44
-
45
-
 46
46 -
 47
47 -
 48
48 -
 49
49 -
 50
50 -
 51
51 -
 52
52 -
 53
53 -
 54
54 -
 55
55 -
 56
56 -
57
-
58
-
59
-
60
-
61
-
62
-
63
-
64
-
65
-
66
-
67
-
68
-
69
-
70
-
71
-
72
-
73
-
74
-
75
-
76
-
77
-
78
-
79
-
80
-
81
-
82
-
83
-
84
-
85
-
86
-
87
-
88
-
89
-
90
-
91
-
92
-
93
-
94
-
95
-
96
-
97
-
98
-
99
-
100
-
101
-
102
-
103
-
104
-
105
-
106
-
107
-
108
-
109
-
110
-
111
-
112
-
113
-
114
-
115
-
116
-
117
-
118
-
119
-
120
-
121
-
122
-
123
-
124
-
125
-
126
-
127
-
128
-
129
-
130
-
131
-
132
-
133
-
134
-
135
-
136
-
137
-
138
-
139
-
140
-
141
-
142
-
143
-
144
-
145
-
146
-
147
-
148
-
149
-
150
-
151
-
152
-
153
-
154
-
155
-
156
-
157
-
158
-
159
-
160
-
161
-
162
-
163
-
164
-
165
-
166
-
167
-
168
-
169
-
170
-
171
-
172
-
173
-
174
-
175
-
176
-
177
-
178
-
179
-
180
-
181
-
182
-
183
-
184
-
185
-
186
-
187
-
188
-
189
-
190
-
191
-
192
-
193
-
194
-
195
-
196
-
197
-
198
-
199
-
200
-
201
-
202
-
203
-
204
-
205
-
206
-
207
-
208
-
209
-
210
-
211
-
212
-
213
-
214
-
215
-
216
-
217
-
218
-
219
-
220
-
221
-
222
-
223
-
224
-
225
-
226
-
227
-
228
-
229
-
230
-
231
-
232
-
233
-
234
-
235
-
236
-
237
-
238
-
239
-
240
-
241
-
242
-
243
-
244
-
245
-
246
-
247
-
248
-
249
-
250
-
251
-
252
-
253
-
254
-
255
-
256
-
257
-
258
-
259
-
260
-
261
-
262
-
263
-
264
-
265
-
266
-
267
-
268
-
269
-
270
-
271
-
272
-
273
-
274
-
275
-
276
-
277
-
278
-
279
-
280
-
281
-
282
-
283
-
284
 |
 |
