Cisco AIR-LAP1252AG-A-K9 Software Configuration Guide - Page 261
Resetting to the Default Configuration
 |
UPC - 882658140716
View all Cisco AIR-LAP1252AG-A-K9 manuals
Add to My Manuals
Save this manual to your list of manuals |
Page 261 highlights
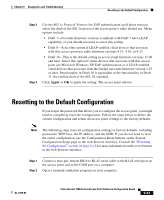
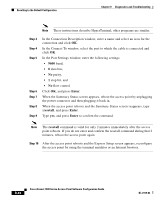
Chapter 9 Diagnostics and Troubleshooting Resetting to the Default Configuration Step 2 Step 3 Use the 802.1x Protocol Version (for EAP authentication) pull-down menu to select the draft of the 802.1x protocol the access point's radio should use. Menu options include: • Draft 7-No radio firmware versions compliant with Draft 7 have LEAP capability, so you should not need to select this setting. • Draft 8-Select this option if LEAP-enabled client devices that associate with this access point use radio firmware versions 4.13, 4.16, or 4.23. • Draft 10-This is the default setting in access point firmware versions 11.06 and later. Select this option if client devices that associate with this access point use Microsoft Windows XP EAP authentication or if LEAP-enabled client devices that associate with this bridge use radio firmware version 4.25 or later. Functionality in Draft 10 is equivalent to the functionality in Draft 11, the ratified draft of the 802.1X standard. Click Apply or OK to apply the setting. The access point reboots. Resetting to the Default Configuration If you forget the password that allows you to configure the access point, you might need to completely reset the configuration. Follow the steps below to delete the current configuration and return all access point settings to the factory defaults. Note The following steps reset all configuration settings to factory defaults, including passwords, WEP keys, the IP address, and the SSID. If you do not need to reset the entire configuration, use the Configuration Reset buttons on the System Configuration Setup page in the web-browser interface. Consult the "Resetting the Configuration" section on page 6-16 for more information on the reset buttons in the web-browser interface. Step 1 Step 2 Connect a nine-pin, female DB-9 to RJ-45 serial cable to the RJ-45 serial port on the access point and to the COM port on a computer. Open a terminal-emulation program on your computer. OL-2159-03 Cisco Aironet 1200 Series Access Point Software Configuration Guide 9-43
-
 1
1 -
2
-
3
-
4
-
5
-
6
-
7
-
8
-
9
-
10
-
11
-
12
-
13
-
14
-
15
-
16
-
17
-
18
-
19
-
20
-
21
-
22
-
23
-
24
-
25
-
26
-
27
-
28
-
29
-
30
-
31
-
32
-
33
-
34
-
35
-
36
-
37
-
38
-
39
-
40
-
41
-
42
-
43
-
44
-
45
-
46
-
47
-
48
-
49
-
50
-
51
-
52
-
53
-
54
-
55
-
56
-
57
-
58
-
59
-
60
-
61
-
62
-
63
-
64
-
65
-
66
-
67
-
68
-
69
-
70
-
71
-
72
-
73
-
74
-
75
-
76
-
77
-
78
-
79
-
80
-
81
-
82
-
83
-
84
-
85
-
86
-
87
-
88
-
89
-
90
-
91
-
92
-
93
-
94
-
95
-
96
-
97
-
98
-
99
-
100
-
101
-
102
-
103
-
104
-
105
-
106
-
107
-
108
-
109
-
110
-
111
-
112
-
113
-
114
-
115
-
116
-
117
-
118
-
119
-
120
-
121
-
122
-
123
-
124
-
125
-
126
-
127
-
128
-
129
-
130
-
131
-
132
-
133
-
134
-
135
-
136
-
137
-
138
-
139
-
140
-
141
-
142
-
143
-
144
-
145
-
146
-
147
-
148
-
149
-
150
-
151
-
152
-
153
-
154
-
155
-
156
-
157
-
158
-
159
-
160
-
161
-
162
-
163
-
164
-
165
-
166
-
167
-
168
-
169
-
170
-
171
-
172
-
173
-
174
-
175
-
176
-
177
-
178
-
179
-
180
-
181
-
182
-
183
-
184
-
185
-
186
-
187
-
188
-
189
-
190
-
191
-
192
-
193
-
194
-
195
-
196
-
197
-
198
-
199
-
200
-
201
-
202
-
203
-
204
-
205
-
206
-
207
-
208
-
209
-
210
-
211
-
212
-
213
-
214
-
215
-
216
-
217
-
218
-
219
-
220
-
221
-
222
-
223
-
224
-
225
-
226
-
227
-
228
-
229
-
230
-
231
-
232
-
233
-
234
-
235
-
236
-
237
-
238
-
239
-
240
-
241
-
242
-
243
-
244
-
245
-
246
-
247
-
248
-
249
-
250
-
251
-
252
-
253
-
254
-
255
-
 256
256 -
 257
257 -
 258
258 -
 259
259 -
 260
260 -
 261
261 -
 262
262 -
 263
263 -
 264
264 -
 265
265 -
 266
266 -
267
-
268
-
269
-
270
-
271
-
272
-
273
-
274
-
275
-
276
-
277
-
278
-
279
-
280
-
281
-
282
-
283
-
284
 |
 |
