Cisco AIR-LAP1252AG-A-K9 Software Configuration Guide - Page 50
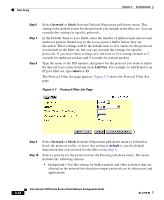
forward, block, Add New, telnet, default, The Protocol Filter Set appears.
 |
UPC - 882658140716
View all Cisco AIR-LAP1252AG-A-K9 manuals
Add to My Manuals
Save this manual to your list of manuals |
Page 50 highlights
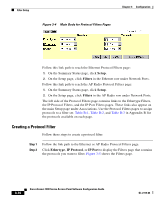
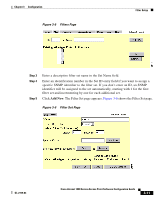
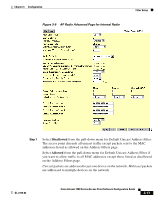
Filter Setup Chapter 3 Configuration Step 6 Step 7 Step 8 Select forward or block from the Default Disposition pull-down menu. This setting is the default action for the protocols you include in the filter set. You can override this setting for specific protocols. In the Default Time to Live fields, enter the number of milliseconds unicast and multicast packets should stay in the access point's buffer before they are discarded. These settings will be the default time-to-live values for the protocols you include in the filter set, but you can override the settings for specific protocols. If you leave these settings at 0, the time-to-live settings default to 3 seconds for multicast packets and 5 seconds for unicast packets. Type the name or the ISO numeric designator for the protocol you want to add in the Special Cases entry field and click Add New. For example, to add Telnet to an IP port filter set, type telnet or 23. The Protocol Filter Set page appears. Figure 3-7 shows the Protocol Filter Set page. Figure 3-7 Protocol Filter Set Page Step 9 Step 10 Select forward or block from the Disposition pull-down menu to forward or block the protocol traffic, or leave this setting at default to use the default disposition that you selected for the filter set in Step 6. Select a priority for the protocol from the Priority pull-down menu. The menu includes the following options: • background-Use this setting for bulk transfers and other activities that are allowed on the network but should not impact network use by other users and applications. 3-12 Cisco Aironet 1200 Series Access Point Software Configuration Guide OL-2159-03
-
 1
1 -
2
-
3
-
4
-
5
-
6
-
7
-
8
-
9
-
10
-
11
-
12
-
13
-
14
-
15
-
16
-
17
-
18
-
19
-
20
-
21
-
22
-
23
-
24
-
25
-
26
-
27
-
28
-
29
-
30
-
31
-
32
-
33
-
34
-
35
-
36
-
37
-
38
-
39
-
40
-
41
-
42
-
43
-
44
-
 45
45 -
 46
46 -
 47
47 -
 48
48 -
 49
49 -
 50
50 -
 51
51 -
 52
52 -
 53
53 -
 54
54 -
 55
55 -
56
-
57
-
58
-
59
-
60
-
61
-
62
-
63
-
64
-
65
-
66
-
67
-
68
-
69
-
70
-
71
-
72
-
73
-
74
-
75
-
76
-
77
-
78
-
79
-
80
-
81
-
82
-
83
-
84
-
85
-
86
-
87
-
88
-
89
-
90
-
91
-
92
-
93
-
94
-
95
-
96
-
97
-
98
-
99
-
100
-
101
-
102
-
103
-
104
-
105
-
106
-
107
-
108
-
109
-
110
-
111
-
112
-
113
-
114
-
115
-
116
-
117
-
118
-
119
-
120
-
121
-
122
-
123
-
124
-
125
-
126
-
127
-
128
-
129
-
130
-
131
-
132
-
133
-
134
-
135
-
136
-
137
-
138
-
139
-
140
-
141
-
142
-
143
-
144
-
145
-
146
-
147
-
148
-
149
-
150
-
151
-
152
-
153
-
154
-
155
-
156
-
157
-
158
-
159
-
160
-
161
-
162
-
163
-
164
-
165
-
166
-
167
-
168
-
169
-
170
-
171
-
172
-
173
-
174
-
175
-
176
-
177
-
178
-
179
-
180
-
181
-
182
-
183
-
184
-
185
-
186
-
187
-
188
-
189
-
190
-
191
-
192
-
193
-
194
-
195
-
196
-
197
-
198
-
199
-
200
-
201
-
202
-
203
-
204
-
205
-
206
-
207
-
208
-
209
-
210
-
211
-
212
-
213
-
214
-
215
-
216
-
217
-
218
-
219
-
220
-
221
-
222
-
223
-
224
-
225
-
226
-
227
-
228
-
229
-
230
-
231
-
232
-
233
-
234
-
235
-
236
-
237
-
238
-
239
-
240
-
241
-
242
-
243
-
244
-
245
-
246
-
247
-
248
-
249
-
250
-
251
-
252
-
253
-
254
-
255
-
256
-
257
-
258
-
259
-
260
-
261
-
262
-
263
-
264
-
265
-
266
-
267
-
268
-
269
-
270
-
271
-
272
-
273
-
274
-
275
-
276
-
277
-
278
-
279
-
280
-
281
-
282
-
283
-
284
 |
 |
