Dell PowerConnect B - MLXe 16 Hardware Installation Guide - Page 183
Access the CLI, and enter
 |
View all Dell PowerConnect B - MLXe 16 manuals
Add to My Manuals
Save this manual to your list of manuals |
Page 183 highlights
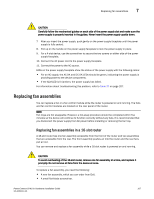
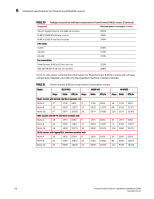
Replacing fan assemblies 7 1 1 Fan tray assembly FIGURE 68 Removing a fan tray assembly from an 8-slot router. 1 1 Fan tray assembly 3. Insert the new fan assembly into the fan slot and push the enclosure in until the faceplate is flush with the router. Pushing the enclosure in seats the fan connector with the router connector. 4. Tighten the four captive screws to secure the fan to the router. 5. Access the CLI, and enter the show chassis command to verify that the fans are operating normally. PowerConnect B-MLXe Hardware Installation Guide 171 53-1002111-01
-
 1
1 -
2
-
3
-
4
-
5
-
6
-
7
-
8
-
9
-
10
-
11
-
12
-
13
-
14
-
15
-
16
-
17
-
18
-
19
-
20
-
21
-
22
-
23
-
24
-
25
-
26
-
27
-
28
-
29
-
30
-
31
-
32
-
33
-
34
-
35
-
36
-
37
-
38
-
39
-
40
-
41
-
42
-
43
-
44
-
45
-
46
-
47
-
48
-
49
-
50
-
51
-
52
-
53
-
54
-
55
-
56
-
57
-
58
-
59
-
60
-
61
-
62
-
63
-
64
-
65
-
66
-
67
-
68
-
69
-
70
-
71
-
72
-
73
-
74
-
75
-
76
-
77
-
78
-
79
-
80
-
81
-
82
-
83
-
84
-
85
-
86
-
87
-
88
-
89
-
90
-
91
-
92
-
93
-
94
-
95
-
96
-
97
-
98
-
99
-
100
-
101
-
102
-
103
-
104
-
105
-
106
-
107
-
108
-
109
-
110
-
111
-
112
-
113
-
114
-
115
-
116
-
117
-
118
-
119
-
120
-
121
-
122
-
123
-
124
-
125
-
126
-
127
-
128
-
129
-
130
-
131
-
132
-
133
-
134
-
135
-
136
-
137
-
138
-
139
-
140
-
141
-
142
-
143
-
144
-
145
-
146
-
147
-
148
-
149
-
150
-
151
-
152
-
153
-
154
-
155
-
156
-
157
-
158
-
159
-
160
-
161
-
162
-
163
-
164
-
165
-
166
-
167
-
168
-
169
-
170
-
171
-
172
-
173
-
174
-
175
-
176
-
177
-
 178
178 -
 179
179 -
 180
180 -
 181
181 -
 182
182 -
 183
183 -
 184
184 -
 185
185 -
 186
186 -
 187
187 -
 188
188 -
189
-
190
-
191
-
192
-
193
-
194
-
195
-
196
-
197
-
198
-
199
-
200
-
201
-
202
-
203
-
204
-
205
-
206
-
207
-
208
-
209
-
210
-
211
-
212
 |
 |

PowerConnect B-MLXe Hardware Installation Guide
171
53-1002111-01
Replacing fan assemblies
7
FIGURE 68
Removing a fan tray assembly from an
8-slot router.
3.
Insert the new fan assembly into the fan slot and push the enclosure in until the faceplate is
flush with the router. Pushing the enclosure in seats the fan connector with the router
connector.
4.
Tighten the four captive screws to secure the fan to the router.
5.
Access the CLI, and enter the
show chassis
command to verify that the fans are operating
normally.
1
Fan tray assembly
1
Fan tray assembly
1
1