Dell PowerConnect B - MLXe 16 Hardware Installation Guide - Page 55
Mounting your device in a cabinet
 |
View all Dell PowerConnect B - MLXe 16 manuals
Add to My Manuals
Save this manual to your list of manuals |
Page 55 highlights
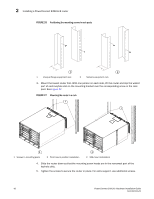
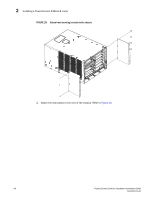
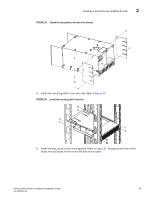
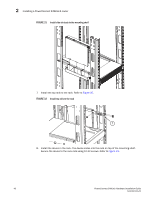
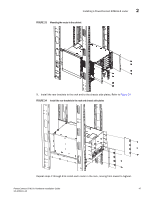
Installing a PowerConnect B-MLXe-8 router 2 NOTE For better grounding of the router to the rack, attach the router using star washers. You should also use star washers with any single-hole grounding lugs to keep the lugs from rotating. Repeat step 2 through step 5 to mount each router in the rack, moving from lowest to highest. Mounting your device in a cabinet You can also install your device in a 4-post rack or cabinet, using a Cabinet Rack Mount Kit, which must be ordered separately (part number VW8MK). This kit includes the following hardware: • Cabinet Mount Kit contents: - Front mounting brackets (2) - Side mounting plates (2) - Rear brackets (4) - Telescoping rack mount shelf - Side duct assembly - Top rails - 2 for use in 29-31" rack and 2 for use in 27-29" rack - 18 6-32 flat head screws - 12 10-32 screws - 12 10-32 slip and caged nuts To order the Cabinet Rack Mount Kit, contact Dell. Cabinet rack mounting steps Follow these steps to mount each PowerConnect B-MLXe-8 router in a rack using the Cabinet Rack Mount Kit, starting with the lowest device first. 1. Determine the position of each router in the rack according to the weight of the router. For example, mount the router with the fewest modules near the top of the rack, the router with more modules near the middle of the rack, and a fully populated router near the bottom of the rack. 2. Remove the factory-installed mounting brackets from the chassis. 3. Attach the kit front mounting brackets to the chassis using 8 6-32 flat head screws. Refer to Figure 17. PowerConnect B-MLXe Hardware Installation Guide 43 53-1002111-01
-
 1
1 -
2
-
3
-
4
-
5
-
6
-
7
-
8
-
9
-
10
-
11
-
12
-
13
-
14
-
15
-
16
-
17
-
18
-
19
-
20
-
21
-
22
-
23
-
24
-
25
-
26
-
27
-
28
-
29
-
30
-
31
-
32
-
33
-
34
-
35
-
36
-
37
-
38
-
39
-
40
-
41
-
42
-
43
-
44
-
45
-
46
-
47
-
48
-
49
-
 50
50 -
 51
51 -
 52
52 -
 53
53 -
 54
54 -
 55
55 -
 56
56 -
 57
57 -
 58
58 -
 59
59 -
 60
60 -
61
-
62
-
63
-
64
-
65
-
66
-
67
-
68
-
69
-
70
-
71
-
72
-
73
-
74
-
75
-
76
-
77
-
78
-
79
-
80
-
81
-
82
-
83
-
84
-
85
-
86
-
87
-
88
-
89
-
90
-
91
-
92
-
93
-
94
-
95
-
96
-
97
-
98
-
99
-
100
-
101
-
102
-
103
-
104
-
105
-
106
-
107
-
108
-
109
-
110
-
111
-
112
-
113
-
114
-
115
-
116
-
117
-
118
-
119
-
120
-
121
-
122
-
123
-
124
-
125
-
126
-
127
-
128
-
129
-
130
-
131
-
132
-
133
-
134
-
135
-
136
-
137
-
138
-
139
-
140
-
141
-
142
-
143
-
144
-
145
-
146
-
147
-
148
-
149
-
150
-
151
-
152
-
153
-
154
-
155
-
156
-
157
-
158
-
159
-
160
-
161
-
162
-
163
-
164
-
165
-
166
-
167
-
168
-
169
-
170
-
171
-
172
-
173
-
174
-
175
-
176
-
177
-
178
-
179
-
180
-
181
-
182
-
183
-
184
-
185
-
186
-
187
-
188
-
189
-
190
-
191
-
192
-
193
-
194
-
195
-
196
-
197
-
198
-
199
-
200
-
201
-
202
-
203
-
204
-
205
-
206
-
207
-
208
-
209
-
210
-
211
-
212
 |
 |
