Dell PowerConnect B - MLXe 16 Hardware Installation Guide - Page 61
PowerConnect B-MLXe Configuration Guide
 |
View all Dell PowerConnect B - MLXe 16 manuals
Add to My Manuals
Save this manual to your list of manuals |
Page 61 highlights
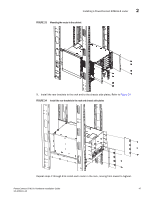
Installing a PowerConnect B-MLXe-8 router 2 NOTE If you are installing a redundant management module, refer to the chapter titled "Using a Redundant Management Module" in the PowerConnect B-MLXe Configuration Guide for information about how the redundant module works, optional software configurations, and how to manage redundancy. Before installing a module in the PowerConnect B-MLXe-8 router, have the following items available: • A large flat-blade screwdriver. • An ESD wrist strap with a plug for connection to the ESD connector on the router. DANGER For safety reasons, the ESD wrist strap should contain a 1 megohm series resistor. You can install modules while the router is powered on and running. The router ships with slot blanks installed in all empty module slots. The slot blanks help ensure proper airflow inside the router. You must remove the slot blank to install a module. CAUTION If you do not install a module in a slot, you must keep the slot blank in place. If you run the router with an uncovered slot, the system may overheat. Tighten the screws that secure the slot blanks so that they remain in place when removing adjacent panels or modules. Although the slot blanks differ in size, the procedure for removing them is identical. You will need a flat-blade screwdriver to perform this task. Slot blank removal steps Follow these steps to remove a slot blank. 1. Loosen the screws on either end of the slot blank by hand or with a flat-blade screwdriver. 2. Pull the slot blank out of the router, and store it in a safe place for future use. CAUTION If you are hot-swapping a module, allow a minimum of two seconds after a module (or power supply or fan tray) has been removed before inserting a module in the same slot. Module installation steps Follow this procedure to install a module in the router. 1. If you are installing a module in a slot which may have been configured for a different module type, remove the old configuration information by following these steps. a. Use the show running-config command in config mode to determine the current configuration of the slot. PowerConnect(config)# show running-config Current configuration: PowerConnect B-MLXe Hardware Installation Guide 49 53-1002111-01
-
 1
1 -
2
-
3
-
4
-
5
-
6
-
7
-
8
-
9
-
10
-
11
-
12
-
13
-
14
-
15
-
16
-
17
-
18
-
19
-
20
-
21
-
22
-
23
-
24
-
25
-
26
-
27
-
28
-
29
-
30
-
31
-
32
-
33
-
34
-
35
-
36
-
37
-
38
-
39
-
40
-
41
-
42
-
43
-
44
-
45
-
46
-
47
-
48
-
49
-
50
-
51
-
52
-
53
-
54
-
55
-
 56
56 -
 57
57 -
 58
58 -
 59
59 -
 60
60 -
 61
61 -
 62
62 -
 63
63 -
 64
64 -
 65
65 -
 66
66 -
67
-
68
-
69
-
70
-
71
-
72
-
73
-
74
-
75
-
76
-
77
-
78
-
79
-
80
-
81
-
82
-
83
-
84
-
85
-
86
-
87
-
88
-
89
-
90
-
91
-
92
-
93
-
94
-
95
-
96
-
97
-
98
-
99
-
100
-
101
-
102
-
103
-
104
-
105
-
106
-
107
-
108
-
109
-
110
-
111
-
112
-
113
-
114
-
115
-
116
-
117
-
118
-
119
-
120
-
121
-
122
-
123
-
124
-
125
-
126
-
127
-
128
-
129
-
130
-
131
-
132
-
133
-
134
-
135
-
136
-
137
-
138
-
139
-
140
-
141
-
142
-
143
-
144
-
145
-
146
-
147
-
148
-
149
-
150
-
151
-
152
-
153
-
154
-
155
-
156
-
157
-
158
-
159
-
160
-
161
-
162
-
163
-
164
-
165
-
166
-
167
-
168
-
169
-
170
-
171
-
172
-
173
-
174
-
175
-
176
-
177
-
178
-
179
-
180
-
181
-
182
-
183
-
184
-
185
-
186
-
187
-
188
-
189
-
190
-
191
-
192
-
193
-
194
-
195
-
196
-
197
-
198
-
199
-
200
-
201
-
202
-
203
-
204
-
205
-
206
-
207
-
208
-
209
-
210
-
211
-
212
 |
 |
