Dell PowerConnect J-8208 Hardware Guide - Page 155
Connecting the Modem to the Console Port, Ethernet Cable Connector
 |
View all Dell PowerConnect J-8208 manuals
Add to My Manuals
Save this manual to your list of manuals |
Page 155 highlights
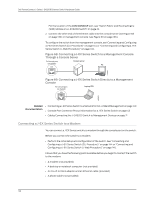
Chapter 10: Connecting the Switch NOTE: You must set the serial port to the fixed speed so that the modem will not adjust the serial port speed to the negotiated line speed. 10. To save the new modem settings, type at&w0 at the prompt. Press Enter. The modem sends an OK message. The modem is now ready to be connected to the switch. Connecting the Modem to the Console Port The console port on every J-EX Series switch accepts a cable with an RJ-45 connector. Figure 70 on page 139 shows the RJ-45 connector of the Ethernet cable supplied with the switch. Figure 70: Ethernet Cable Connector NOTE: If your laptop or PC does not have a DB-9 male connector pin and you want to connect your laptop or PC directly to the switch, use a combination of the RJ-45 to DB-9 female adapter supplied with the switch and a USB to DB-9 male adapter. You must provide the USB to DB-9 male adapter. NOTE: Most modems have an RS-232 DB-25 connector. You must separately purchase an adapter to connect your modem to the RJ-45 to DB-9 adapter and Ethernet cable supplied with the switch. To connect a modem to the console port: 1. Turn off power to the switch. 2. Turn off power to the modem. 3. Connect one end of the cable to the console port (labeled CON or CONSOLE) on the switch. For the location of the console port on different J-EX Series switches: • See "Switch Fabric and Routing Engine (SRE) Module in a J-EX8208 Switch" on page 22. 4. Connect the other end of the cable to the RJ-45 to DB-9 serial port adapter supplied with your switch. 5. Connect the serial port adapter to the DB-9 female to DB-25 male adapter or other adapter appropriate for your modem. 6. Plug the modem adapter into the DB-25 connector on the modem. 139
-
 1
1 -
2
-
3
-
4
-
5
-
6
-
7
-
8
-
9
-
10
-
11
-
12
-
13
-
14
-
15
-
16
-
17
-
18
-
19
-
20
-
21
-
22
-
23
-
24
-
25
-
26
-
27
-
28
-
29
-
30
-
31
-
32
-
33
-
34
-
35
-
36
-
37
-
38
-
39
-
40
-
41
-
42
-
43
-
44
-
45
-
46
-
47
-
48
-
49
-
50
-
51
-
52
-
53
-
54
-
55
-
56
-
57
-
58
-
59
-
60
-
61
-
62
-
63
-
64
-
65
-
66
-
67
-
68
-
69
-
70
-
71
-
72
-
73
-
74
-
75
-
76
-
77
-
78
-
79
-
80
-
81
-
82
-
83
-
84
-
85
-
86
-
87
-
88
-
89
-
90
-
91
-
92
-
93
-
94
-
95
-
96
-
97
-
98
-
99
-
100
-
101
-
102
-
103
-
104
-
105
-
106
-
107
-
108
-
109
-
110
-
111
-
112
-
113
-
114
-
115
-
116
-
117
-
118
-
119
-
120
-
121
-
122
-
123
-
124
-
125
-
126
-
127
-
128
-
129
-
130
-
131
-
132
-
133
-
134
-
135
-
136
-
137
-
138
-
139
-
140
-
141
-
142
-
143
-
144
-
145
-
146
-
147
-
148
-
149
-
 150
150 -
 151
151 -
 152
152 -
 153
153 -
 154
154 -
 155
155 -
 156
156 -
 157
157 -
 158
158 -
 159
159 -
 160
160 -
161
-
162
-
163
-
164
-
165
-
166
-
167
-
168
-
169
-
170
-
171
-
172
-
173
-
174
-
175
-
176
-
177
-
178
-
179
-
180
-
181
-
182
-
183
-
184
-
185
-
186
-
187
-
188
-
189
-
190
-
191
-
192
-
193
-
194
-
195
-
196
-
197
-
198
-
199
-
200
-
201
-
202
-
203
-
204
-
205
-
206
-
207
-
208
-
209
-
210
-
211
-
212
-
213
-
214
-
215
-
216
-
217
-
218
-
219
-
220
-
221
-
222
-
223
-
224
-
225
-
226
-
227
-
228
-
229
-
230
-
231
-
232
-
233
-
234
-
235
-
236
-
237
-
238
-
239
-
240
-
241
-
242
-
243
-
244
-
245
-
246
-
247
-
248
-
249
-
250
-
251
-
252
-
253
-
254
-
255
-
256
-
257
-
258
-
259
-
260
-
261
-
262
-
263
-
264
-
265
-
266
-
267
-
268
-
269
-
270
-
271
-
272
-
273
-
274
-
275
-
276
 |
 |
