Dell PowerConnect J-8208 Hardware Guide - Page 186
Removing a Line Card from a J-EX8200 Switch, Removing an SF Module from a J-EX8208 Switch
 |
View all Dell PowerConnect J-8208 manuals
Add to My Manuals
Save this manual to your list of manuals |
Page 186 highlights
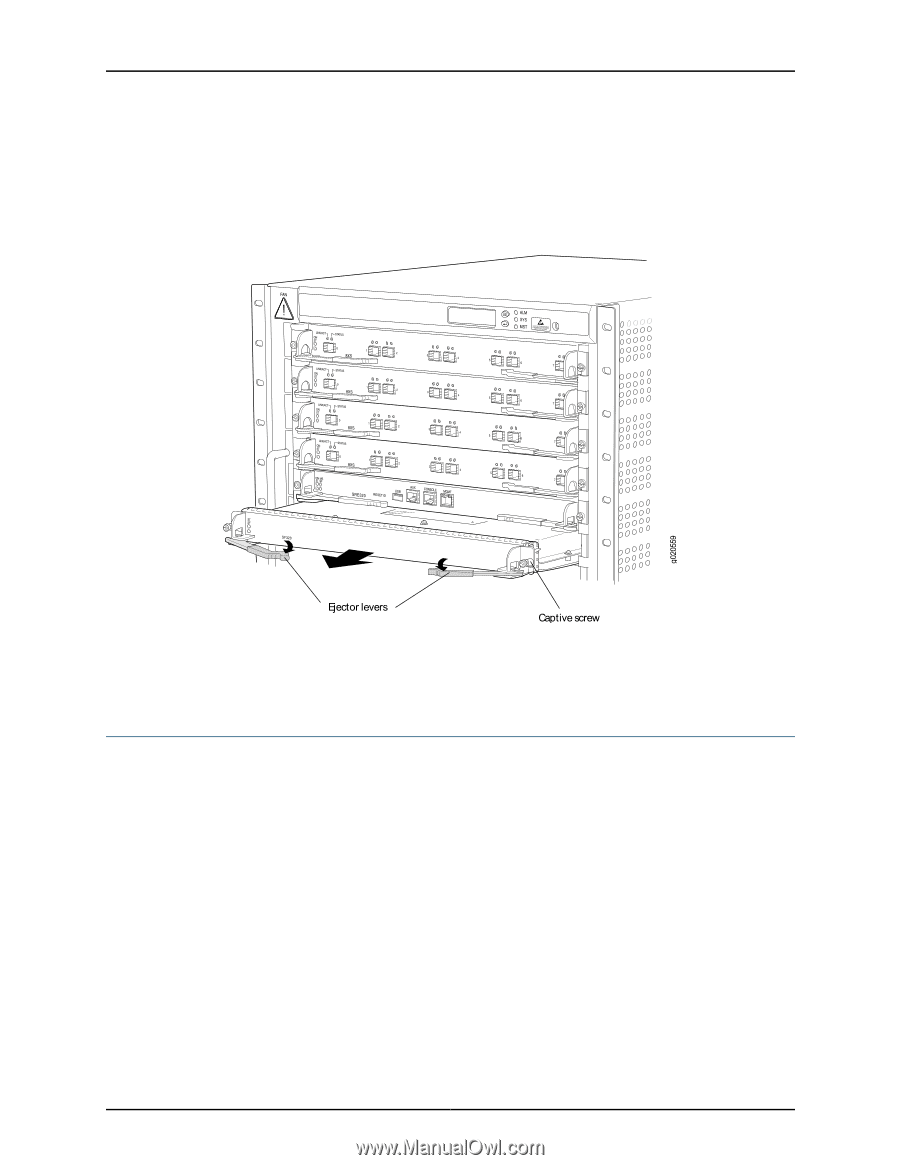
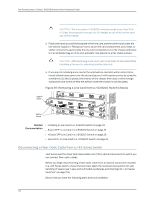
Dell PowerConnect J-Series J-EX8208 Ethernet Switch Hardware Guide 8. Place the SF module in the antistatic bag or on the antistatic mat. 9. If you are not replacing the SF module, install the cover panel over the empty slot by tightening the screws on each side of the cover panel with the screwdriver. Figure 85: Removing an SF Module from a J-EX8208 Switch Related • Installing an SF Module in a J-EX8208 Switch on page 120 Documentation • Switch Fabric (SF) Module in a J-EX8208 Switch on page 25 Removing a Line Card from a J-EX8200 Switch J-EX8200 switches have field-replaceable unit (FRU) line cards that can be installed in the line card slots on the front of the switch chassis. The line cards are hot-insertable and hot-removable: You can remove and replace them without powering off the switch or disrupting switch functions. Before you begin removing a line card from a J-EX8200 switch: • Ensure that you have taken the necessary precautions to prevent ESD damage (see "Prevention of Electrostatic Discharge Damage on J-EX Series Switches" on page 236). • If there are any transceivers installed in the line card, remove them before you remove the line card. See "Removing a Transceiver from a J-EX Series Switch" on page 173. • Ensure that you know how to handle and store the line card (see "Handling and Storing Line Cards in J-EX8200 Switches" on page 179). Ensure that you have the following parts and tools available to remove a line card from a J-EX8200 switch chassis: 170
-
 1
1 -
2
-
3
-
4
-
5
-
6
-
7
-
8
-
9
-
10
-
11
-
12
-
13
-
14
-
15
-
16
-
17
-
18
-
19
-
20
-
21
-
22
-
23
-
24
-
25
-
26
-
27
-
28
-
29
-
30
-
31
-
32
-
33
-
34
-
35
-
36
-
37
-
38
-
39
-
40
-
41
-
42
-
43
-
44
-
45
-
46
-
47
-
48
-
49
-
50
-
51
-
52
-
53
-
54
-
55
-
56
-
57
-
58
-
59
-
60
-
61
-
62
-
63
-
64
-
65
-
66
-
67
-
68
-
69
-
70
-
71
-
72
-
73
-
74
-
75
-
76
-
77
-
78
-
79
-
80
-
81
-
82
-
83
-
84
-
85
-
86
-
87
-
88
-
89
-
90
-
91
-
92
-
93
-
94
-
95
-
96
-
97
-
98
-
99
-
100
-
101
-
102
-
103
-
104
-
105
-
106
-
107
-
108
-
109
-
110
-
111
-
112
-
113
-
114
-
115
-
116
-
117
-
118
-
119
-
120
-
121
-
122
-
123
-
124
-
125
-
126
-
127
-
128
-
129
-
130
-
131
-
132
-
133
-
134
-
135
-
136
-
137
-
138
-
139
-
140
-
141
-
142
-
143
-
144
-
145
-
146
-
147
-
148
-
149
-
150
-
151
-
152
-
153
-
154
-
155
-
156
-
157
-
158
-
159
-
160
-
161
-
162
-
163
-
164
-
165
-
166
-
167
-
168
-
169
-
170
-
171
-
172
-
173
-
174
-
175
-
176
-
177
-
178
-
179
-
180
-
 181
181 -
 182
182 -
 183
183 -
 184
184 -
 185
185 -
 186
186 -
 187
187 -
 188
188 -
 189
189 -
 190
190 -
 191
191 -
192
-
193
-
194
-
195
-
196
-
197
-
198
-
199
-
200
-
201
-
202
-
203
-
204
-
205
-
206
-
207
-
208
-
209
-
210
-
211
-
212
-
213
-
214
-
215
-
216
-
217
-
218
-
219
-
220
-
221
-
222
-
223
-
224
-
225
-
226
-
227
-
228
-
229
-
230
-
231
-
232
-
233
-
234
-
235
-
236
-
237
-
238
-
239
-
240
-
241
-
242
-
243
-
244
-
245
-
246
-
247
-
248
-
249
-
250
-
251
-
252
-
253
-
254
-
255
-
256
-
257
-
258
-
259
-
260
-
261
-
262
-
263
-
264
-
265
-
266
-
267
-
268
-
269
-
270
-
271
-
272
-
273
-
274
-
275
-
276
 |
 |