Dell PowerConnect J-8208 Hardware Guide - Page 170
Removing a J-EX8208 Switch from a Rack or Cabinet Using a Mechanical Lift
 |
View all Dell PowerConnect J-8208 manuals
Add to My Manuals
Save this manual to your list of manuals |
Page 170 highlights
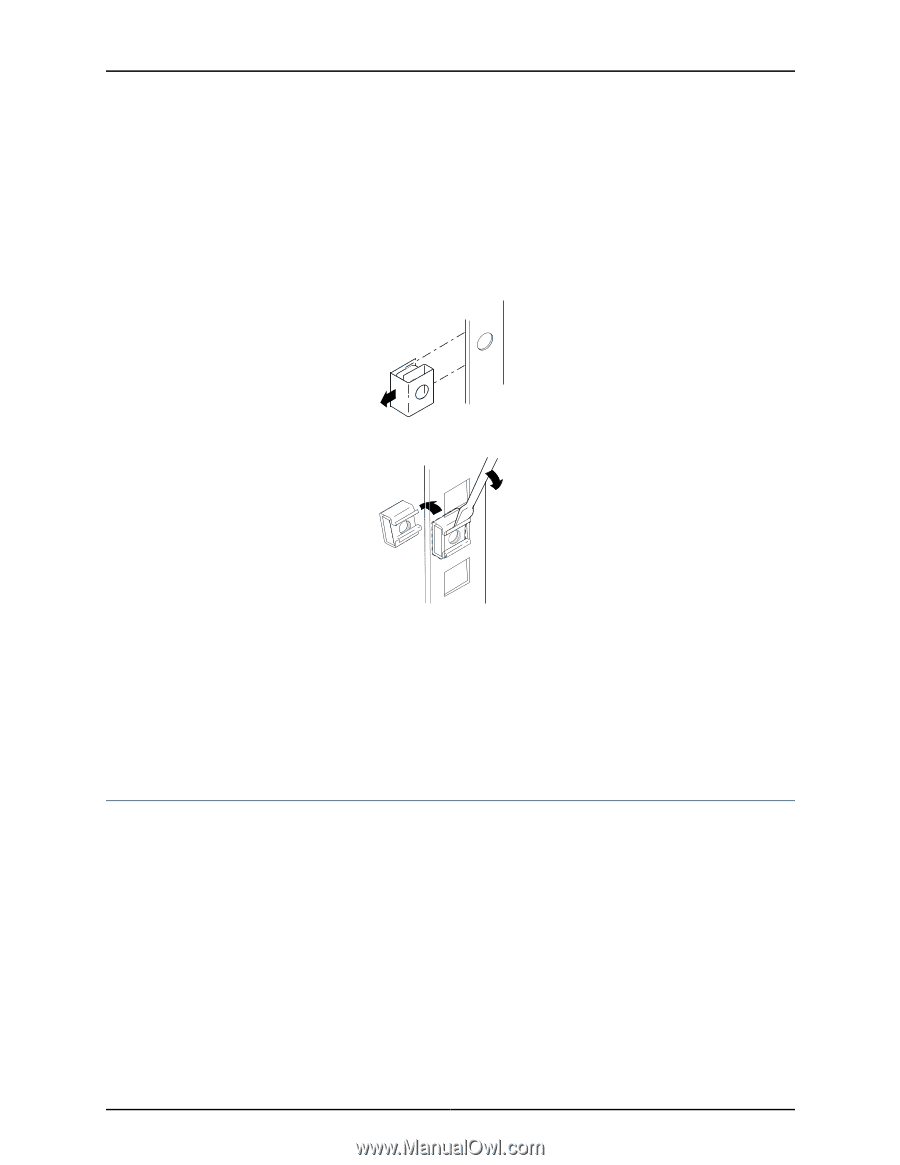
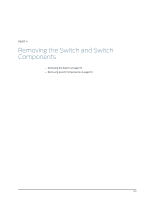
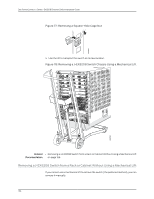
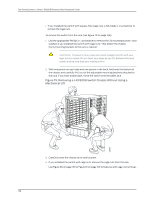
Dell PowerConnect J-Series J-EX8208 Ethernet Switch Hardware Guide mechanical lift, see "Removing a J-EX8208 Switch from a Rack or Cabinet Without Using a Mechanical Lift" on page 156. 4. If you installed the switch with cage nuts: a. Remove the cage nuts from the rack. Use Figure 74 on page 154 or Figure 75 on page 154 to help you with cage-nut removal. Figure 74: Removing a Round-Hole Cage Nut (Clip Nut) Figure 75: Removing a Square-Hole Cage Nut g040638 g040635 b. Place the removed cage nuts in the labeled bag with the screws and washers. You will need them when you reinstall the chassis. Related Documentation • Removing a J-EX8208 Switch from a Rack or Cabinet Using a Mechanical Lift on page 154 • Removing a J-EX8208 Switch from a Rack or Cabinet Without Using a Mechanical Lift on page 156 Removing a J-EX8208 Switch from a Rack or Cabinet Using a Mechanical Lift Because of the switch's size and weight, we strongly recommend using a mechanical lift to remove the switch. For instructions on removing a switch without using a mechanical lift, see "Removing a J-EX8208 Switch from a Rack or Cabinet Without Using a Mechanical Lift" on page 156. Before you remove the switch using a lift: • Ensure that the rack or cabinet is stable and secured to the building. • Ensure that there is enough space to place the removed switch in its new location and along the path to the new location. 154
-
 1
1 -
2
-
3
-
4
-
5
-
6
-
7
-
8
-
9
-
10
-
11
-
12
-
13
-
14
-
15
-
16
-
17
-
18
-
19
-
20
-
21
-
22
-
23
-
24
-
25
-
26
-
27
-
28
-
29
-
30
-
31
-
32
-
33
-
34
-
35
-
36
-
37
-
38
-
39
-
40
-
41
-
42
-
43
-
44
-
45
-
46
-
47
-
48
-
49
-
50
-
51
-
52
-
53
-
54
-
55
-
56
-
57
-
58
-
59
-
60
-
61
-
62
-
63
-
64
-
65
-
66
-
67
-
68
-
69
-
70
-
71
-
72
-
73
-
74
-
75
-
76
-
77
-
78
-
79
-
80
-
81
-
82
-
83
-
84
-
85
-
86
-
87
-
88
-
89
-
90
-
91
-
92
-
93
-
94
-
95
-
96
-
97
-
98
-
99
-
100
-
101
-
102
-
103
-
104
-
105
-
106
-
107
-
108
-
109
-
110
-
111
-
112
-
113
-
114
-
115
-
116
-
117
-
118
-
119
-
120
-
121
-
122
-
123
-
124
-
125
-
126
-
127
-
128
-
129
-
130
-
131
-
132
-
133
-
134
-
135
-
136
-
137
-
138
-
139
-
140
-
141
-
142
-
143
-
144
-
145
-
146
-
147
-
148
-
149
-
150
-
151
-
152
-
153
-
154
-
155
-
156
-
157
-
158
-
159
-
160
-
161
-
162
-
163
-
164
-
 165
165 -
 166
166 -
 167
167 -
 168
168 -
 169
169 -
 170
170 -
 171
171 -
 172
172 -
 173
173 -
 174
174 -
 175
175 -
176
-
177
-
178
-
179
-
180
-
181
-
182
-
183
-
184
-
185
-
186
-
187
-
188
-
189
-
190
-
191
-
192
-
193
-
194
-
195
-
196
-
197
-
198
-
199
-
200
-
201
-
202
-
203
-
204
-
205
-
206
-
207
-
208
-
209
-
210
-
211
-
212
-
213
-
214
-
215
-
216
-
217
-
218
-
219
-
220
-
221
-
222
-
223
-
224
-
225
-
226
-
227
-
228
-
229
-
230
-
231
-
232
-
233
-
234
-
235
-
236
-
237
-
238
-
239
-
240
-
241
-
242
-
243
-
244
-
245
-
246
-
247
-
248
-
249
-
250
-
251
-
252
-
253
-
254
-
255
-
256
-
257
-
258
-
259
-
260
-
261
-
262
-
263
-
264
-
265
-
266
-
267
-
268
-
269
-
270
-
271
-
272
-
273
-
274
-
275
-
276
 |
 |