Dell PowerConnect J-8208 Hardware Guide - Page 191
Removing the Power Cord Tray from a Rack or Cabinet for a J-EX8200 Switch
 |
View all Dell PowerConnect J-8208 manuals
Add to My Manuals
Save this manual to your list of manuals |
Page 191 highlights
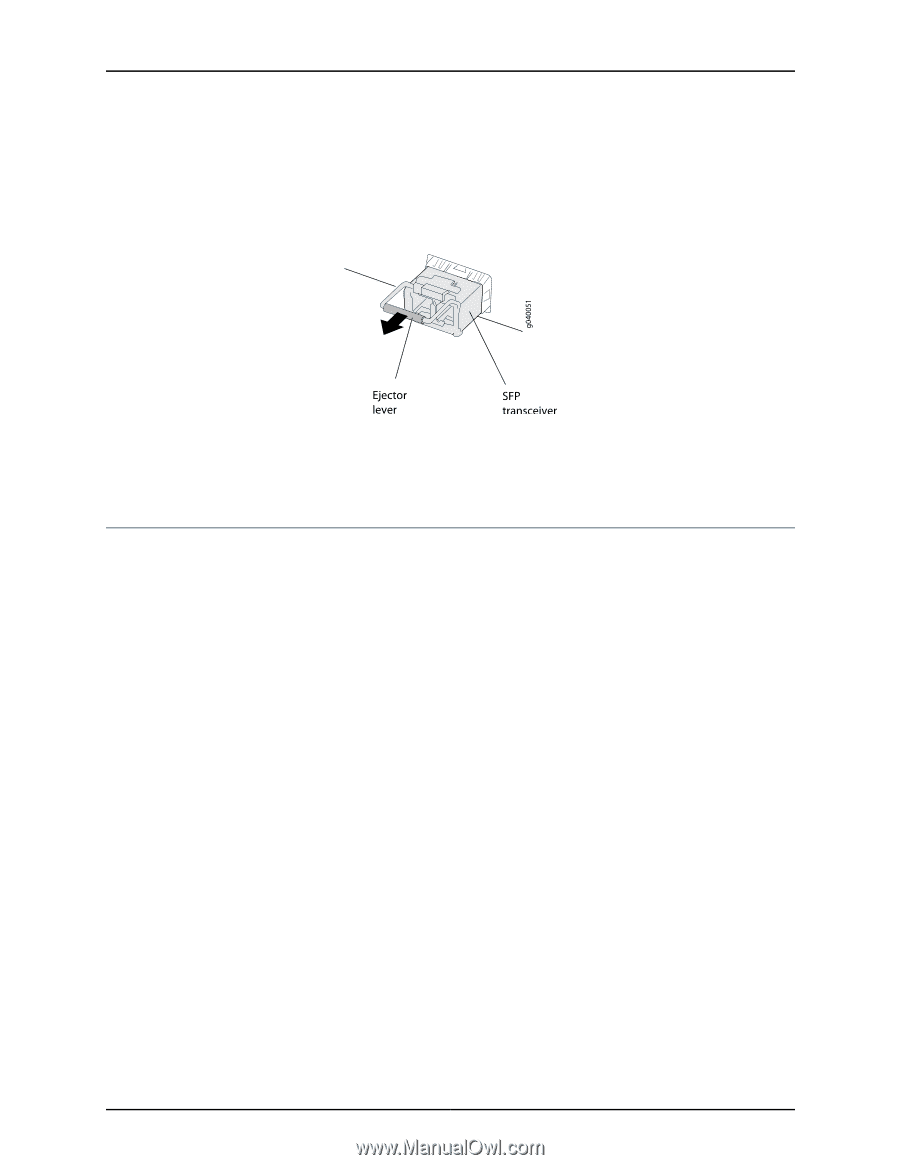
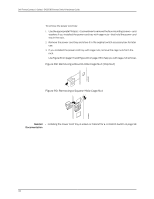
Chapter 13: Removing Switch Components 8. Place the transceiver in the antistatic bag or on the antistatic mat placed on a flat, stable surface. 9. Place the dust cover over the empty port. Figure 88: Removing a Transceiver from a J-EX Series Switch Related • Installing a Transceiver in a J-EX Series Switch on page 125 Documentation • Optical Interface Support in J-EX8200 Switches on page 45 Removing the Power Cord Tray from a Rack or Cabinet for a J-EX8200 Switch You can remove the power cord tray from a rack or cabinet. (The remainder of this topic uses "rack" to mean "rack or cabinet.") In two-post rack installations, we recommend that you do not remove the power cord tray unless you are also removing the switch and that you remove the switch before you remove the power cord tray. If you remove the power cord tray before removing the J-EX8208 switch from a two-post rack, there is no support for the underside of the switch. This creates a problem if and when you need to remove the switch, because the chassis has no support once you remove the screws that hold the front-mounting brackets to the rack. In a four-post rack this is not an issue because the switch rests on the adjustable mounting brackets. Before you begin to remove the power cord tray: • Ensure no power cables are resting on or threaded through the power cord tray. • Remove the switch if the switch and power cord tray are installed on a two-post rack. See "Removing a J-EX8208 Switch from a Rack or Cabinet" on page 152. Ensure that you have the following parts and tools available to remove the power cord tray: • A Phillips (+) screwdriver, number 1, 2, or 3, depending on the size of your rack mounting screws • If you installed the power cord tray with square-hole cage nuts, a flat-blade (-) screwdriver to remove the cage nuts 175
-
 1
1 -
2
-
3
-
4
-
5
-
6
-
7
-
8
-
9
-
10
-
11
-
12
-
13
-
14
-
15
-
16
-
17
-
18
-
19
-
20
-
21
-
22
-
23
-
24
-
25
-
26
-
27
-
28
-
29
-
30
-
31
-
32
-
33
-
34
-
35
-
36
-
37
-
38
-
39
-
40
-
41
-
42
-
43
-
44
-
45
-
46
-
47
-
48
-
49
-
50
-
51
-
52
-
53
-
54
-
55
-
56
-
57
-
58
-
59
-
60
-
61
-
62
-
63
-
64
-
65
-
66
-
67
-
68
-
69
-
70
-
71
-
72
-
73
-
74
-
75
-
76
-
77
-
78
-
79
-
80
-
81
-
82
-
83
-
84
-
85
-
86
-
87
-
88
-
89
-
90
-
91
-
92
-
93
-
94
-
95
-
96
-
97
-
98
-
99
-
100
-
101
-
102
-
103
-
104
-
105
-
106
-
107
-
108
-
109
-
110
-
111
-
112
-
113
-
114
-
115
-
116
-
117
-
118
-
119
-
120
-
121
-
122
-
123
-
124
-
125
-
126
-
127
-
128
-
129
-
130
-
131
-
132
-
133
-
134
-
135
-
136
-
137
-
138
-
139
-
140
-
141
-
142
-
143
-
144
-
145
-
146
-
147
-
148
-
149
-
150
-
151
-
152
-
153
-
154
-
155
-
156
-
157
-
158
-
159
-
160
-
161
-
162
-
163
-
164
-
165
-
166
-
167
-
168
-
169
-
170
-
171
-
172
-
173
-
174
-
175
-
176
-
177
-
178
-
179
-
180
-
181
-
182
-
183
-
184
-
185
-
 186
186 -
 187
187 -
 188
188 -
 189
189 -
 190
190 -
 191
191 -
 192
192 -
 193
193 -
 194
194 -
 195
195 -
 196
196 -
197
-
198
-
199
-
200
-
201
-
202
-
203
-
204
-
205
-
206
-
207
-
208
-
209
-
210
-
211
-
212
-
213
-
214
-
215
-
216
-
217
-
218
-
219
-
220
-
221
-
222
-
223
-
224
-
225
-
226
-
227
-
228
-
229
-
230
-
231
-
232
-
233
-
234
-
235
-
236
-
237
-
238
-
239
-
240
-
241
-
242
-
243
-
244
-
245
-
246
-
247
-
248
-
249
-
250
-
251
-
252
-
253
-
254
-
255
-
256
-
257
-
258
-
259
-
260
-
261
-
262
-
263
-
264
-
265
-
266
-
267
-
268
-
269
-
270
-
271
-
272
-
273
-
274
-
275
-
276
 |
 |