Dell PowerConnect J-8208 Hardware Guide - Page 35
Connecting and Configuring a J-EX Series Switch CLI Procedure
 |
View all Dell PowerConnect J-8208 manuals
Add to My Manuals
Save this manual to your list of manuals |
Page 35 highlights
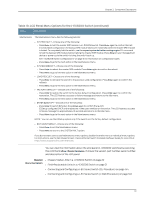
Chapter 2: Component Descriptions Table 10: LCD Panel Menu Options for the J-EX8200 Switch (continued) Menu Description Maintenance The Maintenance menu has the following options: • SYSTEM HALT?-Choose one of the following: • Press Enter to halt the master SRE module in a J-EX8208 switch. Press Enter again to confirm the halt. In a redundant configuration, the backup SRE module takes over mastership when the master SRE module is halted. To completely halt the switch, use the request system halt other-routing-engine CLI command to halt the backup SRE module before halting the master SRE module. Press Enter on your management device or power cycle the switch to bring the switch back up. See "J-EX8208 Switch Configurations" on page 6 for information on configuration types. • Press Menu to go to the next option in the Maintenance menu. • SYSTEM REBOOT?-Choose one of the following: • Press Enter to reboot the master SRE module. Press Enter again to confirm the reboot. • Press Menu to go to the next option in the Maintenance menu. • LOAD RESCUE?-Choose one of the following: • Press Enter to roll back the switch to the previous valid configuration. Press Enter again to confirm the rollback. • Press Menu to go to the next option in the Maintenance menu. • FACTORY DEFAULT?-Choose one of the following: • Press Enter to restore the switch to the factory default configuration. Press Enter again to confirm the restoration. The LCD flashes a success or failure message and returns to the Idle menu. • Press Menu to go to the next option in the Maintenance menu. • ENTER EZSETUP?-Choose one of the following: • Press Enter to launch EZSetup. Press Enter again to confirm the launch. EZSetup configures DHCP and enables the J-Web user interface on the switch. The LCD flashes a success or failure message for approximately 10 seconds and returns to the Idle menu. • Press Menu to go to the next option in the Maintenance menu. NOTE: You can use the EZSetup option only if the switch is in the factory default configuration. • EXIT MAINT MENU?-Choose one of the following: • Press Enter to exit the Maintenance menu. • Press Menu to return to the SYSTEM HALT option. If you do not want users to use Maintenance menu options, disable the entire menu or individual menu options. For instructions, see the Dell PowerConnect J-Series Ethernet Switch Complete Software Guide for Junos OS at http://www.support.dell.com/manuals. You can view the information about the LCD panel in J-EX8200 switches by executing the command show chassis hardware. It shows the version, part number, serial number, and description of the LCD panel. Related • Chassis Status LEDs in a J-EX8200 Switch on page 20 Documentation • Field-Replaceable Units in a J-EX8208 Switch on page 21 • Connecting and Configuring a J-EX Series Switch (CLI Procedure) on page 144 • Connecting and Configuring a J-EX Series Switch (J-Web Procedure) on page 146 19
-
 1
1 -
2
-
3
-
4
-
5
-
6
-
7
-
8
-
9
-
10
-
11
-
12
-
13
-
14
-
15
-
16
-
17
-
18
-
19
-
20
-
21
-
22
-
23
-
24
-
25
-
26
-
27
-
28
-
29
-
 30
30 -
 31
31 -
 32
32 -
 33
33 -
 34
34 -
 35
35 -
 36
36 -
 37
37 -
 38
38 -
 39
39 -
 40
40 -
41
-
42
-
43
-
44
-
45
-
46
-
47
-
48
-
49
-
50
-
51
-
52
-
53
-
54
-
55
-
56
-
57
-
58
-
59
-
60
-
61
-
62
-
63
-
64
-
65
-
66
-
67
-
68
-
69
-
70
-
71
-
72
-
73
-
74
-
75
-
76
-
77
-
78
-
79
-
80
-
81
-
82
-
83
-
84
-
85
-
86
-
87
-
88
-
89
-
90
-
91
-
92
-
93
-
94
-
95
-
96
-
97
-
98
-
99
-
100
-
101
-
102
-
103
-
104
-
105
-
106
-
107
-
108
-
109
-
110
-
111
-
112
-
113
-
114
-
115
-
116
-
117
-
118
-
119
-
120
-
121
-
122
-
123
-
124
-
125
-
126
-
127
-
128
-
129
-
130
-
131
-
132
-
133
-
134
-
135
-
136
-
137
-
138
-
139
-
140
-
141
-
142
-
143
-
144
-
145
-
146
-
147
-
148
-
149
-
150
-
151
-
152
-
153
-
154
-
155
-
156
-
157
-
158
-
159
-
160
-
161
-
162
-
163
-
164
-
165
-
166
-
167
-
168
-
169
-
170
-
171
-
172
-
173
-
174
-
175
-
176
-
177
-
178
-
179
-
180
-
181
-
182
-
183
-
184
-
185
-
186
-
187
-
188
-
189
-
190
-
191
-
192
-
193
-
194
-
195
-
196
-
197
-
198
-
199
-
200
-
201
-
202
-
203
-
204
-
205
-
206
-
207
-
208
-
209
-
210
-
211
-
212
-
213
-
214
-
215
-
216
-
217
-
218
-
219
-
220
-
221
-
222
-
223
-
224
-
225
-
226
-
227
-
228
-
229
-
230
-
231
-
232
-
233
-
234
-
235
-
236
-
237
-
238
-
239
-
240
-
241
-
242
-
243
-
244
-
245
-
246
-
247
-
248
-
249
-
250
-
251
-
252
-
253
-
254
-
255
-
256
-
257
-
258
-
259
-
260
-
261
-
262
-
263
-
264
-
265
-
266
-
267
-
268
-
269
-
270
-
271
-
272
-
273
-
274
-
275
-
276
 |
 |