Epson CX5400 User Manual
Epson CX5400 - Stylus Color Inkjet Manual
 |
UPC - 010343848412
View all Epson CX5400 manuals
Add to My Manuals
Save this manual to your list of manuals |
Epson CX5400 manual content summary:
- Epson CX5400 | User Manual - Page 1
EPSON Stylus CX5400 User's Guide 1 EPSON Stylus CX5400 Parts 2 Loading Paper 3 Single Sheets 3 Envelopes 4 Special Papers 6 Copying 9 Copying Without the Computer 9 Changing Copy Settings 10 Copying With the Computer 13 Printing With Windows 17 Printing From an Application 17 Selecting Default - Epson CX5400 | User Manual - Page 2
the Ink Supply 51 Ink Cartridge Precautions 52 Removing and Installing Ink Cartridges 53 Aligning the Print Head 55 Cleaning the Stylus CX 58 Transporting the Stylus CX 59 Solving Problems 61 Checking the LCD Screen 61 Printing a Nozzle Check 62 Setup and Software Installation Problems 63 Printing - Epson CX5400 | User Manual - Page 3
and Approvals 96 Interface Specifications 96 System Requirements 97 Windows System Requirements 97 Macintosh System Requirements 97 Important Safety Instructions 99 Ink Cartridge Safety Instructions 100 LCD Panel Safety Instructions 101 Legal Notices 102 FCC Compliance Statement 102 Declaration - Epson CX5400 | User Manual - Page 4
's Guide contains instructions on copying, printing, scanning, maintenance, troubleshooting, network printing, and specifications. The Quick Reference Guide contains instructions for using your EPSON Stylus® CX5400 without a computer. To set up your EPSON Stylus CX5400 and install its software, see - Epson CX5400 | User Manual - Page 5
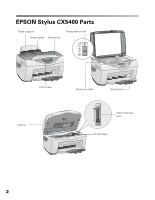
EPSON Stylus CX5400 Parts Paper support Feeder guard Scanner lid Transportation lock LCD screen Scanner Document table Output tray Paper thickness lever Ink cartridges 2 - Epson CX5400 | User Manual - Page 6
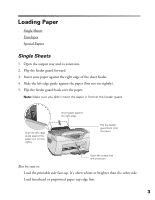
output tray and its extension. 2. Flip the feeder guard forward. 3. Insert your paper against the right edge of the sheet feeder. 4. Slide the left edge guide against the paper (but not too tightly). 5. Flip the feeder guard back over the paper. Note: Make sure you didn't insert the paper in front - Epson CX5400 | User Manual - Page 7
■ Load paper short-edge first, even for landscape-oriented documents and photos. ■ Don't load paper above the arrow on the left edge guide. ■ Load up to approximately 100 sheets of plain paper at a time. If you're loading envelopes or special paper, see the next sections. Envelopes 1. Load - Epson CX5400 | User Manual - Page 8
4. Lower the scanner until it clicks into place. Select the following settings when printing on envelopes: ■ Plain paper as the Type or Media Type setting ■ The correct envelope size as the Size (Windows®) or Paper Size (Macintosh®) setting ■ Landscape as the Orientation setting For instructions on - Epson CX5400 | User Manual - Page 9
S041568 S041331 S041064 S041731 S041734 * The availability of paper types varies by location. To get the best prints and copies, use genuine EPSON ink and paper. You can purchase ink cartridges, paper and accessories from your local retailer. Please call (800) 463-7766 to locate a retailer near you - Epson CX5400 | User Manual - Page 10
Matte Paper Heavyweight 20 sheets with a support sheet beneath the stack Double-Sided Matte Paper 1 sheet Premium Semigloss Photo Paper 20 sheets Ink Jet Transparencies 30 sheets with a sheet the sheet feeder. ■ Check the paper package for additional instructions on using special papers. 7 - Epson CX5400 | User Manual - Page 11
8 - Epson CX5400 | User Manual - Page 12
in about 0.1 inch from the edges Note: If you place your document against the guides, the edges next to the guides won't be copied. If you need to copy a thick document, such as a book, you can remove the scanner lid to scan. Gently press down the original to keep it flat on the - Epson CX5400 | User Manual - Page 13
scanned and then printed. If you're Reset button for at least 3 seconds. Make sure you select your Copy mode before selecting any other copy settings. Number of Copies Press the + Copies button. If you're using the 2-up or 4-up Copy mode setting (see Type of Copies), you can't select more than one - Epson CX5400 | User Manual - Page 14
around the edges* Repeat Copies an image multiple times on one sheet (Works best with originals that are business-card-size or smaller) 2-up Copies two originals onto one sheet 4-up Copies four originals onto one sheet * If you notice reduced print quality at the bottom of your copy, try using the - Epson CX5400 | User Manual - Page 15
Premium Bright White Paper for text and graphics copying with high print quality Plain paper or Premium Bright White Paper for improved image quality Matte Paper Heavyweight or Double-Sided Matte Paper Photo Paper, Glossy Photo Paper, or Premium Semigloss Paper DURABrite Ink Glossy Photo Paper 12 - Epson CX5400 | User Manual - Page 16
the Scan button on the EPSON Stylus CX5400 to open Smart Panel. (To change the application assigned to the Scan button, see One-Touch Scanning.) Note: You can also open EPSON Smart Panel in Windows by selecting Start > All Programs or Programs > EPSON Smart Panel > EPSON Smart Panel. On Macintosh - Epson CX5400 | User Manual - Page 17
, or Text, based on the content of your original. ■ Size: Choose the setting based on the size of your original and your copy, or click Manual and enter a percentage to reduce or enlarge your copy by a specific amount. ■ Lighten/Darken: Adjust this by clicking the up and down arrows. ■ Number of - Epson CX5400 | User Manual - Page 18
Device Settings button on the right to check your input and output devices: You should see your EPSON Stylus CX5400 as the input and output device. Click Settings to change the displayed print settings (such as a different Media Type setting, if you loaded special paper) or select additional options - Epson CX5400 | User Manual - Page 19
to stop copying in progress, click the Stop button. Note: For more information on Smart Panel copy settings, see the on-screen Smart Panel User Guide or click ? on the main Smart Panel window. 16 - Epson CX5400 | User Manual - Page 20
program, follow these steps to print it using the basic printer settings: 1. From the File menu, click Print. You see a Print window like this one: Check for your printer name here Click here to open your printer software 2. Make sure EPSON Stylus CX5400 is selected. 3. Click the Preferences - Epson CX5400 | User Manual - Page 21
or Help button. The Quality Type settings on this screen give you the best combination of quality and print speed for most prints. For the highest print quality (Photo RPM™) on selected papers, click the Advanced button on the Main tab. Then see Customizing Windows Print Settings for instructions on - Epson CX5400 | User Manual - Page 22
You can also see how much ink you have left. Click to cancel printing Click to pause or resume printing Selecting Default Settings Your printer settings apply only to the program you're currently using. If you want, you can change the Windows default printer settings for all your programs. 1. Right - Epson CX5400 | User Manual - Page 23
, click the Help or ? button. If you want to use the Advanced screen each time you access your printer settings, select the Show this screen first checkbox. 3. Once you've finished selecting advanced settings, you can: ■ Click OK to save your settings, return to the Print window, and print. ■ Click - Epson CX5400 | User Manual - Page 24
, select settings here Note: For more information on page layout settings, click the Help or ? button. 5. Click OK to save your settings, return to the Print window, and print. Printing BorderFree Photos (Windows) You can print your photos with no margins, extending the image all the way to the - Epson CX5400 | User Manual - Page 25
You can print BorderFree photos using the EPSON Stylus CX5400 menus and buttons or your printer software. To use the menus and buttons, follow the instructions in Copying Without the Computer and select Border Free as the Copy Mode setting, as described in Changing Copy Settings. To use your printer - Epson CX5400 | User Manual - Page 26
Printing With Macintosh OS 8.6 to 9.x instead.) Before you begin, make sure you added your printer to Print CX5400 from the Format for pop-up menu Select the Paper Size, Orientation, and any other settings you want to use If you want to print a borderless photo, follow the instructions in Printing - Epson CX5400 | User Manual - Page 27
to select the same option in the Printer pull-down menu as you selected in the Page Setup window. For example, if you selected Stylus CX5400 (Sheet Feeder - Borderless), be sure to choose that exact setting in the Print window too. Click here and select Print Settings Select the same option as the - Epson CX5400 | User Manual - Page 28
see Customizing Print Settings (Mac OS X). For more information about printer settings, click Help. 8. You can also choose other print settings by the printer software ■ Summary, to view a list of all your selections 9. Click Print. 10. To monitor the progress of your print job, click the Print - Epson CX5400 | User Manual - Page 29
11. Double-click your printer in the Printer List window. You see a screen like this: 12. Monitor the progress of your print job or do one of the following: ■ Click the print job, then click Delete to delete the job ■ Click the print job, then click Hold to pause printing ■ Click a print job marked - Epson CX5400 | User Manual - Page 30
instructions on saving them as a group so you can reuse them later, click Help. 3. Click Print. Printing BorderFree Photos (Macintosh OS X) You can print or enlargements, without trimming. BorderFree printing supports the following paper types and sizes: EPSON paper name Sizes Menu setting Photo - Epson CX5400 | User Manual - Page 31
Type or Media Type setting Matte Paper Heavyweight DURABrite Ink Glossy Photo Paper Note: For instructions on loading special paper, see Special Papers. You can print BorderFree photos using the menus and buttons on the Stylus CX or your printer software. To use the menus and buttons, follow the - Epson CX5400 | User Manual - Page 32
7. Click File > Print. 8. Select Print Settings from the pull-down menu. 9. Select Stylus CX5400 (Sheet Feeder - BorderFree) from the Printer pull-down menu. Always check to make sure you selected the same setting you chose in the Page Setup window. Select Stylus CX5400 (Sheet Feeder - Borderless) - Epson CX5400 | User Manual - Page 33
CX5400 Select your paper size Select the orientation of your document or image 2. Click OK to close the Page Setup window. 3. From the File menu, select Print see Customizing Print Settings (Mac OS 8.6 to 9.x) for instructions on selecting Photo RPM. For more information about printer settings, click - Epson CX5400 | User Manual - Page 34
menu in the upper right corner of the screen. You see the EPSON Monitor window: Select your print job, then click here to cancel printing Click to check ink levels Note: If you're not using background printing and you need to cancel printing, hold down the key and press the . (period) key. 31 - Epson CX5400 | User Manual - Page 35
options here Select color management settings here Note: For the highest print quality, select Photo RPM. Please note that printing will take longer in this mode. For more information on advanced settings, or instructions on saving them as a group so you can reuse them later, click ?. 3. Click OK - Epson CX5400 | User Manual - Page 36
setting Glossy Photo Paper Matte Paper Heavyweight DURABrite Ink Glossy Photo Paper Note: For instructions on loading special paper, see Special Papers. You can print BorderFree photos using the menus and buttons on the Stylus CX or your printer software. To use the menus and buttons, follow the - Epson CX5400 | User Manual - Page 37
4. Select Portrait or Landscape as the Orientation setting. 5. Click OK. 6. Click File > Print. 7. Select your paper type as the Media Type setting. 8. Click Print. 34 - Epson CX5400 | User Manual - Page 38
Type Select the correct Type or Media Type setting so your printer knows what kind of paper you're using and adjusts the ink coverage accordingly. For this paper Select this Type or Media Type setting Plain paper sheets or envelopes EPSON Premium Bright White Paper Plain Paper/Bright White Paper - Epson CX5400 | User Manual - Page 39
36 - Epson CX5400 | User Manual - Page 40
EPSON Smart Panel ■ Scanning to a File ■ One-Touch Scanning ■ Advanced Scanning With EPSON Scan Placing Your Original Document 1. Open the scanner from the edges 3. Close the scanner lid. Note: If you place your document against the guides, the edges next to the guides won't be scanned. If you need - Epson CX5400 | User Manual - Page 41
programs on your computer, as described below, or use it with the EPSON Stylus CX5400 Scan button for automatic scanning, as described in Scanning to a File. . Scans and prints a document with the power and flexibility of a conventional photocopier. When you install your own fax software, scans your - Epson CX5400 | User Manual - Page 42
the on-screen Smart Panel User Guide. Scanning to a File 1. Place the document face-down on the glass, in the top, left corner as described in Placing Your Original Document. 2. Select the EPSON Smart Panel icon on your desktop or press the Scan button on the EPSON Stylus CX5400 to open Smart Panel - Epson CX5400 | User Manual - Page 43
Note: You can also open EPSON Smart Panel in Windows by selecting Start > All Programs or Programs > EPSON Smart Panel > EPSON Smart Panel. On Macintosh, you can open Smart Panel from the Applications folder. 3. Click the Scan and Save button. Smart Panel starts EPSON Scan, which automatically scans - Epson CX5400 | User Manual - Page 44
Next 5. Click Next. 6. Select a file location and file type, then click Save to save your file to the location you selected. It's ready to open, print, e-mail, or use as you like. Note: For instructions on scanning with the other Smart Panel options, select ? in the Smart Panel - Epson CX5400 | User Manual - Page 45
Smart Panel icon on your desktop or press the Scan button on the EPSON Stylus CX5400. Note: You can also open EPSON Smart Panel in Windows by selecting Start > All Programs or Programs > EPSON Smart Panel > EPSON Smart Panel. On Macintosh, you can open Smart Panel from the Applications folder. Scan - Epson CX5400 | User Manual - Page 46
Professional Mode lets you manually configure advanced image settings, including Color Restoration. Note: EPSON Scan starts in the one of the following: ■ On Macintosh, double-click EPSON Scan in the Applications folder and go to step 4. ■ In Windows, select Start > All Programs or Programs > EPSON - Epson CX5400 | User Manual - Page 47
3. Open the File menu and choose Import or Acquire and select EPSON Stylus CX5400. Click to start EPSON Scan EPSON Scan starts previewing your image in Full Auto Mode. 4. To switch modes, click the Pause button at the bottom of the screen. Click Pause 5. Select - Epson CX5400 | User Manual - Page 48
EPSON Scan previews your image and displays the screen for the mode you chose. Home Mode Professional Mode 45 - Epson CX5400 | User Manual - Page 49
the EPSON Scan window, click the Preview button. After a moment, your image appears in the Preview window. Click the Auto Detect icon Note: If you placed more than one document way you want to print or view it. (Click Help on the EPSON Scan screen for detailed information about all the available settings.) - Epson CX5400 | User Manual - Page 50
the Scan button. If you scanned from an application like Photoshop, your scanned image opens in your application window. If you opened EPSON Scan from the Applications folder, you see a File Save Settings window. Type a name for your file in the Prefix box, select a file format in the Type box, and - Epson CX5400 | User Manual - Page 51
You can create a marquee on each preview image, if you're scanning more than one at a time. Marquee ■ To move the entire marquee, click inside the outlined area the marquee to where you want it. ■ To resize the marquee, click on one of the edges or corners and drag the marquee to the size you want. ■ - Epson CX5400 | User Manual - Page 52
Help button on your printer settings window for instructions running the print head cleaning utility. 1. Make sure the EPSON Stylus CX5400 is turned on but not printing, and the Error light is off. (If the Error light is flashing or on, you may need to replace an ink cartridge; see Replacing an Ink - Epson CX5400 | User Manual - Page 53
When you don't turn on your EPSON Stylus CX5400 for a long time, the print quality can decline. It's a good idea to turn it on at least once a month to maintain good print quality. Purchasing Ink Cartridges Use these EPSON ink cartridges within six months of installing them and before the expiration - Epson CX5400 | User Manual - Page 54
the Ink Supply ■ Ink Cartridge Precautions ■ Removing and Installing Ink Cartridges Checking the Ink Supply If the Error light on the EPSON Stylus CX5400 is flashing and you see an ink low or ink out message on the LCD screen and your computer monitor, you need to replace one of the cartridges. When - Epson CX5400 | User Manual - Page 55
: To avoid damaging the EPSON Stylus CX5400, never move the print head by hand. You cannot print if any ink cartridge is empty. Leave the empty cartridge installed in the EPSON Stylus CX5400 until you have obtained a replacement. Otherwise the ink remaining in the print head nozzles may dry out - Epson CX5400 | User Manual - Page 56
Installing Ink Cartridges Be sure you have a new ink cartridge before you begin. Once you start the ink cartridge replacement procedure, you must complete all the steps in one session. 1. Make sure the EPSON Stylus CX5400 is turned on and not printing. The LCD screen tells you which ink cartridge - Epson CX5400 | User Manual - Page 57
4. Pinch the tabs on the front and back of the cartridge, lift it out of the printer, and dispose of it carefully. 5. Before you remove the new cartridge from its package, shake it four or five times. 6. Unwrap the new ink cartridge and lower it into its holder, then press down on the top of the - Epson CX5400 | User Manual - Page 58
also use a printer software utility to align the print head right from your computer. Select the ? or Help button on your printer settings window for instructions running the print head alignment utility. 1. Make sure the EPSON Stylus CX5400 is turned on and not printing, and the Error light is off - Epson CX5400 | User Manual - Page 59
first alignment page. 4. On the test page, select the pattern with the two vertical lines most precisely printed on top of each other. You may need to use a magnifying glass or loupe. Select one pattern each for rows 1, 2, 3, 4, and 5. (In this example, the best pattern in each row has been circled - Epson CX5400 | User Manual - Page 60
the best pattern, then press the Color Copy button. (In this example, pattern 4 is best.) 9. When you're finished, press the Color Copy button to print the third alignment sheet. 10. Repeat steps 7 through 8 to complete the alignment process. 57 - Epson CX5400 | User Manual - Page 61
Turn off the EPSON Stylus CX5400, unplug the power cord, and disconnect the USB cable. 2. Remove all the paper from the sheet feeder. 3. Clean the exterior with a soft, damp cloth. (Keep the scanner and scanner lid closed as you clean.) 4. If necessary, lift up the scanner and clean ink out of the - Epson CX5400 | User Manual - Page 62
, you need to prepare it for transportation in its original box or one of a similar size. Caution: To avoid damage, always leave the ink cartridges installed when transporting the EPSON Stylus CX5400. Never transport or store the Stylus CX on its side or in a tilted or upside-down position. 1. Press - Epson CX5400 | User Manual - Page 63
the EPSON Stylus CX5400 case. Tape the ink cartridge holder to the case Caution: Be sure to remove the tape after installing the EPSON Stylus CX5400 in its new location. 8. Close the scanner carefully until it clicks back into place, then close the output tray. 9. Repack the EPSON Stylus CX5400 and - Epson CX5400 | User Manual - Page 64
Check ■ Setup and Software Installation Problems ■ Printing and Copying Problems ■ Scanning Problems ■ Paper Feed Problems ■ Print Quality Problems ■ Miscellaneous Printing Problems ■ Scan Quality Problems Checking the LCD Screen LCD screen On button and light Scan button Error light Stop button - Epson CX5400 | User Manual - Page 65
unit. Scanner error - - - > See your documentation and call service if necessary. Printer error - - - > See your documentation and call service if necessary. Solution The indicated ink cartridge is not installed. See Replacing an Ink Cartridge to install a cartridge. The indicated ink cartridge is - Epson CX5400 | User Manual - Page 66
Visit http://support.epson.com and check the section for your product to see if there is new software available for downloading to your computer. The EPSON Stylus CX5400 makes noise after ink cartridge installation. ■ When you install ink cartridges, the Stylus CX must charge its ink delivery system - Epson CX5400 | User Manual - Page 67
sure your EPSON Stylus CX5400 software is installed correctly. ■ If you're printing on a network, you need to set up your EPSON Stylus CX5400 for network printing, as described in Setting Up Network Printing. It sounds like the EPSON Stylus CX5400 is printing, but nothing prints. ■ The print head - Epson CX5400 | User Manual - Page 68
) or Black ink (Macintosh) in your printer software (see Printing With Windows, Printing With Macintosh OS 8.6 to 9.x, or Printing With Macintosh OS X), or press the B&W Copy button. ■ Turn MicroWeave® off (Macintosh only) and High Speed on in your printer software. ■ If your EPSON Stylus CX5400 is - Epson CX5400 | User Manual - Page 69
Use only the USB cable that came with your Stylus CX. ■ If you see your EPSON Stylus CX5400 in the Windows Control Panel, but you can't scan, uninstall and reinstall its software; see Uninstalling Your Software. The EPSON Stylus CX5400 scanning software doesn't work properly. ■ Make sure your system - Epson CX5400 | User Manual - Page 70
button on the Smart Panel main window for instructions. Paper Feed Problems Too many copies are printing. Make sure that the Copies setting in your printer software and/or program aren't set for multiple copies. Paper doesn't feed correctly or jams in the EPSON Stylus CX5400. ■ If paper doesn't feed - Epson CX5400 | User Manual - Page 71
is face up. ■ The ink cartridges may need replacing; see Replacing an Ink Cartridge. ■ Try using Automatic mode (Macintosh); see Printing With Macintosh OS X or Printing With Macintosh OS 8.6 to 9.x. ■ Align the print head; see Aligning the Print Head for instructions. Your printout is blurry or - Epson CX5400 | User Manual - Page 72
saturation and absorption of genuine EPSON inks. Your printout is faint or has gaps. ■ Clean the print head; see Cleaning the Print Head for instructions. ■ The ink cartridges may be old or low on ink; see Replacing an Ink Cartridge. ■ Select the correct Type (Windows) or Media Type (Macintosh - Epson CX5400 | User Manual - Page 73
■ Make sure Black Ink Only is off (Windows) or Color ink is selected (Macintosh), even when you're printing black and white photographs. ■ Clean the print head; see Cleaning the Print Head for instructions. ■ The ink cartridges may be old or low on ink; see Replacing an Ink Cartridge. ■ Try turning - Epson CX5400 | User Manual - Page 74
Miscellaneous Printing Problems You see incorrect characters. ■ Make sure the USB cable is securely connected and that it meets the requirements listed in System Requirements. ■ Make sure your EPSON Stylus CX5400 is selected in your application, or as the Windows default printer. The image size or - Epson CX5400 | User Manual - Page 75
the correct Image Type, Exposure, and Gamma setting are selected in EPSON Scan. Click the Help button on the EPSON Scan window for details. ■ Make sure the document table glass is clean; see Cleaning the Stylus CX. ■ Make sure the EPSON Stylus CX5400 is not tilted or placed on an unstable or uneven - Epson CX5400 | User Manual - Page 76
Scan for instructions. The image does not look the same as the original. ■ Your image and display settings may not be correct for your document type. Click Help in the EPSON Scan window for details. ■ Your monitor and printer use different technologies to represent colors, so your printed colors can - Epson CX5400 | User Manual - Page 77
your printout, you may need to clean your print head, see Cleaning the Print Head. Uninstalling Your Software ■ Windows XP or 2000 ■ Windows Me or 98 Windows XP or 2000 1. Make sure your EPSON Stylus CX5400 is plugged in and connected to your computer. 2. In Windows XP, click Start, right-click My - Epson CX5400 | User Manual - Page 78
■ EPSON Photo Print ■ EPSON Printer Software ■ EPSON Scan ■ ScanToWeb 9. Follow the installation steps on the Start Here sheet to reinstall your software. Windows Me or 98 1. Disconnect the USB cable from the EPSON Stylus CX5400. 2. Click Start > Programs > EPSON Smart Panel > Uninstall EPSON Smart - Epson CX5400 | User Manual - Page 79
76 - Epson CX5400 | User Manual - Page 80
software programs if you log on as a Limited account user. After you install Windows XP, the user account is set as a Computer Administrator account. The images that are provided in the following section pertain to Windows 2000. First, you need to set up the EPSON Stylus CX5400 as a shared printer - Epson CX5400 | User Manual - Page 81
insert the printer software CD into the CD-ROM drive. Select the folder for Windows Me or 98. Click OK to install the additional drivers. 4. Click OK, or click Close if you installed additional drivers. Accessing a Network Printer Follow the steps below to print to the EPSON Stylus CX5400 from other - Epson CX5400 | User Manual - Page 82
click the Add Printer icon. The Add Printer Wizard opens. 3. Click Next. 4. Select Network printer, then click Next. 5. On the next screen, click Next. 6. Double-click the icon of the computer that is directly connected to the EPSON Stylus CX5400. Then, click the icon for the EPSON Stylus CX5400. 79 - Epson CX5400 | User Manual - Page 83
Wizard may prompt you to install the printer driver from the printer software CD. In this case, click the Have Disk button and follow the on-screen instructions. Windows Me and 98 This section tells you how to set up the EPSON Stylus CX5400 so that other computers on a network can print to it. (The - Epson CX5400 | User Manual - Page 84
a Networked Printer Follow the steps below to print to the EPSON Stylus CX5400 from other computers on a network. Note: The EPSON Stylus CX5400 must be set up as a shared resource on the computer to which it is directly connected before you can access it from another computer. For instructions, see - Epson CX5400 | User Manual - Page 85
. 3. Click Next. 4. Select Network printer, then click Next. 5. On the next screen, click Browse. 6. Double-click the icon of the computer that the EPSON Stylus CX5400 is directly connected to. Then, click the icon for the EPSON Stylus CX5400. 7. Click OK and follow the on-screen instructions. 82 - Epson CX5400 | User Manual - Page 86
connected to. Then, you must specify the network path to the EPSON Stylus CX5400 from each computer that will use it, and install the printer software on those computers. Setting Up a Shared Printer To share the EPSON Stylus CX5400 with other computers on an AppleTalk network, follow the steps below - Epson CX5400 | User Manual - Page 87
2. Install the printer software from the EPSON Stylus CX5400 CD-ROM. 3. Choose Chooser from the Apple menu. Then, click the icon for the EPSON Stylus CX5400 and select the shared EPSON Stylus CX5400 from the Select a printer port list. Note: Only printers that are connected to your current AppleTalk - Epson CX5400 | User Manual - Page 88
need help with the EPSON Stylus CX5400 or EPSON Scan, see the contact information below. See Other Software Technical Support if you need help with other software that came on your EPSON Stylus CX5400 CD-ROM. EPSON provides technical assistance 24 hours a day through the electronic support services - Epson CX5400 | User Manual - Page 89
of the problem To get the best prints and copies, use genuine EPSON ink and paper. You can purchase ink cartridges, paper and accessories from your local retailer. Please call (800) 463-7766 to locate a retailer near you. Other Software Technical Support Software Telephone EPSON Smart Panel - Epson CX5400 | User Manual - Page 90
Specifications ■ Printing ■ Paper ■ Mechanical ■ Ink Cartridges ■ Scanning ■ Electrical ■ Environmental ■ Standards and Approvals ■ Interface Specifications 87 - Epson CX5400 | User Manual - Page 91
5760 × 1440 dpi on various papers using Photo RPM; see Customizing Windows Print Settings, Customizing Print Settings (Mac OS X), or Customizing Print Settings (Mac OS 8.6 to 9.x). Bidirectional with logic seeking ESC/P® raster EPSON Remote Paper Note: Since the quality of any particular brand or - Epson CX5400 | User Manual - Page 92
(8.5 × 14 inches) Executive (7.3 × 10.5 inches) Plain bond paper, special paper distributed by EPSON and various types of special media 0.003 to 0.004 inch (0.08 to 0.11 mm) 17 lb mm) 12 lb (45 g/m²) to 20 lb (75 g/m²) Ink Jet Cards Size Paper type A6 (4.1 × 5.8 inches) Special paper distributed by - Epson CX5400 | User Manual - Page 93
by EPSON DURABrite Ink Glossy Photo Paper Size Paper type Letter (8.5 × 11 inches) 4 × 6 inches (101.6 × 152.4 mm) Special paper distributed by EPSON Note: Poor quality paper may reduce the print quality and cause paper jams or other problems. If you have print quality problems, switch - Epson CX5400 | User Manual - Page 94
Do not load curled or folded paper. Use paper under normal conditions: Temperature: 59 to 77 °F (15 to 25 °C) Humidity: 40 to 60% RH Printable Area Single sheets or cards A B-L B-R C Envelopes A: top margin B-L: left margin B-R: right margin Sheets copied with Standard sheets small margin - Epson CX5400 | User Manual - Page 95
the sheet feeder with the short edge first. Load envelopes flap edge left with the flap side down. Depending on the type of paper, the print quality may deteriorate in the top and bottom areas of the printout, or these areas may be smeared. 92 - Epson CX5400 | User Manual - Page 96
inches (453 mm) Depth: 17.1 inches (434 mm) Height: 10.0 inches (254 mm) 19.8 lb (9.0 kg) without the ink cartridges Ink Cartridges Black Ink Cartridge (T0321) Color Print capacity* Temperature Dimensions Black 1240 pages/A4 (ISO/IEC 10561 Letter Pattern at 360 dpi) Storage: -4 to 104 °F (-20 to - Epson CX5400 | User Manual - Page 97
often you use the print head cleaning function and how often you turn this product on. ** Ink thaws and is usable after approximately 3 hours at 77 °F (25 °C). Caution: EPSON recommends the use of original EPSON ink cartridges only. Other products not manufactured by EPSON may cause damage to this - Epson CX5400 | User Manual - Page 98
data Gamma correction Interface Light source Reliability Lamp Flatbed color image scanner Color CCD line sensor 10,200 × 14,040 pixels Letter or A4 size (reading area selectable with software) 1200 dpi (main) 2400 dpi (sub) 50 to 4800 dpi (adjustable in one-dpi increments), 7200 dpi, and 9600 dpi - Epson CX5400 | User Manual - Page 99
based on the standards specified in the Universal Serial Bus Specifications Revision 1.1 and the Universal Serial Bus Device Class Definition for Printing Devices Version 1.1. This interface has the following characteristics: Standard Bit rate Data encoding Connector Based on Universal Serial Bus - Epson CX5400 | User Manual - Page 100
or more recommended) ■ CD-ROM or DVD drive for installing the software ■ Windows-compliant USB port and the USB cable that came with your EPSON Stylus CX5400. Macintosh System Requirements To use your EPSON Stylus CX5400 and its software, your system should have: ■ An Apple® iMacTM series, Power - Epson CX5400 | User Manual - Page 101
■ At least 200MB of free hard disk space (300MB or more recommended) ■ VGA monitor or better with at least 256 colors ■ CD-ROM or DVD drive for installing the printer software ■ The USB cable that came with your Stylus CX. 98 - Epson CX5400 | User Manual - Page 102
Instructions Ink Cartridge Safety Instructions LCD Panel Safety Instructions Before using your EPSON Stylus CX5400, read and follow these safety instructions: ■ Be sure to follow all warnings and instructions marked on the Stylus CX5400. ■ Use only the type of power source indicated on the Stylus - Epson CX5400 | User Manual - Page 103
disposal or recycling. Do not put in the trash. Ink Cartridge Safety Instructions ■ Leave the ink cartridges installed. Removing the cartridges can dehydrate the print head and may prevent the EPSON Stylus CX5200 from printing. ■ Keep ink cartridges out of the reach of children and do not drink - Epson CX5400 | User Manual - Page 104
not put your hand inside the Stylus CX5400 or touch the cartridge during printing. ■ Do not move the print head by hand; otherwise you may damage the Stylus CX5400. ■ Install the ink cartridge immediately after you remove it from its package. Leaving the cartridge unpacked for a long time before use - Epson CX5400 | User Manual - Page 105
installation. This equipment generates, uses, and can radiate radio frequency energy and, if not installed and used in accordance with the instructions . ■ Consult the dealer or an experienced radio/TV technician for help. WARNING The connection of a non-shielded equipment interface cable to - Epson CX5400 | User Manual - Page 106
this device. If this equipment has more than one interface connector, do not leave cables connected to unused interfaces. Changes or modifications received, including interference that may cause undesired operation. Trade Name: Type of Product: Model: EPSON Multifunction printer C141A 103 - Epson CX5400 | User Manual - Page 107
as Original EPSON Products or EPSON Approved Products by SEIKO EPSON CORPORATION. A Note Concerning Responsible Use of Copyrighted Materials Digital cameras, scanners, and ink jet printers, like conventional photocopiers and cameras, can be misused by improper copying or printing of copyrighted - Epson CX5400 | User Manual - Page 108
respectful of the copyright laws when using digital cameras, scanners, and ink jet printers. Trademarks EPSON, EPSON Stylus, ESC/P, and MicroWeave are registered trademarks and EPSON Smart Panel is a trademark of SEIKO EPSON CORPORATION. BorderFree and DURABrite are registered trademarks, RPM and - Epson CX5400 | User Manual - Page 109
106 - Epson CX5400 | User Manual - Page 110
art/Gradient.tif @ 80 dpi 1 art/Gradient.tif @ 80 dpi 2 art/Parts_2.eps 2 art/Parts_1.eps 2 art/envelopes_2.eps 2 art/Gradient.tif @ 80 dpi 3 art/Paper_Loading_Modified.eps 3 art/envelopes_1.eps 4 art/Envelope.eps 5 art/Paper.eps 5 art/envelopes_2.eps 5 art/Envelope.eps 5 art/Gradient.tif @ 80 dpi 9 - Epson CX5400 | User Manual - Page 111
art/osxprintsettings.tif @ 150 dpi 25 art/PCENTER ICON.tif 25 art/osxprintctr.tif @ 150 dpi 26 art/osxcustom.tif @ 150 dpi 27 art/osxborderless1.tif @ 150 dpi 28 art/osxportrait.tif @ 150 dpi 28 art/osxlandscapeleft.tif 28 art/osxlandscaperight.tif 28 art/osxborderless2.tif @ 150 dpi 29 art/Gradient - Epson CX5400 | User Manual - Page 112
50 art/Gradient.tif @ 80 dpi 51 art/BlackInk.eps 51 art/printericon.tif @ 150 dpi 51 art/mac ink icon.tif @ 300 dpi 51 art/Control_Panel.eps 52 art/mac-ink.tif @ 300 dpi 52 art/Control_Panel.eps 53 art/Ink_Replace_1.eps 53 art/Install_Ink_2K.eps 54 art/Install_Ink_1K.eps 54 - Epson CX5400 | User Manual - Page 113
art/Control_Panel.eps 61 art/Horizontal.tif 68 art/Blurry.tif 68 art/Faint.tif 69 art/Incorrect color.tif 70 art/Italyblur.tif 71 art/Italydrk.tif @ 300 dpi 72 art/Italy.tif @ 300 dpi 73 art/Gradient.tif @ 80 dpi 74 art/Gradient.tif @ 80 dpi 77 art/61w_2ksh.tif @ 150 dpi 78 art/787w2n1.tif @ 150 dpi
-
 1
1 -
 2
2 -
 3
3 -
 4
4 -
 5
5 -
 6
6 -
 7
7 -
8
-
9
-
10
-
11
-
12
-
13
-
14
-
15
-
16
-
17
-
18
-
19
-
20
-
21
-
22
-
23
-
24
-
25
-
26
-
27
-
28
-
29
-
30
-
31
-
32
-
33
-
34
-
35
-
36
-
37
-
38
-
39
-
40
-
41
-
42
-
43
-
44
-
45
-
46
-
47
-
48
-
49
-
50
-
51
-
52
-
53
-
54
-
55
-
56
-
57
-
58
-
59
-
60
-
61
-
62
-
63
-
64
-
65
-
66
-
67
-
68
-
69
-
70
-
71
-
72
-
73
-
74
-
75
-
76
-
77
-
78
-
79
-
80
-
81
-
82
-
83
-
84
-
85
-
86
-
87
-
88
-
89
-
90
-
91
-
92
-
93
-
94
-
95
-
96
-
97
-
98
-
99
-
100
-
101
-
102
-
103
-
104
-
105
-
106
-
107
-
108
-
109
-
110
-
111
-
112
-
113
 |
 |

i
EPSON Stylus CX5400 User’s Guide 1
EPSON Stylus CX5400 Parts 2
Loading Paper 3
Single Sheets 3
Envelopes 4
Special Papers 6
Copying 9
Copying Without the Computer 9
Changing Copy Settings 10
Copying With the Computer 13
Printing With Windows 17
Printing From an Application 17
Selecting Default Settings 19
Customizing Windows Print Settings 19
Printing BorderFree Photos (Windows) 21
Printing With Macintosh OS X 23
Customizing Print Settings (Mac OS X) 26
Printing BorderFree Photos (Macintosh OS X) 27
Printing With Macintosh OS 8.6 to 9.x 29
Customizing Print Settings (Mac OS 8.6 to 9.x) 32
Printing BorderFree Photos (Mac OS 8.6 to 9.x) 33
Selecting Your Paper Type 35
Scanning 37
Placing Your Original Document 37
Using EPSON Smart Panel 38
Scanning to a File 39
One-Touch Scanning 42
Advanced Scanning With EPSON Scan 43
Cleaning the Print Head 49
Purchasing Ink Cartridges 50