Epson CX5400 User Manual - Page 83
Windows Me and 98, Setting Up a Shared Printer - drivers
 |
UPC - 010343848412
View all Epson CX5400 manuals
Add to My Manuals
Save this manual to your list of manuals |
Page 83 highlights
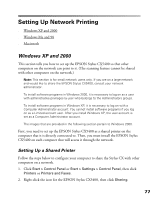
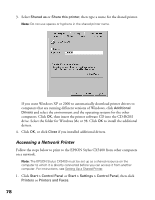
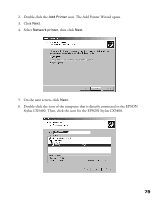
7. Click Next and follow the on-screen instructions. Note: Depending on the operating system and the configuration of the computer to which the EPSON Stylus CX5400 is connected, the Add Printer Wizard may prompt you to install the printer driver from the printer software CD. In this case, click the Have Disk button and follow the on-screen instructions. Windows Me and 98 This section tells you how to set up the EPSON Stylus CX5400 so that other computers on a network can print to it. (The scanning feature cannot be shared with other computers on the network.) First, you need to set up the EPSON Stylus CX5400 as a shared printer on the computer that it is directly connected to. Then, you must install the EPSON Stylus CX5400 on each computer that will access it through the network. Note: This section describes how to use the EPSON Stylus CX5400 as a shared printer on a network. To connect it directly to a network without setting it up as a shared printer, consult your network administrator. Setting Up a Shared Printer Follow the steps below to configure your computer for printer sharing and to share the EPSON Stylus CX5400 with other computers on a network. 1. Click Start > Settings > Control Panel. 2. Double-click the Network icon. 3. Click the File and Print Sharing button. 4. Select the I want to be able to allow others to print to my printer(s) check box and click OK. 80
-
 1
1 -
2
-
3
-
4
-
5
-
6
-
7
-
8
-
9
-
10
-
11
-
12
-
13
-
14
-
15
-
16
-
17
-
18
-
19
-
20
-
21
-
22
-
23
-
24
-
25
-
26
-
27
-
28
-
29
-
30
-
31
-
32
-
33
-
34
-
35
-
36
-
37
-
38
-
39
-
40
-
41
-
42
-
43
-
44
-
45
-
46
-
47
-
48
-
49
-
50
-
51
-
52
-
53
-
54
-
55
-
56
-
57
-
58
-
59
-
60
-
61
-
62
-
63
-
64
-
65
-
66
-
67
-
68
-
69
-
70
-
71
-
72
-
73
-
74
-
75
-
76
-
77
-
 78
78 -
 79
79 -
 80
80 -
 81
81 -
 82
82 -
 83
83 -
 84
84 -
 85
85 -
 86
86 -
 87
87 -
 88
88 -
89
-
90
-
91
-
92
-
93
-
94
-
95
-
96
-
97
-
98
-
99
-
100
-
101
-
102
-
103
-
104
-
105
-
106
-
107
-
108
-
109
-
110
-
111
-
112
-
113
 |
 |