Epson CX5400 User Manual - Page 60
buttons to select the number of the best pattern, then press
 |
UPC - 010343848412
View all Epson CX5400 manuals
Add to My Manuals
Save this manual to your list of manuals |
Page 60 highlights
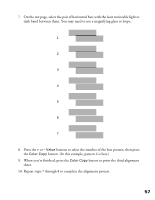
7. On the test page, select the pair of horizontal bars with the least noticeable light or dark band between them. You may need to use a magnifying glass or loupe. 1 2 3 4 5 6 7 8. Press the + or - Value buttons to select the number of the best pattern, then press the Color Copy button. (In this example, pattern 4 is best.) 9. When you're finished, press the Color Copy button to print the third alignment sheet. 10. Repeat steps 7 through 8 to complete the alignment process. 57
-
 1
1 -
2
-
3
-
4
-
5
-
6
-
7
-
8
-
9
-
10
-
11
-
12
-
13
-
14
-
15
-
16
-
17
-
18
-
19
-
20
-
21
-
22
-
23
-
24
-
25
-
26
-
27
-
28
-
29
-
30
-
31
-
32
-
33
-
34
-
35
-
36
-
37
-
38
-
39
-
40
-
41
-
42
-
43
-
44
-
45
-
46
-
47
-
48
-
49
-
50
-
51
-
52
-
53
-
54
-
 55
55 -
 56
56 -
 57
57 -
 58
58 -
 59
59 -
 60
60 -
 61
61 -
 62
62 -
 63
63 -
 64
64 -
 65
65 -
66
-
67
-
68
-
69
-
70
-
71
-
72
-
73
-
74
-
75
-
76
-
77
-
78
-
79
-
80
-
81
-
82
-
83
-
84
-
85
-
86
-
87
-
88
-
89
-
90
-
91
-
92
-
93
-
94
-
95
-
96
-
97
-
98
-
99
-
100
-
101
-
102
-
103
-
104
-
105
-
106
-
107
-
108
-
109
-
110
-
111
-
112
-
113
 |
 |

57
7.
On the test page, select the pair of horizontal bars with the least noticeable light or
dark band between them. You may need to use a magnifying glass or loupe.
8.
Press the
+
or
– Value
buttons to select the number of the best pattern, then press
the
Color Copy
button. (In this example, pattern 4 is best.)
9.
When you’re finished, press the
Color Copy
button to print the third alignment
sheet.
10. Repeat steps 7 through 8 to complete the alignment process.
2
1
3
4
5
6
7