Epson CX5400 User Manual - Page 15
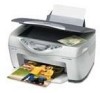
Paper Size, Lighten or Darken, Copy Quality, buttons to select the size of the paper you loaded
 |
UPC - 010343848412
View all Epson CX5400 manuals
Add to My Manuals
Save this manual to your list of manuals |
Page 15 highlights
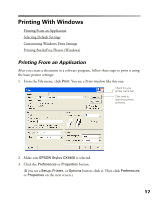
Note: The Copy mode settings determine the options available with other settings. Not all of the other options described here are available with every Copy mode setting. Paper Size Press the right Menu button until you see Paper size on the LCD screen. Then press the + or - Value buttons to select the size of the paper you loaded, either Letter, 4 × 6, 5 × 7, or A4 (8.3 × 11.7 inches). Note: The 4 × 6 Paper size option is not compatible with Glossy Photo Paper, 4" x 6", with micro perforated edges (S041134 and S041671). Lighten or Darken Press the right Menu button until you see Lighter/Darker on the LCD screen. Then press the + or - Value buttons to lighten or darken your copies. Copy Quality Press the right Menu button until you see Quality&Paper on the LCD screen. Then press the + or - Value buttons to select a print quality appropriate for your document and the paper you loaded: Quality&Paper setting Plain Paper-Econ Plain Paper-Norm Plain Paper-Fine Plain Paper-Best Matte Paper HW Photo Paper DB Photo Paper Use when you've loaded Plain paper or Premium Bright White Paper for quick copying with draft print quality Plain paper or Premium Bright White Paper for text copying with normal print quality Plain paper or Premium Bright White Paper for text and graphics copying with high print quality Plain paper or Premium Bright White Paper for improved image quality Matte Paper Heavyweight or Double-Sided Matte Paper Photo Paper, Glossy Photo Paper, or Premium Semigloss Paper DURABrite Ink Glossy Photo Paper 12
-
 1
1 -
2
-
3
-
4
-
5
-
6
-
7
-
8
-
9
-
 10
10 -
 11
11 -
 12
12 -
 13
13 -
 14
14 -
 15
15 -
 16
16 -
 17
17 -
 18
18 -
 19
19 -
 20
20 -
21
-
22
-
23
-
24
-
25
-
26
-
27
-
28
-
29
-
30
-
31
-
32
-
33
-
34
-
35
-
36
-
37
-
38
-
39
-
40
-
41
-
42
-
43
-
44
-
45
-
46
-
47
-
48
-
49
-
50
-
51
-
52
-
53
-
54
-
55
-
56
-
57
-
58
-
59
-
60
-
61
-
62
-
63
-
64
-
65
-
66
-
67
-
68
-
69
-
70
-
71
-
72
-
73
-
74
-
75
-
76
-
77
-
78
-
79
-
80
-
81
-
82
-
83
-
84
-
85
-
86
-
87
-
88
-
89
-
90
-
91
-
92
-
93
-
94
-
95
-
96
-
97
-
98
-
99
-
100
-
101
-
102
-
103
-
104
-
105
-
106
-
107
-
108
-
109
-
110
-
111
-
112
-
113
 |
 |