HP P Class 450/500/550/600/650/700/750 HP Visualize x- and p-Class (733,800, 8 - Page 106
Remove the Hard Disk Drive From Its CD Drive Shelf, Removing the Hard Disk
 |
View all HP P Class 450/500/550/600/650/700/750 manuals
Add to My Manuals
Save this manual to your list of manuals |
Page 106 highlights
Opening Your Personal Workstation and Installing Accessories Hard Disk Drives Figure 2-67 the top of the CD drive bay area. See Figure 2-67. Remove the Hard Disk Drive From Its CD Drive Shelf Hard Disk Drive Hard Disk Drive Metal Blank Figure 2-68 4. Remove both guide rails by lifting up on either end of the guide rails. They will snap off the mounting bracket. Next, remove the four mounting screws from the hard disk drive mounting bracket. See Figure 2-68. Removing the Hard Disk Drive Guide Rails and Mounting Screws Mounting Bracket Guide Rail Slotted Mounting Screws (there are two on the other side) 5. Remove the hard disk drive from the mounting bracket. See Figure 106 Chapter 2
-
 1
1 -
2
-
3
-
4
-
5
-
6
-
7
-
8
-
9
-
10
-
11
-
12
-
13
-
14
-
15
-
16
-
17
-
18
-
19
-
20
-
21
-
22
-
23
-
24
-
25
-
26
-
27
-
28
-
29
-
30
-
31
-
32
-
33
-
34
-
35
-
36
-
37
-
38
-
39
-
40
-
41
-
42
-
43
-
44
-
45
-
46
-
47
-
48
-
49
-
50
-
51
-
52
-
53
-
54
-
55
-
56
-
57
-
58
-
59
-
60
-
61
-
62
-
63
-
64
-
65
-
66
-
67
-
68
-
69
-
70
-
71
-
72
-
73
-
74
-
75
-
76
-
77
-
78
-
79
-
80
-
81
-
82
-
83
-
84
-
85
-
86
-
87
-
88
-
89
-
90
-
91
-
92
-
93
-
94
-
95
-
96
-
97
-
98
-
99
-
100
-
 101
101 -
 102
102 -
 103
103 -
 104
104 -
 105
105 -
 106
106 -
 107
107 -
 108
108 -
 109
109 -
 110
110 -
 111
111 -
112
-
113
-
114
-
115
-
116
-
117
-
118
-
119
-
120
-
121
-
122
-
123
-
124
-
125
-
126
-
127
-
128
-
129
-
130
-
131
-
132
-
133
-
134
-
135
-
136
-
137
-
138
-
139
-
140
-
141
-
142
-
143
-
144
-
145
-
146
-
147
-
148
-
149
-
150
-
151
-
152
-
153
-
154
-
155
-
156
-
157
-
158
-
159
-
160
-
161
-
162
-
163
-
164
-
165
-
166
-
167
-
168
-
169
-
170
-
171
-
172
-
173
-
174
-
175
-
176
-
177
-
178
-
179
-
180
-
181
-
182
-
183
-
184
-
185
-
186
-
187
-
188
-
189
-
190
-
191
-
192
-
193
-
194
-
195
 |
 |
106
Chapter 2
Opening Your Personal Workstation and Installing Accessories
Hard Disk Drives
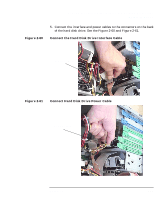
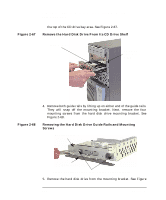
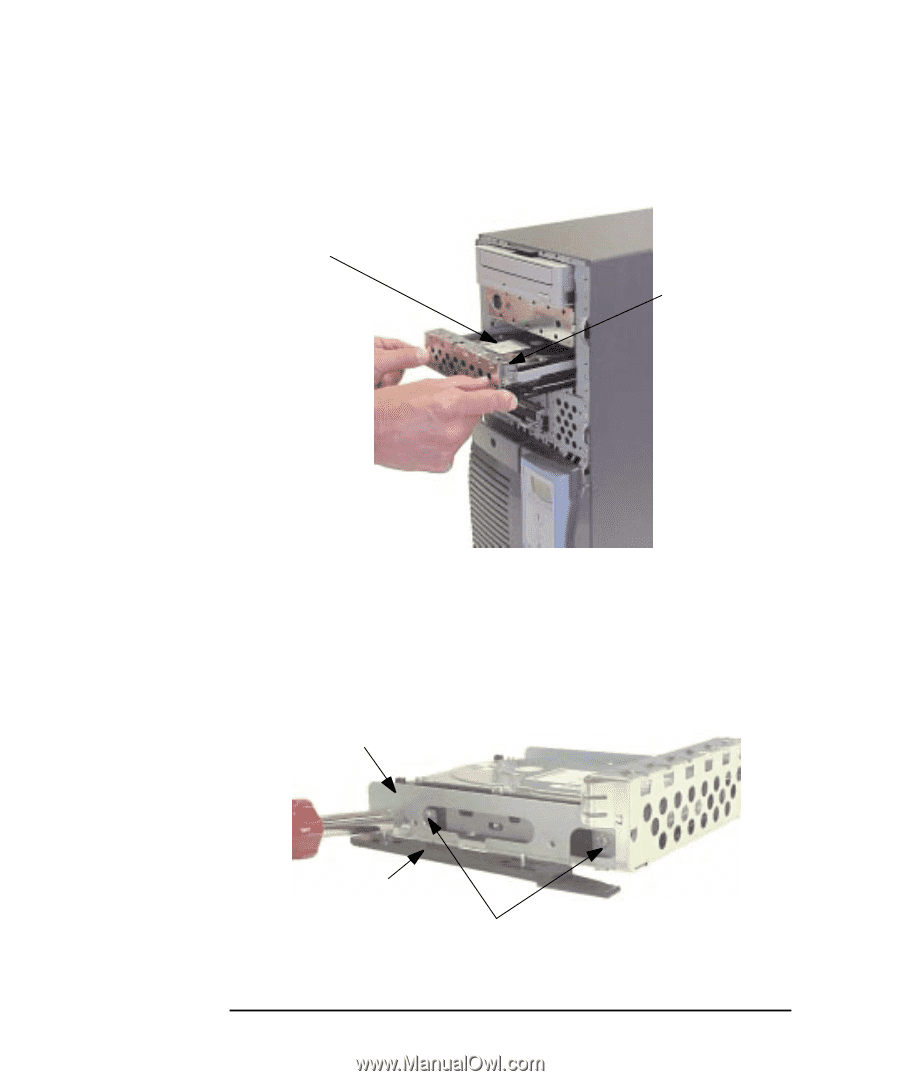
the top of the CD drive bay area. See Figure 2-67.
Figure 2-67
Remove the Hard Disk Drive From Its CD Drive Shelf
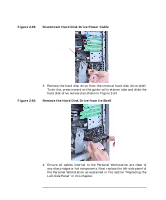
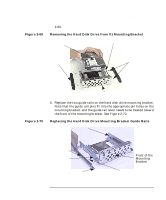
4.
Remove both guide rails by lifting up on either end of the guide rails.
They will snap off the mounting bracket. Next, remove the four
mounting screws from the hard disk drive mounting bracket. See
Figure 2-68.
Figure 2-68
Removing the Hard Disk Drive Guide Rails and Mounting
Screws
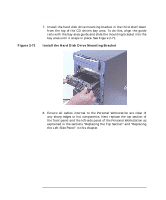
5.
Remove the hard disk drive from the mounting bracket. See Figure
Hard Disk Drive
Hard Disk
Drive Metal
Blank
Slotted Mounting Screws (there are two on the other side)
Guide Rail
Mounting Bracket