HP P Class 450/500/550/600/650/700/750 HP Visualize x- and p-Class (733,800, 8 - Page 89
Installing and Removing a Floppy Disk Drive
 |
View all HP P Class 450/500/550/600/650/700/750 manuals
Add to My Manuals
Save this manual to your list of manuals |
Page 89 highlights
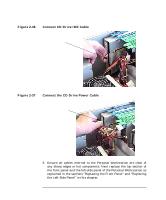
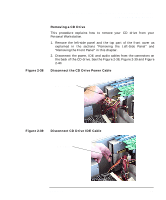
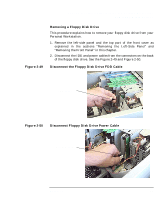
WARNING CAUTION Opening Your Personal Workstation and Installing Accessories Removable Media Devices Installing and Removing a Floppy Disk Drive This section explains how to install and remove your floppy disk drive. Since a floppy disk drive comes installed in your Personal Workstation, the only time you will need to install a floppy disk drive is when you need to replace a faulty one. Turn the Personal Workstation off and unplug the power cord before installing or removing the floppy disk drive. Floppy disk drives are susceptible to mechanical and electrical shock. When handling the drive, always wear the static-grounding strap that came with the floppy disk drive kit. Always handle the drive carefully. Installing a Floppy Disk Drive This procedure explains how to install your floppy disk drive in your Personal Workstation. 1. Remove the left-side panel and the top part of the front cover as explained in the sections "Removing the Left-Side Panel" and "Removing the Front Panel" in this chapter. 2. Remove the old floppy disk drive as explained in the subsequent section "Removing a Floppy Disk Drive" in this chapter. Chapter 2 89
-
 1
1 -
2
-
3
-
4
-
5
-
6
-
7
-
8
-
9
-
10
-
11
-
12
-
13
-
14
-
15
-
16
-
17
-
18
-
19
-
20
-
21
-
22
-
23
-
24
-
25
-
26
-
27
-
28
-
29
-
30
-
31
-
32
-
33
-
34
-
35
-
36
-
37
-
38
-
39
-
40
-
41
-
42
-
43
-
44
-
45
-
46
-
47
-
48
-
49
-
50
-
51
-
52
-
53
-
54
-
55
-
56
-
57
-
58
-
59
-
60
-
61
-
62
-
63
-
64
-
65
-
66
-
67
-
68
-
69
-
70
-
71
-
72
-
73
-
74
-
75
-
76
-
77
-
78
-
79
-
80
-
81
-
82
-
83
-
 84
84 -
 85
85 -
 86
86 -
 87
87 -
 88
88 -
 89
89 -
 90
90 -
 91
91 -
 92
92 -
 93
93 -
 94
94 -
95
-
96
-
97
-
98
-
99
-
100
-
101
-
102
-
103
-
104
-
105
-
106
-
107
-
108
-
109
-
110
-
111
-
112
-
113
-
114
-
115
-
116
-
117
-
118
-
119
-
120
-
121
-
122
-
123
-
124
-
125
-
126
-
127
-
128
-
129
-
130
-
131
-
132
-
133
-
134
-
135
-
136
-
137
-
138
-
139
-
140
-
141
-
142
-
143
-
144
-
145
-
146
-
147
-
148
-
149
-
150
-
151
-
152
-
153
-
154
-
155
-
156
-
157
-
158
-
159
-
160
-
161
-
162
-
163
-
164
-
165
-
166
-
167
-
168
-
169
-
170
-
171
-
172
-
173
-
174
-
175
-
176
-
177
-
178
-
179
-
180
-
181
-
182
-
183
-
184
-
185
-
186
-
187
-
188
-
189
-
190
-
191
-
192
-
193
-
194
-
195
 |
 |