HP P Class 450/500/550/600/650/700/750 HP Visualize x- and p-Class (733,800, 8 - Page 73
Preparing the Memory Slot Ejector Tabs
 |
View all HP P Class 450/500/550/600/650/700/750 manuals
Add to My Manuals
Save this manual to your list of manuals |
Page 73 highlights
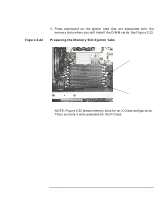
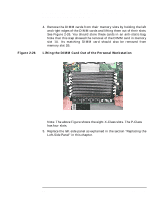
Opening Your Personal Workstation and Installing Accessories Installing and Removing Memory Figure 2-22 3. Press downward on the ejector tabs that are associated with the memory slots where you will install the DIMM cards. See Figure 2-22. Preparing the Memory Slot Ejector Tabs Memory Slot 1B Ejector Tab Memory Slot 1A Ejector Tab NOTE: Figure 2-22 shows memory slots for an X-Class configuration. There are only 4 slots available for the P-Class. Chapter 2 73
-
 1
1 -
2
-
3
-
4
-
5
-
6
-
7
-
8
-
9
-
10
-
11
-
12
-
13
-
14
-
15
-
16
-
17
-
18
-
19
-
20
-
21
-
22
-
23
-
24
-
25
-
26
-
27
-
28
-
29
-
30
-
31
-
32
-
33
-
34
-
35
-
36
-
37
-
38
-
39
-
40
-
41
-
42
-
43
-
44
-
45
-
46
-
47
-
48
-
49
-
50
-
51
-
52
-
53
-
54
-
55
-
56
-
57
-
58
-
59
-
60
-
61
-
62
-
63
-
64
-
65
-
66
-
67
-
 68
68 -
 69
69 -
 70
70 -
 71
71 -
 72
72 -
 73
73 -
 74
74 -
 75
75 -
 76
76 -
 77
77 -
 78
78 -
79
-
80
-
81
-
82
-
83
-
84
-
85
-
86
-
87
-
88
-
89
-
90
-
91
-
92
-
93
-
94
-
95
-
96
-
97
-
98
-
99
-
100
-
101
-
102
-
103
-
104
-
105
-
106
-
107
-
108
-
109
-
110
-
111
-
112
-
113
-
114
-
115
-
116
-
117
-
118
-
119
-
120
-
121
-
122
-
123
-
124
-
125
-
126
-
127
-
128
-
129
-
130
-
131
-
132
-
133
-
134
-
135
-
136
-
137
-
138
-
139
-
140
-
141
-
142
-
143
-
144
-
145
-
146
-
147
-
148
-
149
-
150
-
151
-
152
-
153
-
154
-
155
-
156
-
157
-
158
-
159
-
160
-
161
-
162
-
163
-
164
-
165
-
166
-
167
-
168
-
169
-
170
-
171
-
172
-
173
-
174
-
175
-
176
-
177
-
178
-
179
-
180
-
181
-
182
-
183
-
184
-
185
-
186
-
187
-
188
-
189
-
190
-
191
-
192
-
193
-
194
-
195
 |
 |

Chapter 2
73
Opening Your Personal Workstation and Installing Accessories
Installing and Removing Memory
3.
Press downward on the ejector tabs that are associated with the
memory slots where you will install the DIMM cards. See Figure 2-22.
Figure 2-22
Preparing the Memory Slot Ejector Tabs
NOTE: Figure 2-22 shows memory slots for an X-Class configuration.
There are only 4 slots available for the P-Class.
Memory Slot 1B
Ejector Tab
Memory Slot 1A
Ejector Tab