HP P Class 450/500/550/600/650/700/750 HP Visualize x- and p-Class (733,800, 8 - Page 63
View of the Bottom of the Front Panel Swung Outward, View of
 |
View all HP P Class 450/500/550/600/650/700/750 manuals
Add to My Manuals
Save this manual to your list of manuals |
Page 63 highlights
Figure 2-8 Opening Your Personal Workstation and Installing Accessories Removing and Replacing the Left-Side and Front Panels Your front panel's bottom section will look like the one in Figure 2-8 when you have completed this step. View of the Bottom Section of the Front Panel Swung Outward Front Panel's Bottom section View from the top Front Panel's Bottom Section Figure 2-9 Push 3. Hold the bottom section of the front panel in one hand and push this section in the direction of the "Push" arrow as shown in Figure 2-8. This will release the bottom section's hinge tabs from their hinge slots and the bottom section will be freed from the system chassis. See Figure 2-9. View of the Bottom Section's Hinge Slots Hinge Slots Chapter 2 63
-
 1
1 -
2
-
3
-
4
-
5
-
6
-
7
-
8
-
9
-
10
-
11
-
12
-
13
-
14
-
15
-
16
-
17
-
18
-
19
-
20
-
21
-
22
-
23
-
24
-
25
-
26
-
27
-
28
-
29
-
30
-
31
-
32
-
33
-
34
-
35
-
36
-
37
-
38
-
39
-
40
-
41
-
42
-
43
-
44
-
45
-
46
-
47
-
48
-
49
-
50
-
51
-
52
-
53
-
54
-
55
-
56
-
57
-
 58
58 -
 59
59 -
 60
60 -
 61
61 -
 62
62 -
 63
63 -
 64
64 -
 65
65 -
 66
66 -
 67
67 -
 68
68 -
69
-
70
-
71
-
72
-
73
-
74
-
75
-
76
-
77
-
78
-
79
-
80
-
81
-
82
-
83
-
84
-
85
-
86
-
87
-
88
-
89
-
90
-
91
-
92
-
93
-
94
-
95
-
96
-
97
-
98
-
99
-
100
-
101
-
102
-
103
-
104
-
105
-
106
-
107
-
108
-
109
-
110
-
111
-
112
-
113
-
114
-
115
-
116
-
117
-
118
-
119
-
120
-
121
-
122
-
123
-
124
-
125
-
126
-
127
-
128
-
129
-
130
-
131
-
132
-
133
-
134
-
135
-
136
-
137
-
138
-
139
-
140
-
141
-
142
-
143
-
144
-
145
-
146
-
147
-
148
-
149
-
150
-
151
-
152
-
153
-
154
-
155
-
156
-
157
-
158
-
159
-
160
-
161
-
162
-
163
-
164
-
165
-
166
-
167
-
168
-
169
-
170
-
171
-
172
-
173
-
174
-
175
-
176
-
177
-
178
-
179
-
180
-
181
-
182
-
183
-
184
-
185
-
186
-
187
-
188
-
189
-
190
-
191
-
192
-
193
-
194
-
195
 |
 |
Chapter 2
63
Opening Your Personal Workstation and Installing Accessories
Removing and Replacing the Left-Side and Front Panels
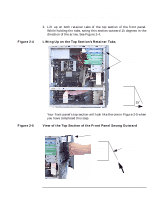
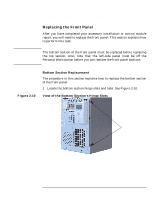
Your front panel’s bottom section will look like the one in Figure 2-8
when you have completed this step.
Figure 2-8
View of the Bottom Section of the Front Panel Swung Outward
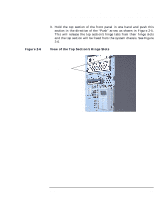
3.
Hold the bottom section of the front panel in one hand and push this
section in the direction of the “Push” arrow as shown in Figure 2-8.
This will release the bottom section’s hinge tabs from their hinge slots
and the bottom section will be freed from the system chassis. See
Figure 2-9.
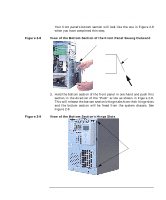
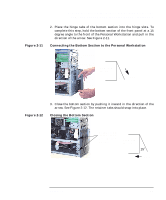
Figure 2-9
View of the Bottom Section’s Hinge Slots
View from
the top
Front Panel’s
Bottom section
Front Panel’s
Bottom Section
Push
Hinge Slots