Intermec PX4i PX4i and PX6i High Performance Printer User's Manual - Page 135
Setup, Media, Media Type, Print Defs, Lss Test, Lss Auto, Test/service, To Test The Lss
 |
View all Intermec PX4i manuals
Add to My Manuals
Save this manual to your list of manuals |
Page 135 highlights
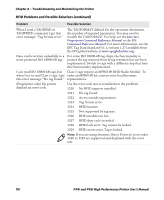
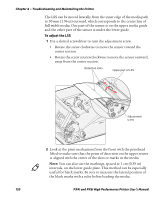
Chapter 4 - Troubleshooting and Maintaining the Printer To test the LSS 1 Make sure that your printer is properly configured for the type of media you are using. Go to SETUP > MEDIA > MEDIA TYPE. 2 Open the media cover. 3 Lift and lower the printhead. 4 Press the A button. 5 Make sure there is a label (not a gap or mark) at the LSS. 6 Make sure that the media is routed as close to the center section as the guide allows. 7 Press T to enter the Setup menu, and use the keypad to go to the LSS menu: • If you are running Fingerprint, go to SETUP > PRINT DEFS > LSS TEST > LSS AUTO. • If you are running IPL, go to SETUP > TEST/SERVICE > LSS TEST > LSS AUTO. The screen displays the LSS AUTO menu with the cursor in the center. LSS AUTO Note: There is no way to adjust the LSS function; the menus only indicate values obtained from the LSS. The test menu can determine if the sensor unit is not physically in position, is blocked by dust or stuck labels, or is defective in some way. 8 Check gap detection: a Lift the printhead. b Slowly pull out the media. When the LSS detects a gap or detection slot, the cursor moves to the right. LSS AUTO PX4i and PX6i High Performance Printer User's Manual 121
-
 1
1 -
2
-
3
-
4
-
5
-
6
-
7
-
8
-
9
-
10
-
11
-
12
-
13
-
14
-
15
-
16
-
17
-
18
-
19
-
20
-
21
-
22
-
23
-
24
-
25
-
26
-
27
-
28
-
29
-
30
-
31
-
32
-
33
-
34
-
35
-
36
-
37
-
38
-
39
-
40
-
41
-
42
-
43
-
44
-
45
-
46
-
47
-
48
-
49
-
50
-
51
-
52
-
53
-
54
-
55
-
56
-
57
-
58
-
59
-
60
-
61
-
62
-
63
-
64
-
65
-
66
-
67
-
68
-
69
-
70
-
71
-
72
-
73
-
74
-
75
-
76
-
77
-
78
-
79
-
80
-
81
-
82
-
83
-
84
-
85
-
86
-
87
-
88
-
89
-
90
-
91
-
92
-
93
-
94
-
95
-
96
-
97
-
98
-
99
-
100
-
101
-
102
-
103
-
104
-
105
-
106
-
107
-
108
-
109
-
110
-
111
-
112
-
113
-
114
-
115
-
116
-
117
-
118
-
119
-
120
-
121
-
122
-
123
-
124
-
125
-
126
-
127
-
128
-
129
-
 130
130 -
 131
131 -
 132
132 -
 133
133 -
 134
134 -
 135
135 -
 136
136 -
 137
137 -
 138
138 -
 139
139 -
 140
140 -
141
-
142
-
143
-
144
-
145
-
146
-
147
-
148
-
149
-
150
-
151
-
152
-
153
-
154
-
155
-
156
-
157
-
158
-
159
-
160
-
161
-
162
-
163
-
164
-
165
-
166
-
167
-
168
-
169
-
170
-
171
-
172
-
173
-
174
-
175
-
176
-
177
-
178
-
179
-
180
-
181
-
182
-
183
-
184
-
185
-
186
-
187
-
188
-
189
-
190
-
191
-
192
-
193
-
194
-
195
-
196
-
197
-
198
-
199
-
200
-
201
-
202
-
203
-
204
 |
 |
