Intermec PX4i PX4i and PX6i High Performance Printer User's Manual - Page 76
Configuring Your Printer With Commands Sent, From Your PC on General Tasks, Add Printer
 |
View all Intermec PX4i manuals
Add to My Manuals
Save this manual to your list of manuals |
Page 76 highlights
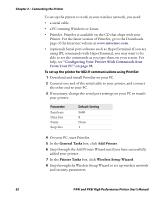
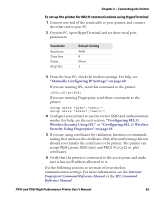
Chapter 2 - Connecting the Printer To set up the printer to work in your wireless network, you need: • a serial cable. • a PC running Windows or Linux. • PrintSet. PrintSet is available on the CD that ships with your Printer. For the latest version of PrintSet, go to the Downloads page of the Intermec website at www.intermec.com. • (optional) Serial port software such as HyperTerminal. If you are using IPL commands with HyperTerminal, you may want to be able to see the commands as you type them on your screen. For help, see "Configuring Your Printer With Commands Sent From Your PC" on page 98. To set up the printer for 802.11 communications using PrintSet 1 Download and install PrintSet on your PC. 2 Connect one end of the serial cable to your printer, and connect the other end to your PC. 3 If necessary, change the serial port settings on your PC to match your printer: Parameter Baud rate Data bits Parity Stop bits Default Setting 9600 8 None 1 4 On your PC, start PrintSet. 5 In the General Tasks box, click Add Printer. 6 Step through the Add Printer Wizard until you have successfully added your printer. 7 In the Printer Tasks box, click Wireless Setup Wizard. 8 Step through the Wireless Setup Wizard to set up wireless network and security parameters. 62 PX4i and PX6i High Performance Printer User's Manual
-
 1
1 -
2
-
3
-
4
-
5
-
6
-
7
-
8
-
9
-
10
-
11
-
12
-
13
-
14
-
15
-
16
-
17
-
18
-
19
-
20
-
21
-
22
-
23
-
24
-
25
-
26
-
27
-
28
-
29
-
30
-
31
-
32
-
33
-
34
-
35
-
36
-
37
-
38
-
39
-
40
-
41
-
42
-
43
-
44
-
45
-
46
-
47
-
48
-
49
-
50
-
51
-
52
-
53
-
54
-
55
-
56
-
57
-
58
-
59
-
60
-
61
-
62
-
63
-
64
-
65
-
66
-
67
-
68
-
69
-
70
-
 71
71 -
 72
72 -
 73
73 -
 74
74 -
 75
75 -
 76
76 -
 77
77 -
 78
78 -
 79
79 -
 80
80 -
 81
81 -
82
-
83
-
84
-
85
-
86
-
87
-
88
-
89
-
90
-
91
-
92
-
93
-
94
-
95
-
96
-
97
-
98
-
99
-
100
-
101
-
102
-
103
-
104
-
105
-
106
-
107
-
108
-
109
-
110
-
111
-
112
-
113
-
114
-
115
-
116
-
117
-
118
-
119
-
120
-
121
-
122
-
123
-
124
-
125
-
126
-
127
-
128
-
129
-
130
-
131
-
132
-
133
-
134
-
135
-
136
-
137
-
138
-
139
-
140
-
141
-
142
-
143
-
144
-
145
-
146
-
147
-
148
-
149
-
150
-
151
-
152
-
153
-
154
-
155
-
156
-
157
-
158
-
159
-
160
-
161
-
162
-
163
-
164
-
165
-
166
-
167
-
168
-
169
-
170
-
171
-
172
-
173
-
174
-
175
-
176
-
177
-
178
-
179
-
180
-
181
-
182
-
183
-
184
-
185
-
186
-
187
-
188
-
189
-
190
-
191
-
192
-
193
-
194
-
195
-
196
-
197
-
198
-
199
-
200
-
201
-
202
-
203
-
204
 |
 |