Intermec PX4i PX4i and PX6i High Performance Printer User's Manual - Page 75
Setting Up 802.11 Radio Communications, TTLS, LEAP, and EAP-FAST. For LEAP authentication, the printer
 |
View all Intermec PX4i manuals
Add to My Manuals
Save this manual to your list of manuals |
Page 75 highlights
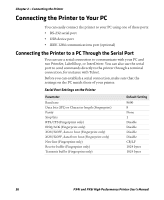
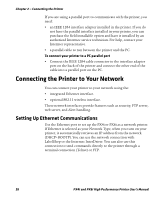
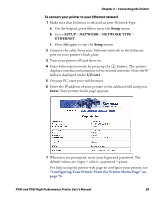
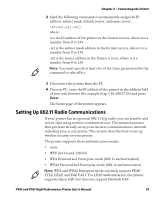
Chapter 2 - Connecting the Printer 2 Send the following commands to permanently assign the IP address, subnet mask, default router, and name server: nn[,m1[,m2]] where: n is the IP address of the printer in the format n.n.n.n, where n is a number from 0 to 255. ,m1 is the subnet mask address in the format n.n.n.n, where n is a number from 0 to 255. ,m2 is the router address in the format n.n.n.n, where n is a number from 0 to 255. Note: You must specify at least two of the three parameters for the command to take effect. 3 Disconnect the printer from the PC. 4 On your PC, enter the IP address of the printer in the address field of your web browser (for example http://10.200.27.94) and press Enter. The home page of the printer appears. Setting Up 802.11 Radio Communications If your printer has an optional 802.11 b/g radio, you can transfer and receive data using wireless communications. This manual assumes that you have already set up your wireless communications network including your access points. This section describes how to set up wireless security on your printer. The printer supports these authentication modes: • none • WEP (64 bit and 128 bit) • WPA Personal and Enterprise mode (802.1x authentication) • WPA2 Personal and Enterprise mode (802.1x authentication) Note: WPA and WPA2 Enterprise mode currently support PEAP, TTLS, LEAP, and EAP-FAST. For LEAP authentication, the printer supports Open EAP, but does not support Network EAP. PX4i and PX6i High Performance Printer User's Manual 61
-
 1
1 -
2
-
3
-
4
-
5
-
6
-
7
-
8
-
9
-
10
-
11
-
12
-
13
-
14
-
15
-
16
-
17
-
18
-
19
-
20
-
21
-
22
-
23
-
24
-
25
-
26
-
27
-
28
-
29
-
30
-
31
-
32
-
33
-
34
-
35
-
36
-
37
-
38
-
39
-
40
-
41
-
42
-
43
-
44
-
45
-
46
-
47
-
48
-
49
-
50
-
51
-
52
-
53
-
54
-
55
-
56
-
57
-
58
-
59
-
60
-
61
-
62
-
63
-
64
-
65
-
66
-
67
-
68
-
69
-
 70
70 -
 71
71 -
 72
72 -
 73
73 -
 74
74 -
 75
75 -
 76
76 -
 77
77 -
 78
78 -
 79
79 -
 80
80 -
81
-
82
-
83
-
84
-
85
-
86
-
87
-
88
-
89
-
90
-
91
-
92
-
93
-
94
-
95
-
96
-
97
-
98
-
99
-
100
-
101
-
102
-
103
-
104
-
105
-
106
-
107
-
108
-
109
-
110
-
111
-
112
-
113
-
114
-
115
-
116
-
117
-
118
-
119
-
120
-
121
-
122
-
123
-
124
-
125
-
126
-
127
-
128
-
129
-
130
-
131
-
132
-
133
-
134
-
135
-
136
-
137
-
138
-
139
-
140
-
141
-
142
-
143
-
144
-
145
-
146
-
147
-
148
-
149
-
150
-
151
-
152
-
153
-
154
-
155
-
156
-
157
-
158
-
159
-
160
-
161
-
162
-
163
-
164
-
165
-
166
-
167
-
168
-
169
-
170
-
171
-
172
-
173
-
174
-
175
-
176
-
177
-
178
-
179
-
180
-
181
-
182
-
183
-
184
-
185
-
186
-
187
-
188
-
189
-
190
-
191
-
192
-
193
-
194
-
195
-
196
-
197
-
198
-
199
-
200
-
201
-
202
-
203
-
204
 |
 |
