Intermec PX4i PX4i and PX6i High Performance Printer User's Manual - Page 81
Configuring 802.11 Wireless Security Using IPL, To con the printer to use WEP authentication - time out
 |
View all Intermec PX4i manuals
Add to My Manuals
Save this manual to your list of manuals |
Page 81 highlights
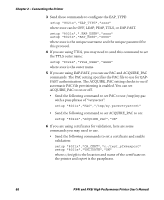
Chapter 2 - Connecting the Printer • Send the following commands to set a common name for server 1 and server 2: setup "8021x",".SERVER_CN1","xxxxxxxxxx" setup "8021x",".SERVER_CN2","xxxxxxxxxx" where xxxxxxxxxx is at least 8 characters but less than 96 characters. • Send the following commands to make sure your values match those used by the access point: setup write "8021x","uart1:" setup write "wlan","uart1:" • You may need to send the following command several times for the wireless station to connect: setup "wlan","ACTIVE","1" Configuring 802.11 Wireless Security Using IPL Use the following procedures to configure 802.11 wireless security parameters on your printer using IPL. To configure the printer to use WEP authentication 1 Send the following commands to login as an admin and set the SSID: .x,su -p pass admin ws,SSID,xxxxx where xxxxx can be from 0 to 32 ASCII characters. To enter non-alphanumeric octets, use "%nn," where nn is two hexadecimal digits representing the value of the character Note: The default password for logging in as an admin is "pass." If you have changed the password, you will need to use your password instead of "pass." 2 Send the following commands to configure the WEP keys. The following example sets WEP key 1 to 01234 and enables WEP key 1. ws,WEP1,0x3031323334 ws,.WEP_KEY,1 PX4i and PX6i High Performance Printer User's Manual 67
-
 1
1 -
2
-
3
-
4
-
5
-
6
-
7
-
8
-
9
-
10
-
11
-
12
-
13
-
14
-
15
-
16
-
17
-
18
-
19
-
20
-
21
-
22
-
23
-
24
-
25
-
26
-
27
-
28
-
29
-
30
-
31
-
32
-
33
-
34
-
35
-
36
-
37
-
38
-
39
-
40
-
41
-
42
-
43
-
44
-
45
-
46
-
47
-
48
-
49
-
50
-
51
-
52
-
53
-
54
-
55
-
56
-
57
-
58
-
59
-
60
-
61
-
62
-
63
-
64
-
65
-
66
-
67
-
68
-
69
-
70
-
71
-
72
-
73
-
74
-
75
-
 76
76 -
 77
77 -
 78
78 -
 79
79 -
 80
80 -
 81
81 -
 82
82 -
 83
83 -
 84
84 -
 85
85 -
 86
86 -
87
-
88
-
89
-
90
-
91
-
92
-
93
-
94
-
95
-
96
-
97
-
98
-
99
-
100
-
101
-
102
-
103
-
104
-
105
-
106
-
107
-
108
-
109
-
110
-
111
-
112
-
113
-
114
-
115
-
116
-
117
-
118
-
119
-
120
-
121
-
122
-
123
-
124
-
125
-
126
-
127
-
128
-
129
-
130
-
131
-
132
-
133
-
134
-
135
-
136
-
137
-
138
-
139
-
140
-
141
-
142
-
143
-
144
-
145
-
146
-
147
-
148
-
149
-
150
-
151
-
152
-
153
-
154
-
155
-
156
-
157
-
158
-
159
-
160
-
161
-
162
-
163
-
164
-
165
-
166
-
167
-
168
-
169
-
170
-
171
-
172
-
173
-
174
-
175
-
176
-
177
-
178
-
179
-
180
-
181
-
182
-
183
-
184
-
185
-
186
-
187
-
188
-
189
-
190
-
191
-
192
-
193
-
194
-
195
-
196
-
197
-
198
-
199
-
200
-
201
-
202
-
203
-
204
 |
 |