Intermec PX4i PX4i and PX6i High Performance Printer User's Manual - Page 77
Manually Configuring IP Settings on Intermec, Fingerprint Command Reference Manual
 |
View all Intermec PX4i manuals
Add to My Manuals
Save this manual to your list of manuals |
Page 77 highlights
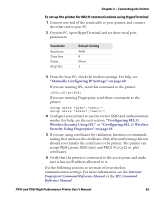
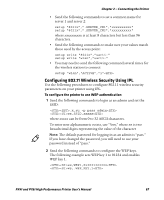
Chapter 2 - Connecting the Printer To set up the printer for 802.11 communications using HyperTerminal 1 Connect one end of the serial cable to your printer, and connect the other end to your PC. 2 On your PC, open HyperTerminal and set these serial port parameters: Parameter Baud rate Data bits Parity Stop bits Default Setting 9600 8 None 1 3 From the host PC, check the wireless settings. For help, see "Manually Configuring IP Settings" on page 60. If you are running IPL, send this command to the printer: wt If you are running Fingerprint, send these commands to the printer: setup write "wlan","uart1:" setup write "8021x","uart1:" 4 Configure your printer to use the correct SSID and authentication modes. For help, see the next section, "Configuring 802.11 Wireless Security Using IPL" or "Configuring 802.11 Wireless Security Using Fingerprint" on page 64. 5 If you are using certificates for validation, Intermec recommends testing first without the certificate. Only after performing this test should you transfer the certificate to the printer. The printer can accept PEM (.pem), DER (.der), and PKCS #12 (.p12 or .pfx) certificates. 6 Verify that the printer is connected to the access point and make sure it has an IP address allocated to it. Use the following sections to set most of your wireless communication settings. For more information, see the Intermec Fingerprint Command Reference Manual or the IPL Command Reference Manual. PX4i and PX6i High Performance Printer User's Manual 63
-
 1
1 -
2
-
3
-
4
-
5
-
6
-
7
-
8
-
9
-
10
-
11
-
12
-
13
-
14
-
15
-
16
-
17
-
18
-
19
-
20
-
21
-
22
-
23
-
24
-
25
-
26
-
27
-
28
-
29
-
30
-
31
-
32
-
33
-
34
-
35
-
36
-
37
-
38
-
39
-
40
-
41
-
42
-
43
-
44
-
45
-
46
-
47
-
48
-
49
-
50
-
51
-
52
-
53
-
54
-
55
-
56
-
57
-
58
-
59
-
60
-
61
-
62
-
63
-
64
-
65
-
66
-
67
-
68
-
69
-
70
-
71
-
 72
72 -
 73
73 -
 74
74 -
 75
75 -
 76
76 -
 77
77 -
 78
78 -
 79
79 -
 80
80 -
 81
81 -
 82
82 -
83
-
84
-
85
-
86
-
87
-
88
-
89
-
90
-
91
-
92
-
93
-
94
-
95
-
96
-
97
-
98
-
99
-
100
-
101
-
102
-
103
-
104
-
105
-
106
-
107
-
108
-
109
-
110
-
111
-
112
-
113
-
114
-
115
-
116
-
117
-
118
-
119
-
120
-
121
-
122
-
123
-
124
-
125
-
126
-
127
-
128
-
129
-
130
-
131
-
132
-
133
-
134
-
135
-
136
-
137
-
138
-
139
-
140
-
141
-
142
-
143
-
144
-
145
-
146
-
147
-
148
-
149
-
150
-
151
-
152
-
153
-
154
-
155
-
156
-
157
-
158
-
159
-
160
-
161
-
162
-
163
-
164
-
165
-
166
-
167
-
168
-
169
-
170
-
171
-
172
-
173
-
174
-
175
-
176
-
177
-
178
-
179
-
180
-
181
-
182
-
183
-
184
-
185
-
186
-
187
-
188
-
189
-
190
-
191
-
192
-
193
-
194
-
195
-
196
-
197
-
198
-
199
-
200
-
201
-
202
-
203
-
204
 |
 |