Intermec PX4i PX4i and PX6i High Performance Printer User's Manual - Page 74
Manually Configuring IP Settings, Connecting the Printer to a PC Through the Serial Port on,
 |
View all Intermec PX4i manuals
Add to My Manuals
Save this manual to your list of manuals |
Page 74 highlights
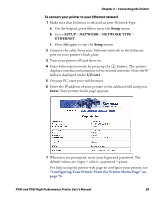
Chapter 2 - Connecting the Printer If your network does not automatically assign an IP address, or the Intermec Ready-to-Work indicator is blinking to indicate a network error, you can use PrintSet (available on the PrinterCompanion CD or as a download from www.intermec.com) to correct the network settings. Manually Configuring IP Settings You can configure the IP settings of your printer by sending Fingerprint or IPL commands through a serial connection. After you configure the IP settings, you can disconnect the printer from your PC and communicate with the printer using Ethernet communications. To configure the IP settings serially using Fingerprint Note: You need to have administrator privileges to configure IP settings. 1 Connect the printer to your PC using a serial cable. For help, see "Connecting the Printer to a PC Through the Serial Port" on page 56. 2 Send the following commands to permanently assign the IP address, subnet mask, default router, and name server: setup "network,IP selection,manual" setup "network,IP address,xxx.xxx.xxx.xxx" setup "network,netmask,xxx.xxx.xxx.xxx" setup "network,default router,xxx.xxx.xxx.xxx" setup "network,nameserver,xxx.xxx.xxx.xxx" where xxx is a number from 0 to 255. 3 Disconnect the printer from the PC. 4 On your PC, enter the IP address of the printer in the address field of your web browser (for example http://10.200.27.94) and press Enter. The home page of the printer appears. To configure the IP settings serially using IPL 1 Connect the printer to your PC using a serial cable. For help, see "Connecting the Printer to a PC Through the Serial Port" on page 56. 60 PX4i and PX6i High Performance Printer User's Manual
-
 1
1 -
2
-
3
-
4
-
5
-
6
-
7
-
8
-
9
-
10
-
11
-
12
-
13
-
14
-
15
-
16
-
17
-
18
-
19
-
20
-
21
-
22
-
23
-
24
-
25
-
26
-
27
-
28
-
29
-
30
-
31
-
32
-
33
-
34
-
35
-
36
-
37
-
38
-
39
-
40
-
41
-
42
-
43
-
44
-
45
-
46
-
47
-
48
-
49
-
50
-
51
-
52
-
53
-
54
-
55
-
56
-
57
-
58
-
59
-
60
-
61
-
62
-
63
-
64
-
65
-
66
-
67
-
68
-
 69
69 -
 70
70 -
 71
71 -
 72
72 -
 73
73 -
 74
74 -
 75
75 -
 76
76 -
 77
77 -
 78
78 -
 79
79 -
80
-
81
-
82
-
83
-
84
-
85
-
86
-
87
-
88
-
89
-
90
-
91
-
92
-
93
-
94
-
95
-
96
-
97
-
98
-
99
-
100
-
101
-
102
-
103
-
104
-
105
-
106
-
107
-
108
-
109
-
110
-
111
-
112
-
113
-
114
-
115
-
116
-
117
-
118
-
119
-
120
-
121
-
122
-
123
-
124
-
125
-
126
-
127
-
128
-
129
-
130
-
131
-
132
-
133
-
134
-
135
-
136
-
137
-
138
-
139
-
140
-
141
-
142
-
143
-
144
-
145
-
146
-
147
-
148
-
149
-
150
-
151
-
152
-
153
-
154
-
155
-
156
-
157
-
158
-
159
-
160
-
161
-
162
-
163
-
164
-
165
-
166
-
167
-
168
-
169
-
170
-
171
-
172
-
173
-
174
-
175
-
176
-
177
-
178
-
179
-
180
-
181
-
182
-
183
-
184
-
185
-
186
-
187
-
188
-
189
-
190
-
191
-
192
-
193
-
194
-
195
-
196
-
197
-
198
-
199
-
200
-
201
-
202
-
203
-
204
 |
 |