Kyocera KM-2540 Fax System (P) Operation Guide Rev-1 - Page 17
Operation Panel, Fax Screens, Start, Reset, Stop/Clear, Print Management, System Menu/Counter
 |
View all Kyocera KM-2540 manuals
Add to My Manuals
Save this manual to your list of manuals |
Page 17 highlights
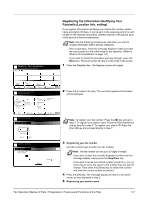
9 8 Operation Panel 10 11 6 7 54 1 2 3 1 Touch Panel 2 Numeric Keys 3 Start Key/Indicator 4 FAX Key/Indicator 5 FAX Lamp 6 Reset Key 7 Stop/Clear Key 8 Print Management Key/Indicator 9 System Menu/Counter Key 10 Interrupt Key/Indicator 11 Power Key/Indicator Fax Screens The initial screen that appears in the touch panel when you press the FAX key in the Copy Operation mode, etc., in order to change to the Fax Operation mode is called the 'basic fax screen'. Press (A), (B), (C) or (D) to switch between the various fax screens as follows: (A) Basic fax screen 1 Ready for fax transmission. Place the original & assign destination. 2 Dest 3 Addr e ss book Basic Abbr e v . Application TX setting Register Print Report Memory usage: .0% 4 JUN-06-2007 16:00 Dest. check Re- di a l On- ho o k Memory TX Auto RX 5 (A) (B) (C) (D) Fax Operation (Names of Parts / Preparations / Features and Functions of this Fax) 1-3
-
 1
1 -
2
-
3
-
4
-
5
-
6
-
7
-
8
-
9
-
10
-
11
-
 12
12 -
 13
13 -
 14
14 -
 15
15 -
 16
16 -
 17
17 -
 18
18 -
 19
19 -
 20
20 -
 21
21 -
 22
22 -
23
-
24
-
25
-
26
-
27
-
28
-
29
-
30
-
31
-
32
-
33
-
34
-
35
-
36
-
37
-
38
-
39
-
40
-
41
-
42
-
43
-
44
-
45
-
46
-
47
-
48
-
49
-
50
-
51
-
52
-
53
-
54
-
55
-
56
-
57
-
58
-
59
-
60
-
61
-
62
-
63
-
64
-
65
-
66
-
67
-
68
-
69
-
70
-
71
-
72
-
73
-
74
-
75
-
76
-
77
-
78
-
79
-
80
-
81
-
82
-
83
-
84
-
85
-
86
-
87
-
88
-
89
-
90
-
91
-
92
-
93
-
94
-
95
-
96
-
97
-
98
-
99
-
100
-
101
-
102
-
103
-
104
-
105
-
106
-
107
-
108
-
109
-
110
-
111
-
112
-
113
-
114
-
115
-
116
-
117
-
118
-
119
-
120
-
121
-
122
-
123
-
124
-
125
-
126
-
127
-
128
-
129
-
130
-
131
-
132
-
133
-
134
-
135
-
136
-
137
-
138
-
139
-
140
-
141
-
142
-
143
-
144
-
145
-
146
-
147
-
148
-
149
-
150
-
151
-
152
-
153
-
154
-
155
-
156
-
157
-
158
-
159
-
160
-
161
-
162
-
163
-
164
-
165
-
166
-
167
-
168
-
169
-
170
-
171
-
172
-
173
-
174
-
175
-
176
-
177
-
178
-
179
-
180
-
181
-
182
-
183
-
184
-
185
-
186
-
187
-
188
-
189
-
190
-
191
-
192
-
193
-
194
-
195
-
196
-
197
-
198
-
199
-
200
-
201
-
202
-
203
-
204
-
205
-
206
-
207
-
208
 |
 |
