Lexmark OptraImage Color 1200r User's Guide - Page 131
Setup Guide, Setup, Guide
 |
View all Lexmark OptraImage Color 1200r manuals
Add to My Manuals
Save this manual to your list of manuals |
Page 131 highlights
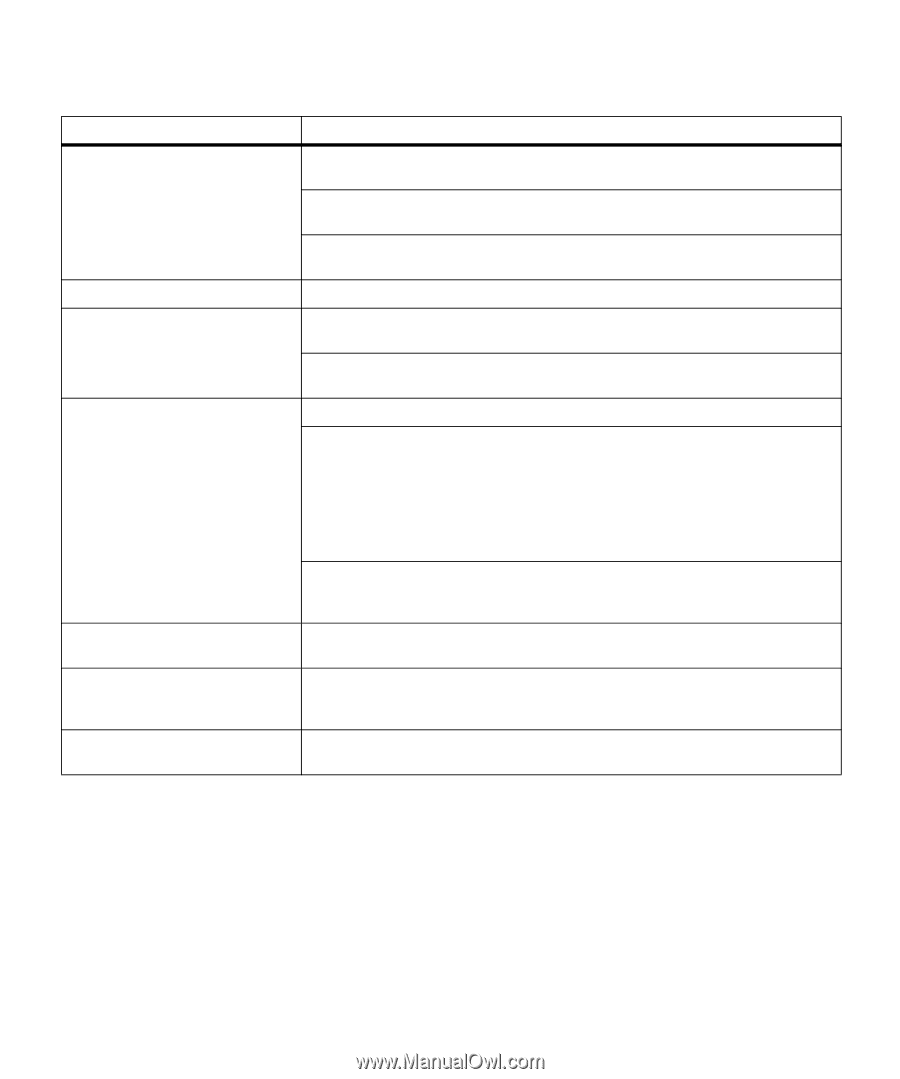
Other printing problems (continued) Problem Action You can't collate a large job. Reduce the complexity of your print job. Eliminate the number and size of fonts, the number and complexity of images, and the number of pages. Add more printer memory. See page 65 or refer to the Setup Guide for more information. Install an optional hard disk in your printer. See page 68, or refer to the Setup Guide for more information. You get unexpected page breaks. Check the Print Timeout setting in the Setup Menu. Increase the value. Transparencies curl excessively. Make sure you're using the recommended Lexmark transparencies. See page 76 for more information. Select the rear output bin when printing transparencies, rather than the top output bin. Transparencies jam. Fan transparencies before loading. If you just turned the printer on or the printer has been idle for a period of time, print on paper before trying to print on transparencies. For example, before printing transparencies, select Print Menus from the Tests Menu and print the menu settings page on a sheet of paper. Disabling Power Saver may also prevent transparencies from jamming after the printer has been idle. See page 29 for more information about the Power Saver setting. If the last transparency jams as you try to feed it from tray 1, place the cardboard sheet (with the cutout) included in the transparencies box in the bottom of tray 1 before loading transparencies. You cannot remove paper jammed Make sure the printer's top cover is completely open. Opening the top cover all in the fuser. the way releases the fuser roll so you can easily remove jammed paper. You cannot clear the paper jam message. To clear the paper jam messages, you must remove all paper from the printer's paper path. Check both inside the printer as well as the paper source you were using. Then open and close the top cover and press Go. The page that jammed does not Set Jam Recovery to Auto or to On in the Setup Menu. See page 31 for more reprint after you clear the jam. information. Identifying other problems 117
-
 1
1 -
2
-
3
-
4
-
5
-
6
-
7
-
8
-
9
-
10
-
11
-
12
-
13
-
14
-
15
-
16
-
17
-
18
-
19
-
20
-
21
-
22
-
23
-
24
-
25
-
26
-
27
-
28
-
29
-
30
-
31
-
32
-
33
-
34
-
35
-
36
-
37
-
38
-
39
-
40
-
41
-
42
-
43
-
44
-
45
-
46
-
47
-
48
-
49
-
50
-
51
-
52
-
53
-
54
-
55
-
56
-
57
-
58
-
59
-
60
-
61
-
62
-
63
-
64
-
65
-
66
-
67
-
68
-
69
-
70
-
71
-
72
-
73
-
74
-
75
-
76
-
77
-
78
-
79
-
80
-
81
-
82
-
83
-
84
-
85
-
86
-
87
-
88
-
89
-
90
-
91
-
92
-
93
-
94
-
95
-
96
-
97
-
98
-
99
-
100
-
101
-
102
-
103
-
104
-
105
-
106
-
107
-
108
-
109
-
110
-
111
-
112
-
113
-
114
-
115
-
116
-
117
-
118
-
119
-
120
-
121
-
122
-
123
-
124
-
125
-
 126
126 -
 127
127 -
 128
128 -
 129
129 -
 130
130 -
 131
131 -
 132
132 -
 133
133 -
 134
134 -
 135
135 -
 136
136 -
137
-
138
-
139
-
140
-
141
-
142
-
143
-
144
-
145
-
146
-
147
-
148
-
149
-
150
-
151
-
152
-
153
-
154
-
155
-
156
-
157
-
158
-
159
-
160
-
161
-
162
-
163
-
164
-
165
-
166
-
167
-
168
-
169
-
170
-
171
-
172
-
173
-
174
-
175
-
176
-
177
-
178
-
179
-
180
-
181
-
182
-
183
-
184
-
185
-
186
-
187
-
188
-
189
-
190
-
191
-
192
-
193
-
194
-
195
-
196
-
197
-
198
-
199
-
200
-
201
-
202
-
203
-
204
-
205
-
206
-
207
-
208
 |
 |