Lexmark OptraImage Color 1200r User's Guide - Page 29
Color Menu, Use the Color Menu to make print quality adjustments, and customize color printing.
 |
View all Lexmark OptraImage Color 1200r manuals
Add to My Manuals
Save this manual to your list of manuals |
Page 29 highlights
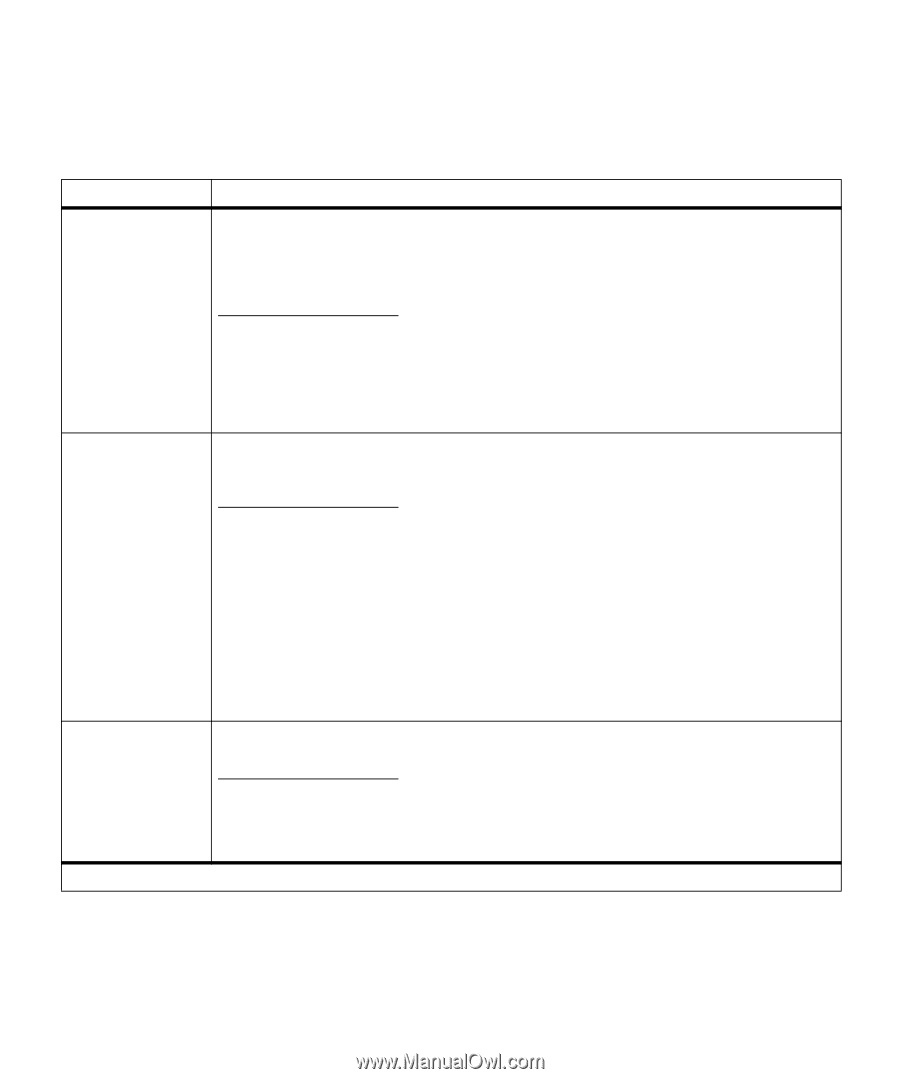
Color Menu Menu item Color Correction Print Quality Toner Saver *Factory default Color Menu Use the Color Menu to make print quality adjustments and customize color printing. Values Vivid* RGB CMYK Black & White Display The Color Correction setting lets you adjust the printed color to better match the colors of other output devices or standard color systems. For example, if you want your printed colors to simulate the colors on your computer screen, choose Display. If you are using a software application that has its own color correction, choose CMYK. The Vivid setting (the default) produces bright and well saturated colors for transparencies and general business graphics. For more information, see page 61. Graphics* Images 1200 Image Q The default setting, Graphics, provides high quality output for text and business graphics, such as line art and electronically generated charts. If you need to print jobs composed largely of image data (scanned photos or video frames, for example), you may want to select Images. The Images setting enhances the quality of printed images on the page, while maintaining high quality text and graphics. For the best overall print quality when printing jobs containing images, text, and graphics, select 1200 Image Quality. This setting may require more memory than the other two settings to process a particular job, and may slow print speed. However, the 1200 Image Quality setting delivers the highest quality output, with crisp text and graphics and exceptionally high quality images. See page 62 for more information about the Print Quality settings. Off* On To get the most from your toner supply, set Toner Saver On. Toner Saver reduces the amount of toner used on the printed page and may help lower the cost of printing. When Toner Saver is Off, the printer smooths printed characters to improve the appearance of text. Menus 15
-
 1
1 -
2
-
3
-
4
-
5
-
6
-
7
-
8
-
9
-
10
-
11
-
12
-
13
-
14
-
15
-
16
-
17
-
18
-
19
-
20
-
21
-
22
-
23
-
 24
24 -
 25
25 -
 26
26 -
 27
27 -
 28
28 -
 29
29 -
 30
30 -
 31
31 -
 32
32 -
 33
33 -
 34
34 -
35
-
36
-
37
-
38
-
39
-
40
-
41
-
42
-
43
-
44
-
45
-
46
-
47
-
48
-
49
-
50
-
51
-
52
-
53
-
54
-
55
-
56
-
57
-
58
-
59
-
60
-
61
-
62
-
63
-
64
-
65
-
66
-
67
-
68
-
69
-
70
-
71
-
72
-
73
-
74
-
75
-
76
-
77
-
78
-
79
-
80
-
81
-
82
-
83
-
84
-
85
-
86
-
87
-
88
-
89
-
90
-
91
-
92
-
93
-
94
-
95
-
96
-
97
-
98
-
99
-
100
-
101
-
102
-
103
-
104
-
105
-
106
-
107
-
108
-
109
-
110
-
111
-
112
-
113
-
114
-
115
-
116
-
117
-
118
-
119
-
120
-
121
-
122
-
123
-
124
-
125
-
126
-
127
-
128
-
129
-
130
-
131
-
132
-
133
-
134
-
135
-
136
-
137
-
138
-
139
-
140
-
141
-
142
-
143
-
144
-
145
-
146
-
147
-
148
-
149
-
150
-
151
-
152
-
153
-
154
-
155
-
156
-
157
-
158
-
159
-
160
-
161
-
162
-
163
-
164
-
165
-
166
-
167
-
168
-
169
-
170
-
171
-
172
-
173
-
174
-
175
-
176
-
177
-
178
-
179
-
180
-
181
-
182
-
183
-
184
-
185
-
186
-
187
-
188
-
189
-
190
-
191
-
192
-
193
-
194
-
195
-
196
-
197
-
198
-
199
-
200
-
201
-
202
-
203
-
204
-
205
-
206
-
207
-
208
 |
 |