Lexmark OptraImage Color 1200r User's Guide - Page 24
Locking the menus, Turn the printer off.
 |
View all Lexmark OptraImage Color 1200r manuals
Add to My Manuals
Save this manual to your list of manuals |
Page 24 highlights
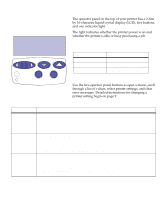
7 When the value you want appears on the second line of the display, press Select to make the value the new user default setting. An asterisk appears beside the value to indicate that it is now the user default setting. The display shows the new setting for one second and then clears and shows the word Saved. It then displays the previous list of menu items. 8 Press Return if you need to go back to previous menus or menu items and select other user defaults. 9 Press Go if you have finished changing menu set- tings. User default settings remain in effect until you save new settings or restore the factory defaults. Locking the menus To lock the menus so that changes cannot be made to the user default settings: 1 Turn the printer off. 2 Press and hold the Go and Stop buttons and turn the printer on. 3 Release the buttons when Performing Self Test is displayed. Locking Menus appears on the display. When the printer self test is complete, the Ready message is displayed. If you press Menu> or
-
 1
1 -
2
-
3
-
4
-
5
-
6
-
7
-
8
-
9
-
10
-
11
-
12
-
13
-
14
-
15
-
16
-
17
-
18
-
 19
19 -
 20
20 -
 21
21 -
 22
22 -
 23
23 -
 24
24 -
 25
25 -
 26
26 -
 27
27 -
 28
28 -
 29
29 -
30
-
31
-
32
-
33
-
34
-
35
-
36
-
37
-
38
-
39
-
40
-
41
-
42
-
43
-
44
-
45
-
46
-
47
-
48
-
49
-
50
-
51
-
52
-
53
-
54
-
55
-
56
-
57
-
58
-
59
-
60
-
61
-
62
-
63
-
64
-
65
-
66
-
67
-
68
-
69
-
70
-
71
-
72
-
73
-
74
-
75
-
76
-
77
-
78
-
79
-
80
-
81
-
82
-
83
-
84
-
85
-
86
-
87
-
88
-
89
-
90
-
91
-
92
-
93
-
94
-
95
-
96
-
97
-
98
-
99
-
100
-
101
-
102
-
103
-
104
-
105
-
106
-
107
-
108
-
109
-
110
-
111
-
112
-
113
-
114
-
115
-
116
-
117
-
118
-
119
-
120
-
121
-
122
-
123
-
124
-
125
-
126
-
127
-
128
-
129
-
130
-
131
-
132
-
133
-
134
-
135
-
136
-
137
-
138
-
139
-
140
-
141
-
142
-
143
-
144
-
145
-
146
-
147
-
148
-
149
-
150
-
151
-
152
-
153
-
154
-
155
-
156
-
157
-
158
-
159
-
160
-
161
-
162
-
163
-
164
-
165
-
166
-
167
-
168
-
169
-
170
-
171
-
172
-
173
-
174
-
175
-
176
-
177
-
178
-
179
-
180
-
181
-
182
-
183
-
184
-
185
-
186
-
187
-
188
-
189
-
190
-
191
-
192
-
193
-
194
-
195
-
196
-
197
-
198
-
199
-
200
-
201
-
202
-
203
-
204
-
205
-
206
-
207
-
208
 |
 |