Lexmark OptraImage Color 1200r User's Guide - Page 75
Adjusting color, Toner Saver
 |
View all Lexmark OptraImage Color 1200r manuals
Add to My Manuals
Save this manual to your list of manuals |
Page 75 highlights
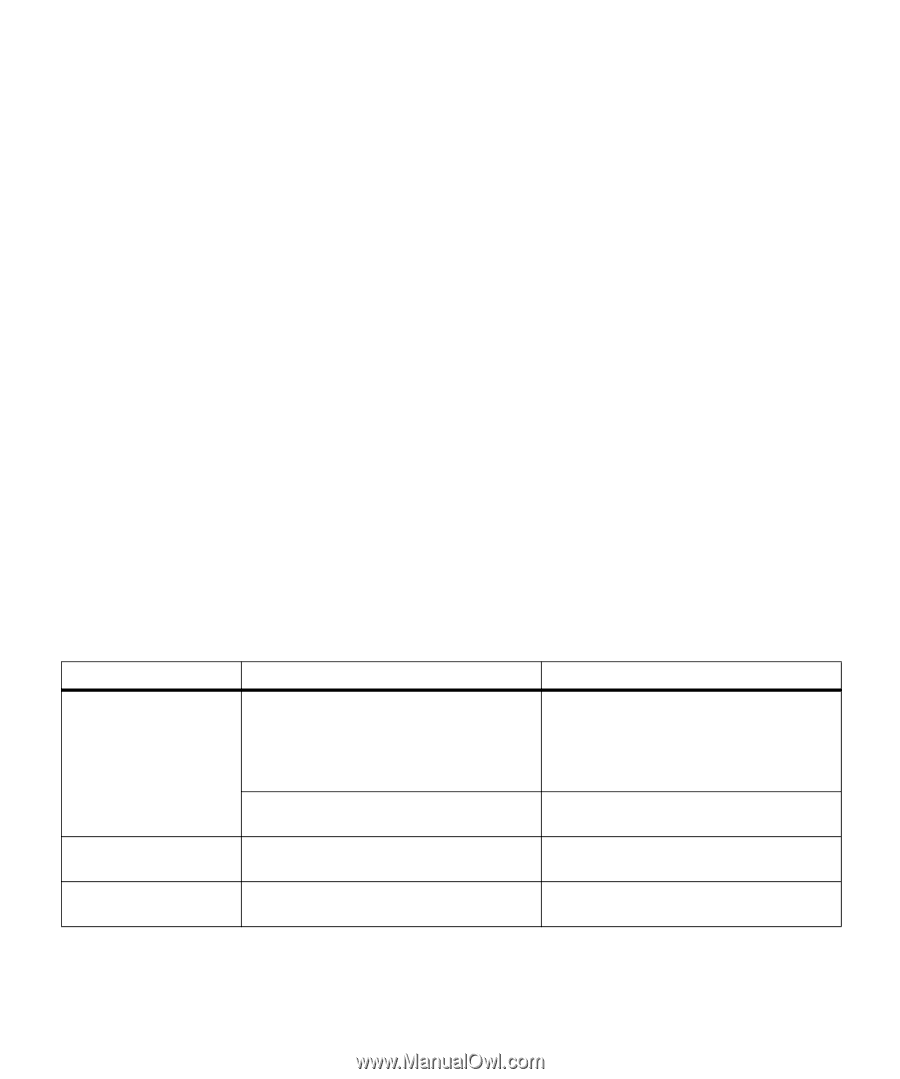
Adjusting color You can make color adjustments from your Lexmark printer driver, from the MarkVision printer utility, and from the printer operator panel. Lexmark posts updates about color support on its web site (www.lexmark.com). See page 141 for more information about online services. From the operator panel, select Color Menu. The following menu items are available to customize your color printing: • Color Correction • Print Quality • Toner Saver The values for each menu item are defined in the following tables. Each table indicates: • What you can adjust • Why you would make the adjustment • When you would want to make the adjustment The settings you choose may depend on the types of jobs you print. For example, jobs full of images-visual data typically scanned from original sources external to the PC, such as photographs or video frames-may require settings different from those you would choose for business graphics, such as charts and graphs electronically generated from a software application. Color Correction What Vivid (default) RGB CMYK Why When To print brighter colors. Vivid adjusts CMYK components, resulting in more saturated colors. • You need sharp overhead transparencies, especially when creating transparencies that contain graphics. • Printed colors appear faded or washed out. To adjust the cyan to magenta range of colors to be more blue. Your printed blues are too purple. To print with no color correction from RGB You are using an application that does its applications. own color correction in RGB color. To print with no color correction from CMYK You are using a software application that applications. does its own color correction. Adjusting color 61
-
 1
1 -
2
-
3
-
4
-
5
-
6
-
7
-
8
-
9
-
10
-
11
-
12
-
13
-
14
-
15
-
16
-
17
-
18
-
19
-
20
-
21
-
22
-
23
-
24
-
25
-
26
-
27
-
28
-
29
-
30
-
31
-
32
-
33
-
34
-
35
-
36
-
37
-
38
-
39
-
40
-
41
-
42
-
43
-
44
-
45
-
46
-
47
-
48
-
49
-
50
-
51
-
52
-
53
-
54
-
55
-
56
-
57
-
58
-
59
-
60
-
61
-
62
-
63
-
64
-
65
-
66
-
67
-
68
-
69
-
 70
70 -
 71
71 -
 72
72 -
 73
73 -
 74
74 -
 75
75 -
 76
76 -
 77
77 -
 78
78 -
 79
79 -
 80
80 -
81
-
82
-
83
-
84
-
85
-
86
-
87
-
88
-
89
-
90
-
91
-
92
-
93
-
94
-
95
-
96
-
97
-
98
-
99
-
100
-
101
-
102
-
103
-
104
-
105
-
106
-
107
-
108
-
109
-
110
-
111
-
112
-
113
-
114
-
115
-
116
-
117
-
118
-
119
-
120
-
121
-
122
-
123
-
124
-
125
-
126
-
127
-
128
-
129
-
130
-
131
-
132
-
133
-
134
-
135
-
136
-
137
-
138
-
139
-
140
-
141
-
142
-
143
-
144
-
145
-
146
-
147
-
148
-
149
-
150
-
151
-
152
-
153
-
154
-
155
-
156
-
157
-
158
-
159
-
160
-
161
-
162
-
163
-
164
-
165
-
166
-
167
-
168
-
169
-
170
-
171
-
172
-
173
-
174
-
175
-
176
-
177
-
178
-
179
-
180
-
181
-
182
-
183
-
184
-
185
-
186
-
187
-
188
-
189
-
190
-
191
-
192
-
193
-
194
-
195
-
196
-
197
-
198
-
199
-
200
-
201
-
202
-
203
-
204
-
205
-
206
-
207
-
208
 |
 |