Nokia N95 User Guide - Page 51
Camera, Take pictures - review
 |
UPC - 758478012536
View all Nokia N95 manuals
Add to My Manuals
Save this manual to your list of manuals |
Page 51 highlights
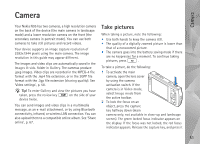
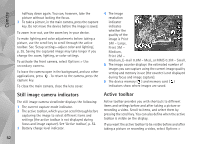
Camera Camera Your Nokia N95 has two cameras, a high resolution camera on the back of the device (the main camera in landscape mode) and a lower resolution camera on the front (the secondary camera in portrait mode). You can use both cameras to take still pictures and record videos. Your device supports an image capture resolution of 2592x1944 pixels using the main camera. The image resolution in this guide may appear different. The images and video clips are automatically saved in the Images & vids. folder in Gallery. The cameras produce .jpeg images. Video clips are recorded in the MPEG-4 file format with the .mp4 file extension, or in the 3GPP file format with the .3gp file extension (sharing quality). See 'Video settings', p. 58. Tip! To enter Gallery and view the pictures you have taken, press the review key on the side of your device twice. You can send images and video clips in a multimedia message, as an e-mail attachment, or by using Bluetooth connectivity, infrared, or wireless LAN connection. You can also upload them to a compatible online album. See 'Share online', p. 67. Take pictures When taking a picture, note the following: • Use both hands to keep the camera still. • The quality of a digitally zoomed picture is lower than that of a nonzoomed picture. • The camera goes into the battery saving mode if there are no keypresses for a moment. To continue taking pictures, press . To take a picture, do the following: 1 To activate the main camera, open the lens cover by using the camera activation switch. If the camera is in Video mode, select Image mode from the active toolbar. 2 To lock the focus on an object, press the capture key halfway down (main camera only, not available in close-up and landscape scenes). The green locked focus indicator appears on the display. If the focus was not locked, the red focus indicator appears. Release the capture key, and press it 51
-
 1
1 -
2
-
3
-
4
-
5
-
6
-
7
-
8
-
9
-
10
-
11
-
12
-
13
-
14
-
15
-
16
-
17
-
18
-
19
-
20
-
21
-
22
-
23
-
24
-
25
-
26
-
27
-
28
-
29
-
30
-
31
-
32
-
33
-
34
-
35
-
36
-
37
-
38
-
39
-
40
-
41
-
42
-
43
-
44
-
45
-
 46
46 -
 47
47 -
 48
48 -
 49
49 -
 50
50 -
 51
51 -
 52
52 -
 53
53 -
 54
54 -
 55
55 -
 56
56 -
57
-
58
-
59
-
60
-
61
-
62
-
63
-
64
-
65
-
66
-
67
-
68
-
69
-
70
-
71
-
72
-
73
-
74
-
75
-
76
-
77
-
78
-
79
-
80
-
81
-
82
-
83
-
84
-
85
-
86
-
87
-
88
-
89
-
90
-
91
-
92
-
93
-
94
-
95
-
96
-
97
-
98
-
99
-
100
-
101
-
102
-
103
-
104
-
105
-
106
-
107
-
108
-
109
-
110
-
111
-
112
-
113
-
114
-
115
-
116
-
117
-
118
-
119
-
120
-
121
-
122
-
123
-
124
-
125
-
126
-
127
-
128
-
129
-
130
-
131
-
132
-
133
-
134
-
135
-
136
-
137
-
138
-
139
-
140
-
141
-
142
-
143
-
144
-
145
-
146
 |
 |
