Samsung SCD6550 User Manual (ENGLISH) - Page 77
Recording with a DV Connection Cable
 |
UPC - 036725365506
View all Samsung SCD6550 manuals
Add to My Manuals
Save this manual to your list of manuals |
Page 77 highlights
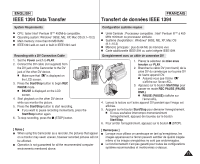
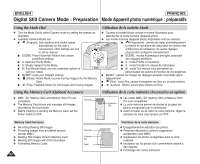
ENGLISH IEEE 1394 Data Transfer FRANÇAIS Transfert de données IEEE 1394 System Requirements Configuration système requise I CPU: faster Intel® Pentium III™ 450MHz compatible. I Operating system: Windows® 98SE, ME, XP, Mac OS (9.1~10.2) I Main memory: more than 64 MB RAM I IEEE1394 add-on card or built in IEEE1394 card Recording with a DV Connection Cable 1. Set the Power switch to PLAY. 2. Connect the DV cable (not supplied) from the DV jack of the Camcorder to the DV jack of the other DV device. I Make sure that is displayed on the LCD screen. 3. Press the Start/Stop button to begin REC PAUSE mode. I PAUSE is displayed on the LCD screen. 4. Start playback on the other DV device while you monitor the picture. 5. Press the Start/Stop button to start recording. I If you want to pause recording momentarily, press the Start/Stop button again. 6. To stop recording, press the I (STOP) button. I Unité Centrale : Processeur compatible : Intel® Pentium III™ à 450 MHz minimum ou processeur similaire. I Système d'exploitation : Windows® 98SE, ME, XP, Mac OS (9.1~10.2) I Mémoire principale : plus de 64 Mo de mémoire vive I Carte additionnelle IEEE1394 ou carte intégrée IEEE1394 Enregistrement avec un câble de connexion DV 1. Placez le sélecteur de mise sous tension sur PLAY. 2. Branchez le câble DV (non fourni) de la prise DV du caméscope sur la prise DV de l'autre appareil DV. I Assurez-vous que l'icône s'affiche sur l'écran ACL. 3. Appuyez sur le bouton Start/Stop pour passer en mode REC PAUSE (PAUSE ENR.). I PAUSE (PAUSE) s'affiche sur l'écran ACL. 4. Lancez la lecture sur l'autre appareil DV pendant que l'image est affichée. 5. Appuyez sur le bouton Start/Stop pour démarrer l'enregistrement. I Si vous souhaitez interrompre momentanément l'enregistrement, appuyez de nouveau sur le bouton Start/Stop. 6. Pour arrêter l'enregistrement, appuyez sur le bouton I (STOP). [ Notes ] I When using this Camcorder as a recorder, the pictures that appear on a monitor may seem uneven, however recorded pictures will not be affected. I Operation is not guaranteed for all the recommended computer environments mentioned above. [ Remarques ] I Lorsque vous utilisez ce caméscope en tant qu'enregistreur, les images apparaissant à l'écran peuvent sembler de qualité inégale même si les images enregistrées ne sont pas endommagées. I Le fonctionnement n'est pas garanti pour toutes les configurations système recommandées et mentionnées ci-dessus. 77
-
 1
1 -
2
-
3
-
4
-
5
-
6
-
7
-
8
-
9
-
10
-
11
-
12
-
13
-
14
-
15
-
16
-
17
-
18
-
19
-
20
-
21
-
22
-
23
-
24
-
25
-
26
-
27
-
28
-
29
-
30
-
31
-
32
-
33
-
34
-
35
-
36
-
37
-
38
-
39
-
40
-
41
-
42
-
43
-
44
-
45
-
46
-
47
-
48
-
49
-
50
-
51
-
52
-
53
-
54
-
55
-
56
-
57
-
58
-
59
-
60
-
61
-
62
-
63
-
64
-
65
-
66
-
67
-
68
-
69
-
70
-
71
-
 72
72 -
 73
73 -
 74
74 -
 75
75 -
 76
76 -
 77
77 -
 78
78 -
 79
79 -
 80
80 -
 81
81 -
 82
82 -
83
-
84
-
85
-
86
-
87
-
88
-
89
-
90
-
91
-
92
-
93
-
94
-
95
-
96
-
97
-
98
-
99
-
100
-
101
-
102
-
103
-
104
-
105
-
106
-
107
-
108
-
109
-
110
-
111
-
112
-
113
-
114
-
115
-
116
-
117
-
118
-
119
-
120
-
121
-
122
-
123
-
124
-
125
-
126
-
127
-
128
-
129
-
130
-
131
-
132
-
133
-
134
-
135
-
136
-
137
-
138
-
139
-
140
-
141
-
142
-
143
-
144
-
145
-
146
-
147
-
148
-
149
-
150
-
151
-
152
-
153
-
154
-
155
 |
 |
