Samsung SCD6550 User Manual (ENGLISH) - Page 81
Power, CAMERA, Notes ], Using the USB Streaming Function, Using the removable Disk Function,
 |
UPC - 036725365506
View all Samsung SCD6550 manuals
Add to My Manuals
Save this manual to your list of manuals |
Page 81 highlights
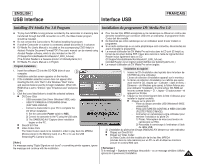
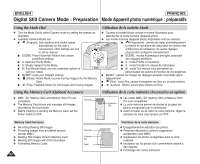
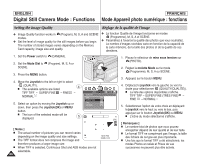
ENGLISH USB Interface Interface USB FRANÇAIS Using the USB Streaming Function ✤ To use USB streaming, the DV Driver, Video Codec and DirectX 9.0. programs must be installed in the PC. ✤ You can view Camcorder video on your PC using USB streaming. ✤ You can also store it as a moving picture in the "avi" file format, or as a still image in the "jpg" file format on a PC. 1. Set the Power switch to REC or PLAY. 2. Connect one end of the USB cable to the USB jack on the Camcorder and the other end to the USB jack on your computer. 3. Setup and execute Windows Movie Maker or the Ulead VIDEO Studio Software application provided on the CD. - For detailed instructions for Ulead VIDEO Studio use, refer to the program's Help function. - Windows Movie Maker is used for WINDOWS ME and XP users. (C:\program files\Movie maker\moviemk.exe) Using the removable Disk Function ✤ You can easily transfer data from a Memory card to a PC without additional addon cards via a USB connection. 1. Set the Power switch to (CAMERA). 2. Connect one end of the USB cable to the USB jack on the Camcorder and the other end to the USB jack on your computer. 3. To verify whether the removable disk has been properly recognized, open Windows Explorer and locate the removable disk. Connecting to a PC 1. Connect a USB cable to the USB jack on the PC. I If a USB cable is connected to the Camcorder's USB jack, the audio/video output is disabled. 2. Connect the other end of the USB cable into the USB jack on the Camcorder. (USB jack) I If a PC is connected to the Camcorder with a USB cable, only the Power switch and Zoom switch operate. Disconnecting the USB Cable ✤ After completing the data transmission, you must disconnect the cable in the following way: 1. Select the removable disc icon and click the right mouse button to select [Eject]. 2. Select [Confirm] and disconnect the USB cable when the Windows Splash screen appears. [ Notes ] I If you disconnect the USB cable from the PC or the Camcorder while transferring, the data transmission will stop and the data may be damaged. I If you connect the USB cable to a PC via a USB HUB or simultaneously connect the USB cable along with other USB devices, the Camcorder may not work properly. If this occurs, remove all USB devices from the PC and reconnect the Camcorder. Utilisation de la fonction Lecture en continu USB ✤ Pour utiliser la lecture en continu USB, le pilote DV, Video Codec et les programmes DirectX 9.0. doivent être installés sur le PC. ✤ Vous pouvez visionner la vidéo du caméscope sur votre ordinateur grâce la lecture en continu USB. ✤ Vous pouvez également l'enregistrer sur votre ordinateur comme un film au format de fichier "avi" ou comme une photo au format de fichier "jpg". 1. Réglez l'interrupteur de mise sous tension sur REC ou PLAY. 2. Branchez une extrémité du câble USB sur la prise USB du caméscope et l'autre extrémité sur la prise USB de votre ordinateur. 3. Installez et lancez le logiciel de création de films Windows Movie Maker ou le logiciel de montage vidéo Ulead VIDEO Studio fourni sur le CD. - Pour plus de détails concernant l'utilisation du logiciel de montage vidéo Ulead VIDEO Studio, veuillez consulter la rubrique Aide du programme. - Le logiciel de création de films Windows Movie Maker fonctionne avec les versions WINDOWS ME et WINDOWS XP. (C:\program files\Movie maker\moviemk.exe) Utilisation de la fonction de disque amovible ✤ Vous pouvez transférer aisément des données d'une carte mémoire vers un ordinateur via une connexion USB sans carte additionnelle. 1. Placez le sélecteur de mise sous tension sur (CAMERA). 2. Branchez une extrémité du câble USB sur la prise USB du caméscope et l'autre extrémité sur la prise USB de votre ordinateur. 3. Pour vérifier que le disque amovible a bien été reconnu, ouvrez l'explorateur Windows afin de le localiser. Connexion à un PC 1. Branchez un câble USB sur la prise USB du PC. I Si un câble USB est connecté à la prise USB du caméscope, la sortie audio/vidéo est désactivée. 2. Branchez l'autre extrémité du câble USB sur la prise USB correspondante du caméscope. (prise USB) I Si un PC est relié au caméscope par un câble USB, seuls les interrupteurs d'alimentation et de zoom fonctionnent. Débranchement du câble USB ✤ Après avoir terminé le transfert de données, vous devez débrancher le câble de la façon suivante : 1. Sélectionnez l'icône de disque amovible et cliquez sur le bouton droit de la souris pour sélectionner [Eject] (Ejection). 2. Sélectionnez [Confirm] (Confirmer) et déconnectez le câble USB lorsque le bureau Windows apparaît. USB Cable [ Remarques ] I Si vous déconnectez le câble USB du PC ou du caméscope pendant le transfert, la transmission de données s'interrompt et les données risquent d'être endommagées. I Si vous branchez le câble USB sur un PC par l'intermédiaire d'un hub USB ou si vous branchez simultanément le câble USB avec d'autres appareils USB, le caméscope peut ne pas fonctionner correctement. Si cela se produit, retirez tous les appareils USB de l'ordinateur et reconnectez le caméscope. 81
-
 1
1 -
2
-
3
-
4
-
5
-
6
-
7
-
8
-
9
-
10
-
11
-
12
-
13
-
14
-
15
-
16
-
17
-
18
-
19
-
20
-
21
-
22
-
23
-
24
-
25
-
26
-
27
-
28
-
29
-
30
-
31
-
32
-
33
-
34
-
35
-
36
-
37
-
38
-
39
-
40
-
41
-
42
-
43
-
44
-
45
-
46
-
47
-
48
-
49
-
50
-
51
-
52
-
53
-
54
-
55
-
56
-
57
-
58
-
59
-
60
-
61
-
62
-
63
-
64
-
65
-
66
-
67
-
68
-
69
-
70
-
71
-
72
-
73
-
74
-
75
-
 76
76 -
 77
77 -
 78
78 -
 79
79 -
 80
80 -
 81
81 -
 82
82 -
 83
83 -
 84
84 -
 85
85 -
 86
86 -
87
-
88
-
89
-
90
-
91
-
92
-
93
-
94
-
95
-
96
-
97
-
98
-
99
-
100
-
101
-
102
-
103
-
104
-
105
-
106
-
107
-
108
-
109
-
110
-
111
-
112
-
113
-
114
-
115
-
116
-
117
-
118
-
119
-
120
-
121
-
122
-
123
-
124
-
125
-
126
-
127
-
128
-
129
-
130
-
131
-
132
-
133
-
134
-
135
-
136
-
137
-
138
-
139
-
140
-
141
-
142
-
143
-
144
-
145
-
146
-
147
-
148
-
149
-
150
-
151
-
152
-
153
-
154
-
155
 |
 |
